 Technical description
 SAML 2.0 SSO guide for hosted Testlab
This document is a guide for how to set up a SAML 2.0 based single-sign for your hosted Meliora Testlab installation. Hosted means that you are using Meliora Testlab from the cloud – not from your own installation on-premises.
For Meliora Testlab on-premises, you should consult this documentation.
-
Introduction
SAML 2.0 (Security Assertion Markup Language) is a version of the SAML standard for exchanging authentication and authorization data between security domains. Meliora Testlab implements the Web Browser SSO Profile of the SAML standard which makes it possible to federate identity from your own user directory to Testlab in a single sign-on fashion. For example, if your organization has Active Directory hosting all your users set up with SSO federation services (ADFS), you can automatically log on your identified users to Testlab without needing to enter credentials on every login.
A simplified diagram on authentication flow is described in the following diagram:
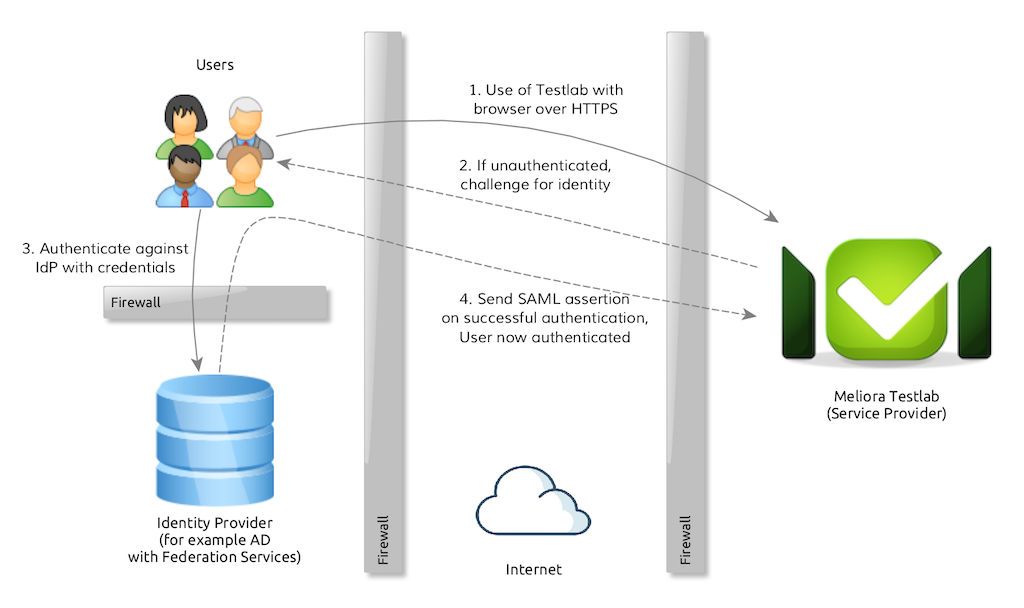
All unauthenticated users are redirected to the configured Identity Provider for authentication. When the user authenticates successfully (for example with her/his user name and password), the user’s browser is redirected back to Testlab and the user is allowed access.
The protocol itself is more complicated with signed assertion messages passed between IdP and Service Provider, but the important thing to note is that the user credentials never leave the customer’s network. The trust between systems is achieved by configuring the certificates/keys as shared secrets which can be used to verify that the assertion messages are valid.
-
Prerequisites and overview
To set up SAML 2.0 based SSO, you should
- be familiar with the basic concepts of SSO and SAML,
- have a SAML 2.0 WebSSO compliant identity provider (IdP) available from the location you are using Testlab (such as Active Directory with ADFS installed) and
- have an Enterprise subscription for Meliora Testlab.
The basic steps for setting up the SSO are
- Export the token signing key from your identity provider
- Export the federation metadata XML file from your identity provider
- Contact our support and request a SAML 2.0 SSO set up and include the key and metadata to the request
- We will provide our service provider metadata file for you for which you can use to set up trust to your IdP.
- Testing the SSO.
-
Example: Setting up SSO with ADFS 3.0
As an example, we will give you an example on how to set up single sign-on and authentication via a Microsoft Active Directory federated identity.
Step 1: Export the token signing key
- Connect to your ADFS-server and from Server Manager, choose Tools > AD FS Management
- From the left-hand side tree, select AD FS > Certificates
- Right mouse click “Token-signing” certificate and choose View Certificate… A Certificate dialog opens up.
- On Details tab, click “Copy to File…”. A Certificate Export Wizard opens up.
- Click Next
- Select “DER encoded binary X.509 (.CER)” and click Next
- Enter “mytokensigningkey.cer” as the name for the export file and click Next
- Click Finish
The token signing key is exported to a file “mytokensigningkey.cer”.
Step 2: Export federation metadata XML file
- With your browser, download the metadata from https://<your ADFS server>/FederationMetadata/2007-06/FederationMetadata.xml
The federation metadata should be saved to FederationMetadata.xml file.
Step 3: Contact Meliora support and request an SSO set up
Open a support ticket for your Testlab and request a SAML 2 SSO set up. To the ticket, please include
- the token signing key file,
- federation metadata file,
- the hostname of your Testlab installation.
Via the ticket, we will provide you with the federation metadata file we have set up for your Testlab.
Step 4: Configure trust to your ADFS
To set up the trust in your ADFS do the following.
- Transfer the XML file we sent you in the ticket to your ADFS server
- From Server Manager, choose Tools > AD FS Management
- From the left-hand side tree, select AD FS > Trust Relationships > Relaying Party Trusts and with right mouse click choose “Add Relaying Party Trust…”. A wizard to add a new trust opens up.
- Click Start
- Choose “Import data about the relaying party from a file” and choose the xml file as “Federation metadata file location”. Click Next >
- Enter “Meliora Testlab” as a display name and click Next >
- Choose “I do not want to configure multi-factor authentication settings for this relaying party trust at this time.” and click Next >
- Choose “Permit all users to access this relaying party” and click Next >
- Inspect the relaying party trust parsed from the metadata file and check that
- Identifiers tab contains the identifier of your local service provider,
- Encryption tab contains details about the key created earlier for SAML token signing,
- The signature tab contains details about the signature of the key created,
- Endpoints tab contains URLs pointing to your hosted Testlab installation and
- The advanced tab has SHA-256 set as the Secure hash algorithm.
- Click Next > and click Close.
Step 5: Configure claims to your ADFS
To set up claims (= the information that is passed to Testlab) in ADFS, do the following:
- From Server Manager, choose Tools > AD FS Management
- From the left-hand side tree, select AD FS > Trust Relationships > Relaying Party Trusts
- Right-click “Meliora Testlab” and choose “Edit Claim Rules…”. An Edit Claim Rules dialog opens up.
- On Issuance Transform Rules tab, click “Add Rule…” and
- Select “Send LDAP Attributes as Claims” and click Next >
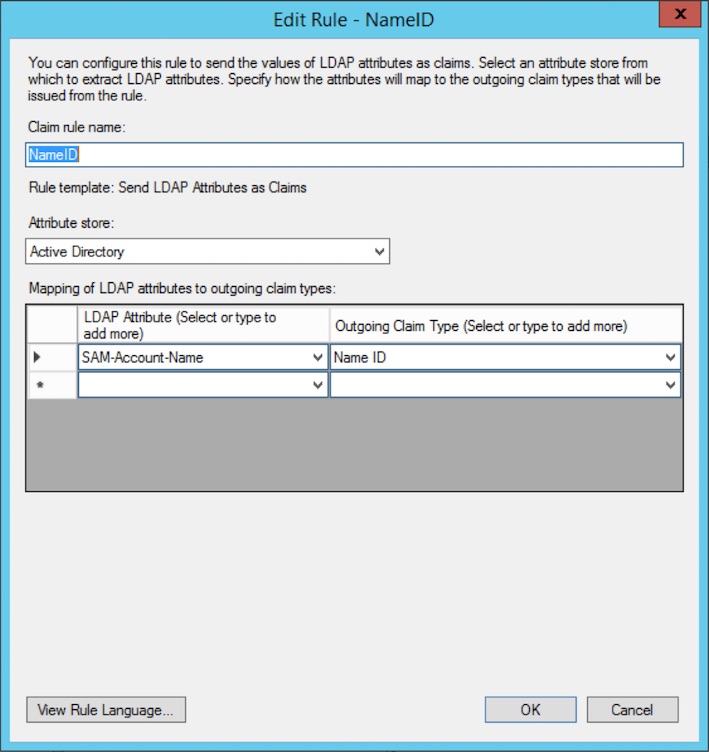
- Enter
- Claim rule name: Name ID
- Attribute store: Active Directory
- LDAP Attribute: SAM-Account-Name
- Outgoing Claim Type: Name ID
- Click FinishThis will add a rule that sends the name of your account as the identifying user ID to Testlab when authenticating. If this is not what you want and you would, for example, want to send the E-mail address of the user as the user ID, choose “E-Mail-Addresses” as LDAP Attribute instead of “SAM-Account-Name”. In this example, we assume that the account names in AD will be the ones mapped as user IDs in your Testlab.
- On Issuance Transform Rules tab, click “Add Rule…” and
- Select “Send LDAP Attributes as Claims” and click Next >
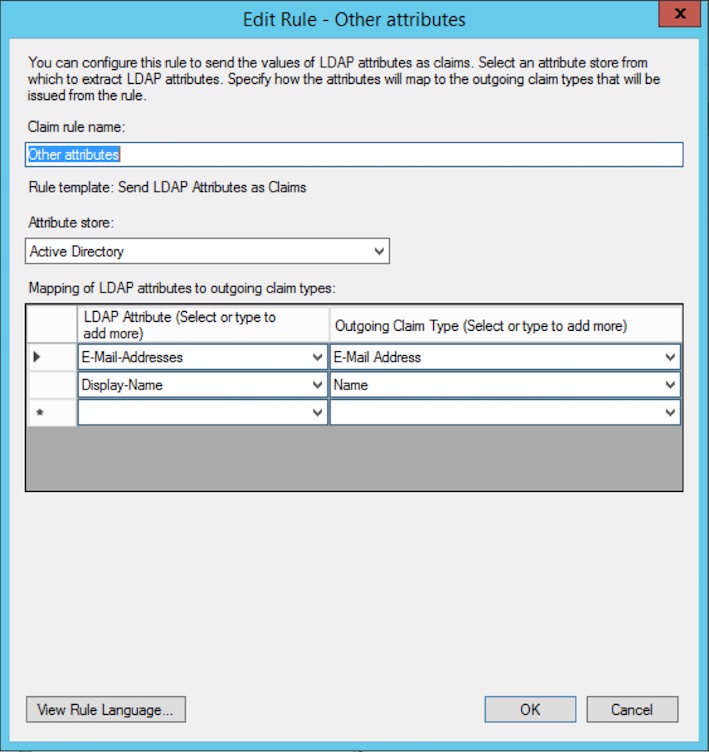
- Enter
- Claim rule name: Other attributes
- Attribute store: Active Directory
- Add two rows of mappings as
- LDAP Attribute: E-Mail-Addresses
- Outgoing Claim Type: E-Mail Address
- and
- LDAP Attribute: Display-Name
- Outgoing Claim Type: Name
- Click FinishThis will add an additional rule that will send the e-mail address and the full name of the user to Testlab.
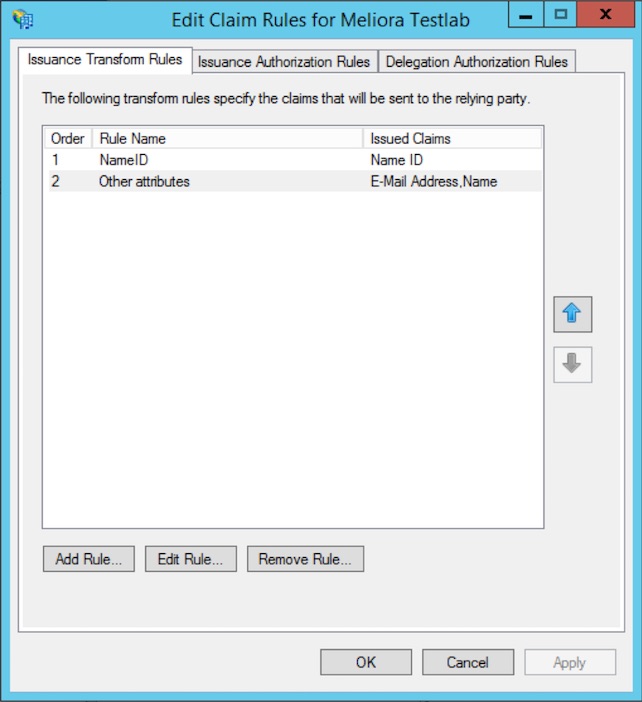
- Click Apply and OK.
After you’ve set up the claims, you should have the following claims set up:
Step 6: Finalize configuration and test the SSO
When you’ve set up the trust and claims to your ADFS, reply to the support ticket and request that we enable the SSO for you. On agreed time, we will enable the SSO for you which means you cannot access your Testlab anymore with the credentials from the internal user database of Testlab.
On testing the setup:
- When accessing your Testlab instance, your browser should be redirected to a login page from your ADFS server.
- When you enter correct credentials, your browser should be redirected back to Testlab and access should be granted.
- If Testlab does not hold the user account for the user ID provided in redirection, a dialog will open up to register a new user account to your Testlab. Enter the details and a new user account should be registered to your Testlab.
-
Technical details and supported claims
The implementation conforms to the Web Browser SSO Profile of SAML 2.0 standard. We advocate the use of SHA-256 as the hashing algorithm.
The following claims should be mapped from the IdP to be sent for the integration to work:
Claim type Testlab attribute Mandatory http://schemas.xmlsoap.org/ws/2005/05/identity/claims/nameidentifier User ID Yes http://schemas.xmlsoap.org/ws/2005/05/identity/claims/emailaddress E-mail address of the user No http://schemas.xmlsoap.org/ws/2005/05/identity/claims/name Full name of the user No The NameID is always used to identify the user in Testlab. It must match the ID of the user in Testlab.
The E-mail address and the full name of the user are only used when the user logs on to Testlab for the first time. When this happens the user is presented with an option to register a new user account in your Testlab. The e-mail address and the full name are pre-filled from the federated identity.