 Technical description
 Meliora Testlab Integration API
Meliora Testlab Integration API offers REST/JSON-based integration interfaces over HTTP protocol. API can be used as a two-way integration point to integrate other systems.
-
How it works
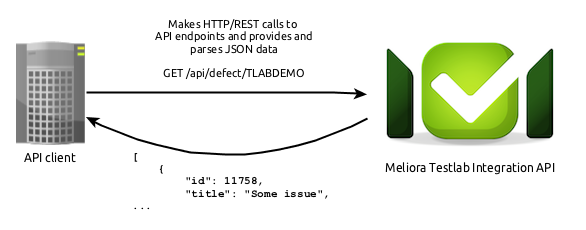
Meliora Testlab Integration API offers HTTP based endpoints that return JSON encapsulated data. To call the endpoints, a valid API key must be included in accordance with the basic auth authentication scheme. To access documentation on available endpoints, please see
https://yourtestlab.melioratestlab.com/api
The link provides a live Swagger based documentation that you can use to make actual API calls to your Testlab instance.
-
How to get started
To call the endpoints, an API key must be configured to your Testlab instance. To configure an API key, log into your Testlab as an administrator and go to Testlab > Manage company… > API keys and add a new key. Please, take note of your API key when you register one as the key is hash encoded to the database with no way of recovering it after saving your changes.
With your browser, go to https://yourtestlab.melioratestlab.com/api (or, applicable URL in your own Testlab installation) and familiarize yourself with the offered endpoints and parameters required. Please note, that you can use the forms provided by the live documentation to make actual calls to your Testlab installation. For this to work, you must authenticate with the API key you have registered by entering it to the field in the upper right corner and pressing “Authenticate”.
For the actual integration, implement some program code as a REST client for chosen endpoints. For technical guidelines followed and programming examples, please see below.
-
API guidelines
The REST endpoints offered follow the API guidelines as:
- Requests and responses are in JSON format
- All assets are identified with a numerical “id” identifier
- Some fields are returned encoded as numerical values (Such as Test case / priority): For documentation on these values please see Webhooks / JSON payload documentation page.
- Timestamps are in Epoch time with millisecond accuracy (“milliseconds elapsed since January 1st, 1970 00:00:00 UTC”)
- Resources are representational with HAL-compliant _links provided. The following link relations are currently in use (all optional):
- self: link to the current item
- swagger: link to the applicable online documentation (to this Swagger)
- collection: link to the applicable collection the item belongs to
- HAL: No _embedded resources are used – all data including related items (if any) are returned in response body instead
- The JSON responses can be formatted in pretty human-readable format by appending a “pretty” parameter to the URI
-
Programming examples
Node.js – get issues from Testlab
The following simple Node.js based example makes a call to your Testlab and lists all issues from the Demo project. Download the source file -> get_issues_from_testlab.js.
//
// Simple nodejs example to fetch all issues from a Testlab project
//
// requires https://www.npmjs.com/package/node-rest-client, to install run
//
// # npm install node-rest-client
//

var Client = require('node-rest-client').Client;

var companyId = 'mycompany',
 apiKey = '1234567890123456';

client = new Client({ user: companyId, password: apiKey });

client.registerMethod(
 "getProjectIssues",
 "https://" + companyId + ".melioratestlab.com/api/defect/${project}",
 "GET"
);

client.methods.getProjectIssues({
 path: { "project" : "TLABDEMO" },
 parameters: { closed: "true", resolved: "true" }
}, function(issues, response) {
 issues.forEach(function(i) {
 console.log('Testlab issue ' + i.defectId + " - " + i.title);
 });
});
Note: As explained in comments, to run the above example please install the node-rest-client dependency. In addition, remember to configure your companyId and apiKey at the beginning of the script.
# npm install node-rest-client
# node get_issues_from_testlab.js
Testlab issue TLABDEMO-1 - Removing all items for a product does not show confirmation dialog
Testlab issue TLABDEMO-2 - Customer's e-mail address is not validated correctly
...
Node.js – push testing results to Testlab project
The following Node.js based program posts XUnit/JUnit compatible automated results to the Testlab project. Download the source file -> post_results_to_testlab.js.
//
// Simple nodejs example to push xunit results to Testlab
//
// requires node-rest-client and optimist, to install run
//
// # npm install node-rest-client
// # npm install optimist
//

XML_FILE_ENCODING = 'utf8';

// configure these to match your environment
var companyId = 'mycompany',
 apiKey = 'mysecretapikey';
var url = "https://" + companyId + ".melioratestlab.com/api/testresult";

var args = require('optimist').boolean('o').argv;

if(args._.length == 0 || args.h || args.help || !args.p || !args.r || !args.s) {
 console.log(
 args.$0 + ' -- post test results to Meliora Testlab\n\n' +
 'usage: ' + args.$0 + ' -p <project key> -r <name of the ruleset> -s <source for the results> [-q <format>] [-t <test run title>] [-w <test run tags>] [-d <test run description>] [-u <test run user>] [-m <test run milestone>] [-v <test run version>] [-e <test run environment>] [-i ADDPERTESTRUN | ADDPERTESTCASE | ADDPERRESULT] [-o] [-a <user to assign issues for>] results-file.xml\n\n' +
 'Mandatory options:\n' +
 ' -h print this usage\n' +
 ' -p key of the project in Testlab to push the results to\n' +
 ' -r name of the ruleset to apply to the results (uses "default" if not specified)\n' +
 ' -s source for the results\n' +
 '\nOptional - most of these parameters can be used to override default settings of the ruleset:\n' +
 ' -q format of the result file (junit | robot, defaults to junit, optional)\n' +
 ' -t title for the test run (optional)\n' +
 ' -w tags for the test run (optional, separate with a comma)\n' +
 ' -d description for the test run (optional)\n' +
 ' -u name of the user to create the test run with (optional)\n' +
 ' -m milestone to target the test run with (optional)\n' +
 ' -v version to target the test run with (optional)\n' +
 ' -e environment to target the test run with (optional)\n' +
 ' -f name for the pushed results (such as file name, url, or else) (optional)\n' +
 ' -i strategy for adding issues for failed tests: ADDPERTESTRUN | ADDPERTESTCASE | ADDPERRESULT (default: do not add issues)\n' +
 ' -o try to reopen existing issues? (default: no)\n' +
 ' -a user to assign the opened issues for (optional)\n' +
 '\nResults for test cases should be provided in a XML file (in JUnit compatible format or as Robot Framework output format).\n\n' +
 'For example:\n\n' +
 '<testsuite name="MyTestSuite" tests="2" failures="1" timestamp="2014-09-11T14:37:37+02:00">\n' +
 ' <testcase classname="cart.test" name="EventLogTest" time="2331">\n' +
 ' <failure message="False was not true" type="java.lang.AssertionError">java.lang.AssertionError: False was not true ...</failure>\n' +
 ' </testcase>\n' +
 ' <testcase classname="cart.test" name="SubmitOrderTest" time="1121"/>\n' +
 '</testsuite>\n\n' +
 'Format is widely used in unit testing and functional testing frameworks.'
 );
 process.exit(0);
}

// read xml file
var inputFile = args._[0];
var fs = require('fs');
var xml = fs.readFileSync(inputFile, XML_FILE_ENCODING);

var Client = require('node-rest-client').Client;
client = new Client({ user: companyId, password: apiKey });
client.registerMethod("putTestResult", url, "PUT");

var data = {
 "status": "3",
 "projectKey": args.p,
 "ruleset": "default",
 "automationSourceTitle": args.s,
 "addIssueStrategy": "DONOTADD",
 "xmlFormat": "junit",
 "xml": xml,
 "buildUrl": args.f
};

if(args.r) data.ruleset = args.r;
if(args.q) data.xmlFormat = args.q;
if(args.t) data.testRunTitle = args.t;
if(args.d) data.description = args.d;
if(args.u) data.user = args.u;
if(args.m) { data.milestoneIdentifier = args.m; data.milestoneTitle = args.m; }
if(args.v) data.testTargetTitle = args.v;
if(args.e) data.testEnvironmentTitle = args.e;
if(args.i) data.addIssueStrategy = args.i;
if(args.o) data.reopenExistingIssues = 'true';
if(args.a) data.assignIssuesToUser = args.a;
if(args.w) data.tags = args.w;
if(args.f) data.buildUrl = args.f;

console.log('\nPUT to ' + url + ' as:');
console.log(data);

client.methods.putTestResult({
 headers: { "Content-Type": "application/json" },
 data: data
}, function(data, response) {
 // on success, we get returned with the id of the created/updated test run
 console.log('\nGot response:');
 console.log(data);
});
The example above depends on node-rest-client and optimist packages, so run the example as:
# npm install node-rest-client optimist
# node post_results_to_testlab.js ...args...
Some examples of how to use this example are below. You should have your JUnit results in a file named myresults.xml to try the examples below. Before running the example please remember to configure your companyId and apiKey at the beginning of the script.
-
# node post_results_to_testlab.js -h
Prints out the help on how to set the arguments for the script.
-
# node post_results_to_testlab.js -p TLABDEMO -t "My test run" myresults.xml
Log in to Testlab, go to “Test Execution” view and note that a new run “My test run” has been added and new test cases have been created to a test category “Import”.
-
# node post_results_to_testlab.js -p TLABDEMO -t "My test run" -i "ADDPERTESTRUN" -o myresults.xml
As above, but an issue should be created for failing test cases in your results if any.
-
# node post_results_to_testlab.js -p TLABDEMO -t "My robot run" -q "robot" output.xml
Pushes results from the Robot Framework output file. Log in to Testlab, go to “Test Execution” view and note that a new run “My robot run” has been added and new test cases have been created to a test category “Import”.
-