 Guides
 Exploratory testing with Testlab
In this article we introduce you to the recently released new features enabling more streamlined workflow for exploratory testing.
-
Introduction
Exploratory testing is an approach to testing where the tester or team of testers ‘explores’ the system under test and during the testing generates and documents good test cases to be run. In a more academic way, it is an approach to software testing that is concisely described as simultaneous learning, test design, and test execution.
Compared to scripted testing – where test cases and scenarios are pre-planned before execution – exploratory testing is often seen as more free and flexible. Each of these methodologies has its own benefits and drawbacks and in reality, all testing is usually something in between of these two. We won’t go into methodological detail in this article as we focus on how to do the actual test execution in an explorative way with Testlab. We can conclude though, that exploratory testing is particularly suitable if requirements for the system under test are incomplete, or there is a lack of time.
-
Pre-planning exploratory test cases
As said, all testing approaches can be usually placed in between a fully pre-scripted and fully exploratory approach. It is often recommended to consider if pre-planning the test cases in some way would be beneficial. If the system under test is not a total black box meaning there are some knowledge or even specifications available it might be a wise idea to add so-called stubs for your test cases in pre-planning phase. Pre-planning test case stubs might give you better insight into testing coverage as in pre-planning, you have an option to bind the test cases to requirements. We’ll discuss using requirements in exploratory testing in more detail later.
For example, one approach might be that you could just add the test cases you think you might need to cover some or all areas of the system without the actual execution steps. The actual execution steps, preconditions, and expected results would be filled out in exploratory fashion during the testing. Alternatively, you might be able to plan the preconditions and expected results and just leave the actual execution steps for the testers.
Keep in mind, that pre-planning test cases do not and should not prevent your testers from adding totally new test cases during the testing. Additionally, you should consider if pre-planning testing might affect your testers’ way of testing. Sometimes this is not desirable and you should take into account the experience level of your testers and how the different pre-planning models fit into your testing approach and workflow overall.
-
Exploratory testing session
Exploratory testing is not an exact testing methodology per se. In reality, there are many testing methods such as Session-based testing or pair testing which are exploratory in a way. As Testlab is methodology agnostic and can be used with various different testing methods, in this article we combine all these methods by just establishing the fact that the testing must be done in a testing session. The testing method itself can be any method you wish to use but the actual test execution must be done in a session which optionally specifies
- the system or target under testing (such as a software version),
- the environment in which the testing is executed (such as production environment, staging environment, …) and
- sets a timeframe in which the testing must be executed (a starting date and/or a deadline).
To execute test cases in a testing session add a new test run to your project in Testlab. Go to the Test runs view and click the Add test run… button to add a new blank testing session.
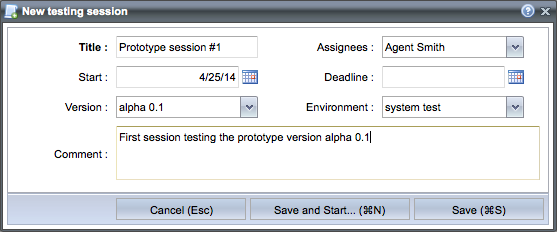
When the needed fields are set you have an option to just Save the test run for later execution or, to Save and Start… the added test run immediately. The test run is added to the project as blank meaning it does not have any test cases bound to it yet. We want to start testing right away so we click the Save and Start… button.
-
Executing tests
The set of functionality while executing is a good match for an exploratory testing session. As said, test execution in Testlab enables you to
- pick a test case for execution,
- record testing results for test cases and their steps,
- add issues such as found defects,
- add comments to test cases and for executed test case steps,
- add existing test cases to be executed to the run,
- remove test cases from the run,
- re-order test cases in the run to the desired order,
- add new test cases to the test case hierarchy and pick them for execution,
- edit existing test cases and their steps and
- cut and copy test cases around in your test case hierarchy.
The actual user interface while executing looks like this:
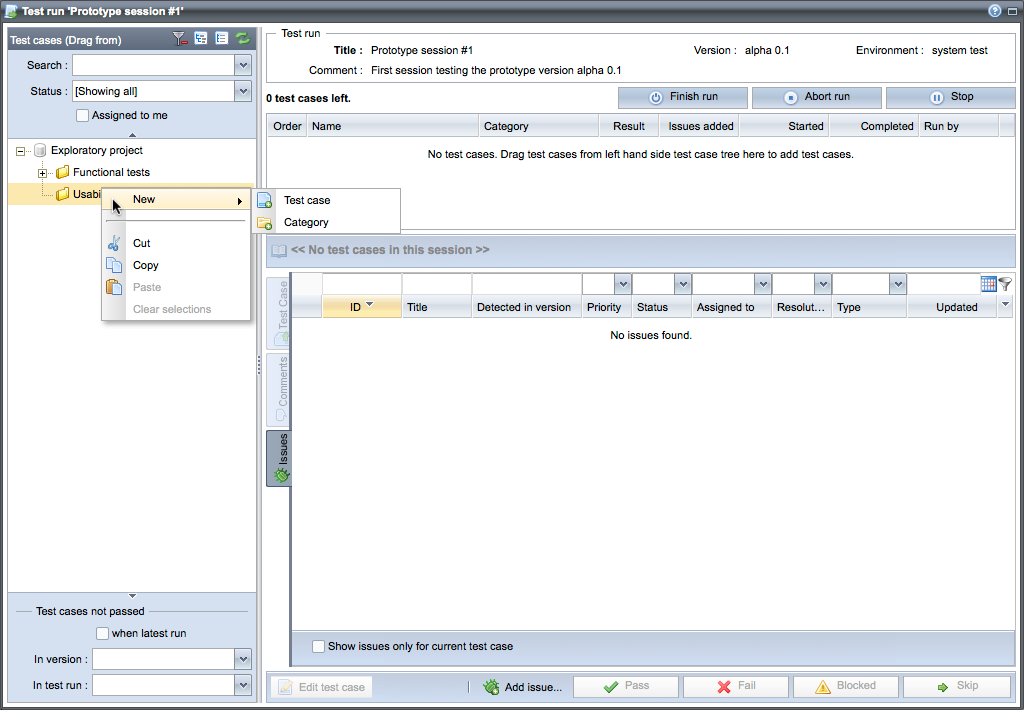
The left-hand side of the window has the same test case hierarchy tree that is used to manipulate the hierarchy of test cases in the test planning view. It enables you to add new categories and test cases and move them around in your hierarchy. The hierarchy tree may be hidden – you can show (and hide) it by clicking the resizing bar of the tree panel. The top right shows you the basic details of the test run you are executing and the list below it shows the test cases picked for execution in this testing session.
The panel below the list of test cases holds the details of a single test case. When no test cases for execution are available, the panel disables itself (like shown in the shot above) and lists all issues from the project. This is especially handy when testing for regression or re-testing – it makes it easy to reopen closed findings and retest resolved issues.
The bottom toolbar of buttons enables you to edit the current test case, add an issue and record results for test cases. The “Finish”, “Abort” and “Stop” buttons should be used to end the current testing session. Keep in mind, that finishing, aborting and stopping testing have their own meaning which we will come to later in this article.
-
Adding and editing test cases during a session
When exploring, it is essential to be able to document the steps for later execution if an issue is found. This way scripted testing for regression is easier later on. Also, if your testing approach aims to document the test cases for later use by exploring the system you must be able to easily add them during execution.
If you have existing test cases added which you would like to pick for execution during a session you can drag the test cases from the test hierarchy tree on to the list of test cases. Additionally, you can add new test cases by selecting New > Test case for the test category you want to add the new test case to. Picking test cases and adding new via inline editing is demonstrated in the following video:
Editing existing test cases is similar to adding. You just press the Edit button at the bottom bar to switch the view to editing mode. The edits are made in identical fashion compared to adding.
-
Ending the session
When you have executed the tests you want you to have three options:

It is important to understand the difference which comes from the fact that each executed session is always a part of a test run. If you wish to continue executing tests in the same test run at the later time you must Stop the session. This way the test run can be continued later on normally.
If you conclude that the test run is ready and you wish not to continue it anymore you should Finish it. When done so the test run is marked as finished and no testing sessions can be started on it anymore. It should be noted though, that if you discard a result of a test case from the run later on the run is reset back to Started-state and is again executable.
Aborted test runs are considered discarded and cannot be continued later on. So, if for some reason you think that the test run is not valid anymore and should be discarded you can press the Abort run button.
-
Asset workflows and user roles in exploratory testing
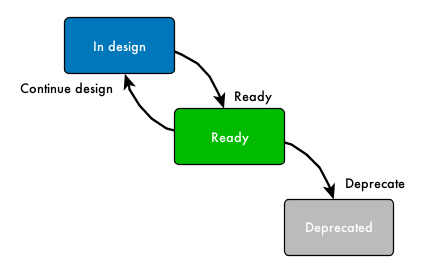
Requirements, test cases, and issues have an asset workflow tied to them via the project’s workflow setting. This means that each asset has states that they can be in (In design, Ready for review, Ready, …) and actions that can be executed on them (Approve, Reject, …). In exploratory testing having a complex workflow for project’s test cases is usually not desirable. For example, having a workflow that requires a review of test cases from another party makes no sense when testers should be able to add, edit and execute test cases inline during testing.
That said, if using default workflows it recommended to use the “No review” workflow for your projects.
If executing test cases that are not yet approved as ready Testlab tries to automatically approve them on behalf of the user. This means, that if the test case’s workflow allows it (and the user has the needed permissions to do so) the test case is automatically marked as approved during the session. This way using more complex workflows in a project with an exploratory testing approach might work if the transitions between test case states are suitable. That said, as the testers must be able to add and edit test cases during executing having a review based workflow is useless.
The asset workflows’ actions are also tied to user roles. For the testers to be able to document test cases during execution the tester users should also be granted a TESTDESIGNER role. This ensures that the users should have the needed permissions to add and edit test cases they need.
-
Using requirements in exploratory testing approach
When designing test cases in exploratory testing sessions the test cases are added without any links to requirements. In Testlab, testing coverage is reported against the system’s requirements and in testing parlance, a test case verifies a requirement it is linked to when the test case is executed and passes.
It is often recommended to bind the added test cases to requirements at the later stage. This way you can easily report what actually has been covered by testing. It should be noted, that the requirements we talk about here don’t have to be fully documented business requirements for this to work. For example, if you would just like to know which parts of the system have been covered you might want to add the system’s parts as project’s requirements and bind the appropriate test cases to them. This way a glance at Testlab’s coverage view should give you insight into which parts of the system have been tested successfully.
Better yet, if you did pre-plan your test cases in some form, you might consider adding a requirement hierarchy too and linking your test case stubs to these requirements. This would give you insight into your testing coverage straight away when the testing starts.
-
Summary
In this article, we talked about the new test execution features of Testlab enabling you to execute your tests using exploratory testing approaches. We went through the advantages of pre-planning some of your testing, using requirements in your exploratory testing, talked about testing sessions and noted how Testlab’s workflows and user roles should be used in exploratory testing.