 Guides
 How to: Migrate from TestLink to Meliora Testlab
Some of our customers have moved from using TestLink to our tool, Meliora Testlab. We’ve been asked to make this transition easier and so we decided to document this migration path, and this article describes how the migration works. Basically the migration moves your important test data from TestLink to Testlab so you can continue to work in your new tool.
-
When changing the tool, do I need to change the way I work?
This is a tough subject that deserves another post completely dedicated to that matter. To put it shortly, Testlab offers a lot of features that allow working in new ways, but most of the Testlink features are also in Testlab, so if there is no need to alter your way of working, you can do most of your work in the same way as before. TestLink’s “Test specification” view’s data can be seen in Testlab in “Test case design”. Assigning test cases to be tested in the simple form in Testlab is done by picking the cases to work set and then creating a test run, which tells the what release/version is being tested. Test execution is again pretty much the same again.
-
In nutshell – how does this all work?
In TestLink there is an export feature that allows you to export your test case data as XML. We can transform this data into a format that can be directly put into the Testlab. When custom fields have been used in Testlink, the tool needs to be instructed how the custom fields are mapped into Testlab fields. After the definition, a click of a button transforms the data into the desired format.
For your convenience, Meliora will do this transformation free of charge (*). For our On-premise customers, we can also deliver the tool to allow doing the transformation yourself.
The migration has five distinct steps:
- Modifying the Testlab to used format (optional).
- Exporting Test cases from TestLink test suites.
- Describing the data mappings (optional).
- Transforming the TestLink Export XML to CSV format that Testlab can read.
- Importing the test case data from CSV.
The technical part behind these steps is pretty straightforward. Once you know how you want to migrate the data, the export-import will be just a few clicks for you.
*) Meliora reserves rights to decline the free service on cases where making the transformation would engage Meliora with the exceptional workload. This could happen if you would have a huge amount of projects to be migrated.
-
What do I need to do before the migration?
Well, the only required thing is becoming a Meliora customer. Any edition of Testlab will do. A very very recommended thing to do is to plan how do you want to test with Testlab in the future. As Testlab offers many features that make testing easier that are not present in Testlink, it might be wise to change the way how testing is done at the same time when the tool is being changed. For example, Testlab has automatic revisioning, history, built-in (optional) review, etc. so you might have made customizations to TestLink for these issues. These customizations are probably not needed anymore, so you need to decide if it is better just to ditch the customizations or do you want to continue using them. If you are in a hurry, fear not! Then you can just import all custom data and ditch the unneeded later.
-
General considerations
The most important thing to ensure is that your company’s testing work is not interrupted more than it has to. When you switch the tool, it is not effective if you continue using the old tool ( in migrated projects ) as you would be getting test case updates in two tools and test results in two tools for the same project. Thus it is best to decide a timeslot for the switch and ensure everything goes smoothly when the time comes.
It is best to contact Meliora as you plan the migration and prepare a timeslot in case you want to keep to switch time in absolute minimum. Just create a support ticket and Meliora will help you get the migration done smoothly. -
Migration steps
Modifying the Testlab
Testlab, by default, has different fields and field Values than TestLink. You can, if you want, do the migration without modifying Testlab. Then the fields are going to be mapped by default. In case you decide to do the modification, these are the things to consider:
Choosing / Modifying a workflow
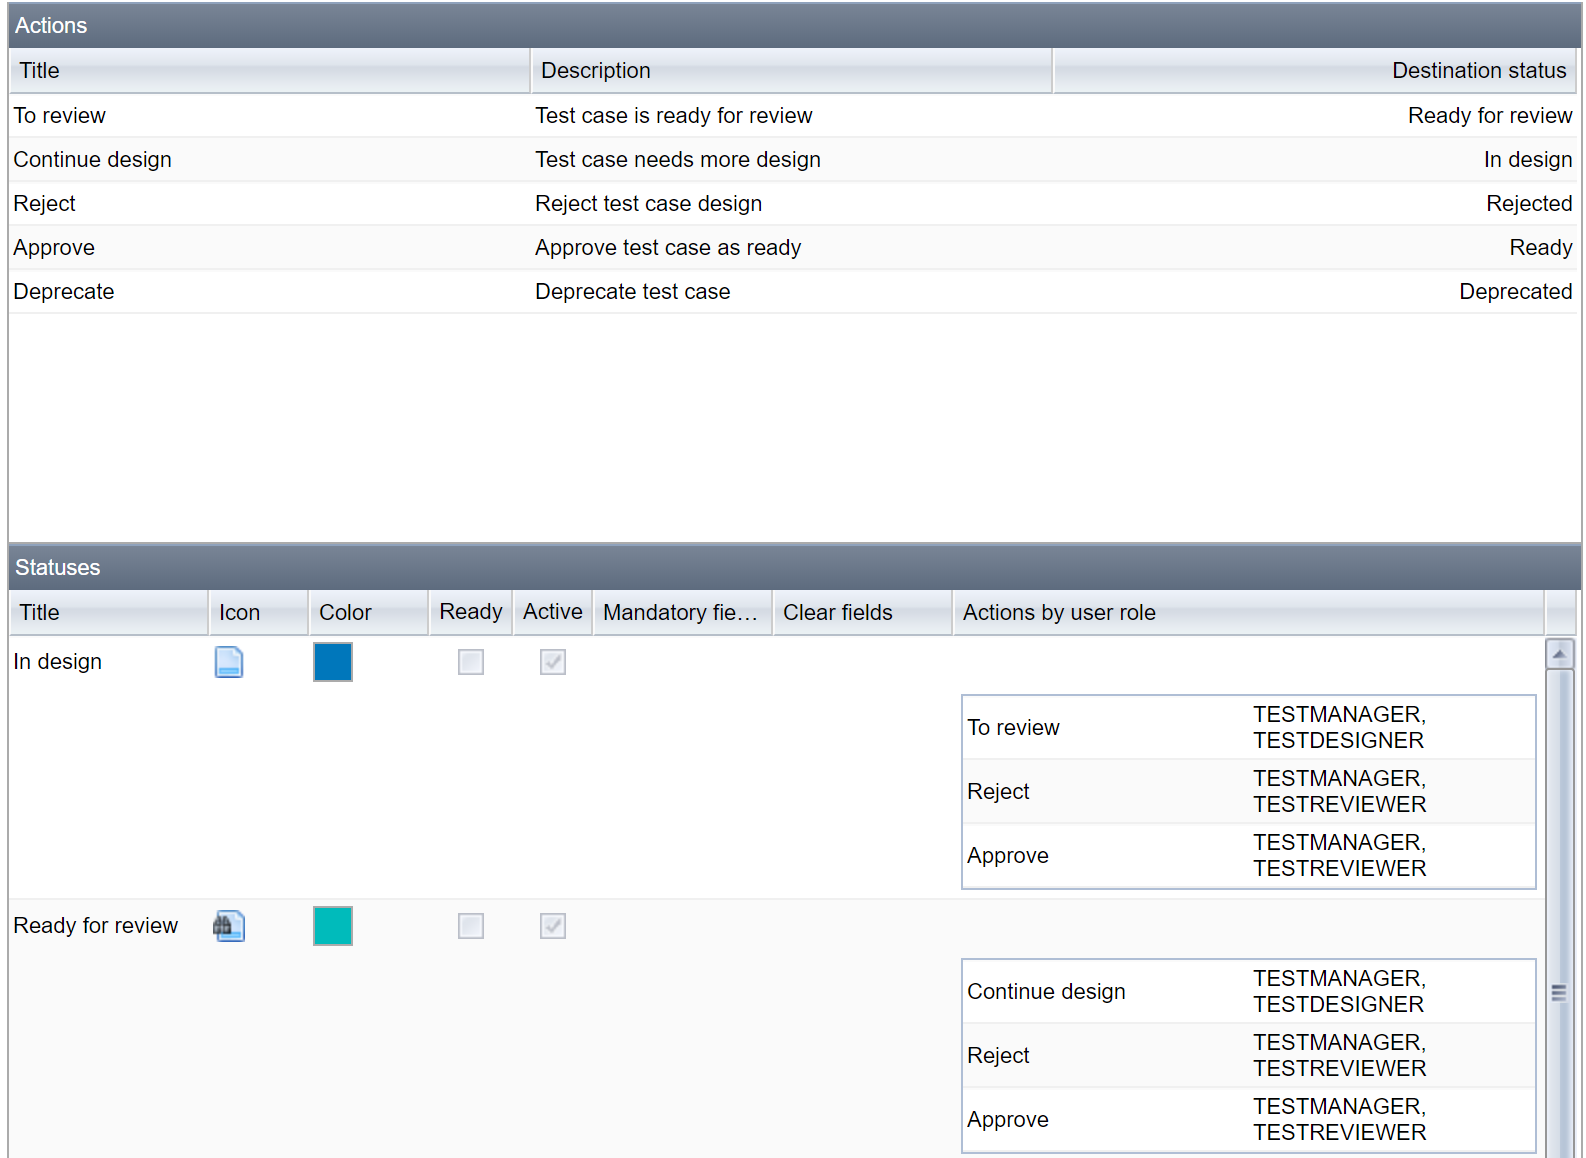 In Testlab, the way how statuses are used is controlled by workflows. Workflows allow logic behind changing statuses – what statuses can be reached from what status, what fields are mandatory in which state and who has privileges to make changes. Testlab comes with two default workflows, called “simple” and “review”. The difference for test cases here is that review has a phase for review, where simple skips this. Basically you need to decide what statuses you wish to see in Testlab. The default Status transformations are depicted in the following table:
TestLink Status
Testlab Simple workflow
Testlab With review workflow
Draft In design In design Ready for review Ready for review In design Review in progress Ready for review In design Rework In design In design Obsolete Deprecated Deprecated Future Ready Ready Final Ready Ready You can add additional data transformations for the migration in addition to simply changing statuses. For example, the “Testlab way” for handling test cases that are not yet runnable, is using a “Milestone” field to define when the test case is planned to be used. More on this in the chapter “Describing the data mappings”.
Modifying the Testlab project
In case you have used custom fields and wish to keep the data in the custom fields in the future as well, you need to configure your Testlab’s project to include those. You’ll find the instructions for that in Testlab’s manual – it’s a very simple operation.
Keep in mind, that you also have an option to import data from custom fields to the description field. This makes sense when you do not want to lose this information, but you do not need to filter data in reports using custom field data.
If you are migrating data to multiple Testlab projects you can do the common modifications once and then copy the project with modifications. This way you do not need to do the modifications for all the projects separately.
Exporting test cases from TestLink
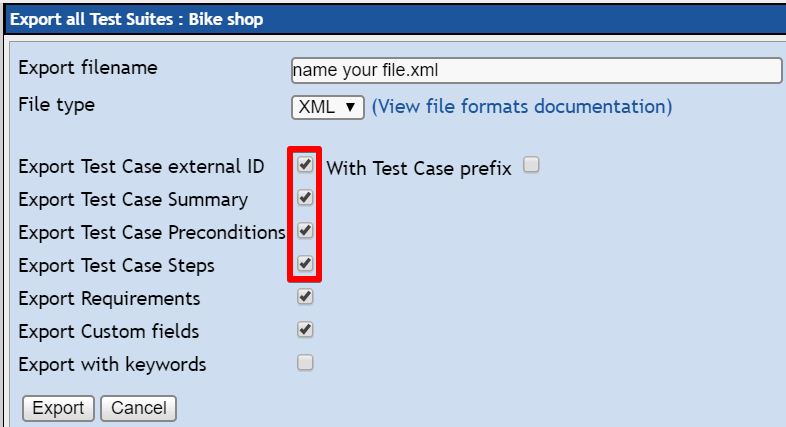
In Testlink, you need to export test cases as XML for each project you wish to migrate.
- In Testlink, go to “Test specification”
- Choose “Actions” -> Export All Test Suites
- make sure you have at least four boxes checked
- Save your XML export file
Describing the data mapping
Before transforming the data you can define how the TestLink data is to be transformed in the migration. Our on-premise customers that wish to do the transformation themselves do not need to do this as they are going to put this data into tool themselves. Send the following information to Meliora:
- What custom fields are to be migrated. For each field describe to what field you want to import the data in to.
- Example1 ) TestLink custom field “risk” values to Testlab field “risk”
- Example 2) TestLink custom field “legacy link” added to the end of “description” field
- How you want to change the data values
- Example 1) TestLink custom field “risk” value “petty” to be “Low” in Testlab
- Example 2) TestLink status “Future” to Testlab status “In design” + Milestone to value “Future”
Transforming the XML to Testlab CSV
Here you have a few options:
- For SaaS users, you can just send the XML to Meliora, and Meliora will do the transformation and import the data to your Testlab project. Just wait for the confirmation and you can start using your Testlab with imported data!
- For On-premise / SaaS users that want Meliora to just do the transformation, send the XML to Meliora and Meliora will deliver you a CSV that is ready to be imported into Testlab.
- For On-Premise users that want to do the transformation themselves, contact Meliora for details. Meliora will deliver you the tool along with instructions to do the transformation.
Importing the data from CSV
The import itself is just a few clicks really:
- From Testlab menu choose Import -> Test cases
- Choose the CSV file
- Try the import first with a “dry run” option on. This will show errors/warnings should there be any. Here you will see if, for example, if you do not have a custom field in this project where you try to input data with the CSV file.
- After you are satisfied with dry run results, uncheck the dry run box to really load the data into the Testlab.
- Refresh the test case tree and start using your Testlab.
-
Final words
This document describes the basic setup of the migration process. As with all projects more complicated than Hello World!, there will be unknown factors. You might have in-house customization done to your TestLink or you might want to include data from completely another source. Fear Not! Meliora can work with migrations that do not follow the ordinary path. Just contact our great support and we will work through the migration together!