 Technical description
 Integrating with Pivotal Tracker
Pivotal Tracker is an agile project management tool for software team project management and collaboration. The tool allows you to plan and track your project using stories.
Your Testlab project can be integrated with Pivotal Tracker to export assets from Testlab to Pivotal Tracker as stories and, to push stories from Pivotal Tracker to Testlab’s project as requirements.
Important note: In early 2024, Pivotal Tracker is shutting down for everyone except enterprise customers.
-
How it works
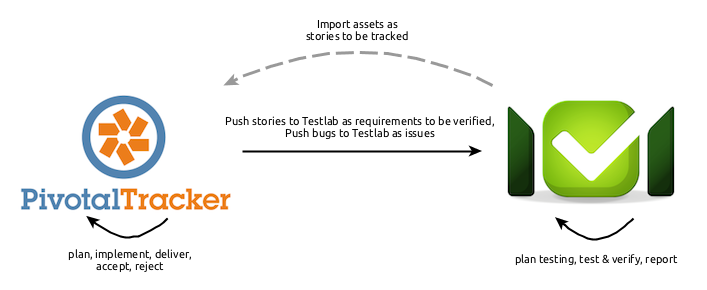
The integration works in a two-way manner. First, you have an option to import assets from your Testlab project to your Pivotal Project as stories to be tracked. You have an option to pull requirements, test runs, test sets, milestones, issues and even test cases from your Testlab project. When done so, a new story is created to your Pivotal Tracker project. It is as easy as dragging an asset to your project’s Icebox in Pivotal.
You also have an option to push stories from your Pivotal Tracker project to your Testlab project. This way, you can easily push all your stories from your Pivotal Tracker to Testlab project’s specification as user stories to be verified and in addition, push bugs from your Tracker to Testlab project as issues.
Using Pivotal Tracker with Testlab is an excellent choice for project management. This way you can plan and track your project activities in Pivotal Tracker and at the same time, test, verify and report your implementation in Testlab.
To integrate Testlab with Pivotal Tracker, technically, we use two kinds of integrations:
- Activity Web Hooks: When a story in Pivotal Tracker is changed (added, updated, removed, …) Web Hooks are triggered. These are used to push stories from your Pivotal Tracker project as requirements or issues to your Testlab project.
- Other Integrations: These integrations are used to expose assets from your Testlab project to your Pivotal Tracker project. This way you can easily import different kinds of assets from Testlab as stories to be tracker in your Pivotal Tracker project.
When a Pivotal Tracker integration is configured, the behavior of Testlab’s user interface is changed as follows:
- In Testlab, for all requirements and/or issues linked to Pivotal Tracker stories:
- Fields pushed from Pivotal Tracker become read-only. Fields not mapped from Pivotal Tracker are editable normally in Testlab.
- When viewing a linked asset, the view contains a button that can be pressed to easily open up the linked story in Pivotal Tracker.
- When commenting on a linked asset, the user is automatically transferred to Pivotal Tracker.
- For all assets in Testlab not linked to a Pivotal Tracker story, the UI of Testlab will act normally.
-
Prerequisities
- You are using Pivotal Tracker.
- You must have access to set up the needed integrations in your Pivotal Tracker project.
-
How to get started
To get started with integration follow the steps described below. If you have questions about these instructions or any problems with the set up please feel free to open up a support ticket in Testlab. We are happy to help you with your setup!
1. Preliminary configuration at Testlab side
- Go to Company management > API keys and configure an API key to be used for authentication for calls from Pivotal Tracker to Testlab. Please see the Testlab’s Help-manual for configuration of API keys. Take note of the API key configured as it is needed later on for configuration at the Pivotal Tracker side.
-
Expose assets from Testlab project to Pivotal Tracker
When you are using Pivotal Tracker for tracking your project tasks, it is essential that you can also track things related to Testlab. For this, you can expose assets (Requirements / user stories, issues, milestones, test runs, test sets, and test cases) from Testlab to your Pivotal Tracker. You can import assets to your Pivotal Tracker project as stories just by dragging them to your Icebox.
Configure an integration to your Pivotal Tracker project as follows:
- Log on to your Pivotal Tracker project and select “Configure Integrations” for your project.
- Go to the section “External Tool Integrations” and select “Create New Integration … / Other“.
- Enter the following:
- Name: Descriptive name for your assets – this name is shown as it is on your Pivotal Tracker board when you import assets from this integration. For example, if you prefer to import milestones from Testlab you should enter “Testlab milestone”.
- Basic Auth Username: Company Identifier of your Testlab installation.
- For hosted Testlab, if you are using Testlab from mycompany.melioratestlab.com enter “mycompany”.
- For Testlab On-premise, enter “company”.
- Basic Auth Password: Enter the API Key for your Testlab (See prerequisites above).
- Base URL: Enter a URL pointing to your Testlab in format /testlab/open/ASSETTYPE
- Replace ASSETTYPE with
- Requirement for Testlab’s requirements
- Defect for Testlab’s issues
- TestRun for Testlab’s test runs
- TestSet for Testlab’s test sets
- Milestone for Testlab’s milestones
- TestCase for Testlab’s test cases
- For hosted Testlab, for example, the complete URL for milestones you should enter https://mycompany.melioratestlab.com/testlab/open/Milestone
- For Testlab On-premise, you should enter http(s):///testlab/open/Milestone
- Replace ASSETTYPE with
- Import API URL: Enter a URL pointing to your Testlab in format /api/pivotal/TESTLABPROJECTKEY/ASSETTYPE
- Replace TESTLABPROJECTKEY with the key given to your project in Testlab (for example, “TLABDEMO”).
- Replace ASSETTYPE in a similar manner explained above
- For hosted Testlab, for example, the complete URL for milestones in Testlab’s Demo project you should enter https://mycompany.melioratestlab.com/api/pivotal/TLABDEMO/Milestone
- Active: Yes
- Click Create.
- Go to your project in Pivotal Tracker, and you should now have a new source for stories titled “Testlab milestone”. Click to open it and you should now have a column on your project board from which you can drag stories to your Icebox for tracking.
- Repeat the above for all the assets you prefer to be importable from your Testlab project.
Assets exposed from Testlab
When importing assets from Testlab to Pivotal Tracker the assets are importable as follows:
Testlab asset What can you import Requirement All non-deprecated requirements excluding folders. Defect All issues which are not yet resolved or closed. TestRun All test runs which are in not started or started status. Finished or aborted test runs are not exported. TestSet All test sets. Milestone All milestones. TestCase All non-deprecated test cases. Configuration example
As an example for the above for hosted Testlab mycompany.melioratestlab.com, you can expose Milestones from your Demo project by configuring the Other integration as follows:
- Name: Testlab milestone
- Basic Auth Username: mycompany
- Basic Auth Password: your Testlab API key
- Base URL: https://mycompany.melioratestlab.com/testlab/open/Milestone
- Import API URL: https://mycompany.melioratestlab.com/api/pivotal/TLABDEMO/Milestone
- Active: Yes
-
Pushing changes of stories to Testlab
If you prefer to push stories from Pivotal Tracker to your Testlab, a Web Hook in your Pivotal Tracker project configuration must be configured. This allows you to push changes of your Pivotal Tracker stories to your Testlab as requirements and issues.
To configure this, execute the steps below.
- Log on to your Pivotal Tracker project and select “Configure Integrations” for your project.
- Go to section “Activity Web Hook” and configure a new Web Hook URL as follows:
- Select v5 for Web Hook version.
- Enter a URL pointing to your Testlab in format /api/pivotal/activity/TESTLABPROJECTKEY?testlabapikey=APIKEY
- Replace TESTLABPROJECTKEY with the key given to your project in Testlab (for example, “TLABDEMO”).
- Replace APIKEY with the API Key for your Testlab (See prerequisites above).
- Click ADD.
- Log on to your Testlab project, select Testlab > Manage projects … and select the Integrations tab for the matching Testlab project.
- Select “Pivotal Tracker” as a requirement management system, and configure the following:
- API Token: API Token of your Pivotal Tracker. You can find your Pivotal Tracker API key from the profile page in your Pivotal Tracker.
- Requirement story types: A comma-separated list of Pivotal Tracker story types that should be imported to Testlab as requirements. Possible values: feature, chore, release, bug.
- Folder for new requirements: The identifier of Testlab’s requirement folder in which all new stories from Pivotal Tracker are created in. If the folder is missing, the user stories are created to project’s root.
- Issue story types: A comma-separated list of Pivotal Tracker story types that should be imported to Testlab as issues. Possible values: feature, chore, release, bug.
- Ignore Testlab imported: Check this option to ignore all changes pushed from Pivotal Tracker for assets, which are originally imported to the Pivotal Tracker from Testlab. This option can be used if you wish to keep your requirements created in Testlab always separate and non-synced to the stories in your Tracker.
- Delete from Testlab: Check this option to always delete the related asset from Testlab when a linked story is deleted from Pivotal Tracker. When left unchecked, no assets are removed from Testlab even if the linked stories tracked in your Pivotal Tracker are deleted.
- Click Verify Configuration to verify that a connection to your Pivotal Tracker project can be established.
- Click Save to save changes to your Testlab project configuration.
Configuration example
As an example for the above for hosted Testlab mycompany.melioratestlab.com, you can push changes from your Pivotal Tracker to your Testlab’s Demo project by configuring the following:
- Pivotal Tracker Web Hook v5 URL: https://mycompany.melioratestlab.com/api/pivotal/activity/TLABDEMO/?testlabapikey=YOURAPIKEY
- Testlab’s “Pivotal Tracker” requirement management configuration:
- API Token: Your Pivotal Tracker API token found on your profile page.
- Requirement story types: feature,chore
- Folder for new requirements: US
- Issue story types: bug
- Ignore Testlab imported: No
- Delete from Testlab: No
This configuration will
- push all features and chores from Pivotal Tracker to Testlab as requirements to a folder “US”,
- push all bugs from Pivotal Tracker as issues to Testlab,
- push changes also for stories which are originally imported from your Testlab and
- never delete any requirements or defects from Testlab even if you’d decide to delete the linked stories from your Tracker.
-
Default mappings between Pivotal Tracker and Testlab
When pushing stories from Pivotal Tracker to Testlab, the fields of assets are mapped according to the table below by default.
If you prefer to have these mappings configured for your project please open up a support ticket and we’ll customize them for you.
Stories pushed as requirements
Pivotal Tracker Field Pivotal Tracker value Testlab Field Testlab value Story type feature, chore Class User story release, bug Requirement State planned, unstarted, unscheduled Status * In design started, finished, delivered, accepted, rejected Ready * Workflow status is used for different purposes between these systems. In Pivotal Tracker, status is used to track the progress of the actual implementation of the story and in Testlab, status is used to track the design of the requirement. For this reason, it makes no practical sense to map these workflows together. The above mapping only ensures, that when a related story in Pivotal Tracker is started for implementation, the matching requirement in Testlab is also transitioned as ready to indicate it should be ready for testing.
Stories pushed as issues
Pivotal Tracker Field Pivotal Tracker value Testlab Field Testlab value State finished, delivered, accepted Resolution Fixed unscheduled Status * Open, Unscheduled unstarted Open, Unstarted planned Open, Planned started Assigned, Started finished Assigned, Finished delivered Resolved, Delivered accepted Closed, Accepted rejected Reopened, Rejected * The above maps the Pivotal Tracker’s story status to the default workflows for Testlab’s issues. If you’d prefer to have matching workflow visible in Testlab too, you can configure an issue workflow in the Testlab side with matching titles (as seen in the table above).
-
Frequently asked questions
In short – what exactly does this do?
You can integrate your Pivotal Tracker project with Testlab in a way, in which Testlab’s assets can be easily imported to your Pivotal Tracker to be tracked as stories and/or, to push changes of your Tracker stories to Testlab to be created as requirements and issues.
This enables you to track your project tasks with Pivotal Tracker and manage and plan your testing with Testlab.
From where exactly do I set this up with?
In Testlab, log in to your Testlab project, select Testlab > Manage project(s)… and choose the Integrations tab. All integrations which can be taken in use by yourself are configured per project from this view.
In the Pivotal tracker, the integrations and related Web Hooks need to be set up. Check the prerequisites and follow the instructions above in this document to set up the integration at the Tracker side.
When integrated, is there a possibility that I lose any data?
From Pivotal Tracker, no data is ever deleted.
From Testlab, when configuring the integration you have an option to forbid asset deletions by leaving the “Delete from Testlab” option in the project configuration disabled. When done so, when a story from the Tracker is deleted the possible linked requirement or issue in Testlab is left as it is.
It should be noted, that if configured for deletion, only requirements and issues are deleted from Testlab. For example, if a story in Pivotal Tracker is imported from Testlab’s test run, the idea is, that you want to track the execution of this test run in your Pivotal project. If for some reason, you delete the story from your Pivotal project, the test run in Testlab is not deleted, which probably is preferred.
On the other hand, for user stories and issues (Pivotal’s bugs) which originated from your Pivotal board, it makes sense to purge them from your Testlab too if they are regarded as not needed and they are deleted from your Pivotal project. The “Delete from Testlab” option mentioned controls just that.
When I push stories from Tracker to Testlab, where do they go?
In the Testlab projects integration configuration, you have an option to define the identifier of a (requirement) folder in your project. When a new story is pushed from the Tracker, it is always initially created to this folder.
If a story is a bug and is mapped as an issue in Testlab, issues will be added normally to the issue listing of your project. The issue will get automatically created Testlab specific ID for tracking.
How can I distinguish stories in different states (Icebox, Backlog, …) in Testlab?
When changes of a story from a Tracker is pushed to Testlab, the linked requirement or issue in Testlab is always automatically tagged with a matching tag. For example, if your story in Tracker is in Backlog the user story in Testlab will be tagged with a tag “backlog”.
In addition, we also set the raw state value of the story as a tag. In Pivotal Tracker, stories move between unscheduled, unstarted, planned, started, finished, delivered, accepted and rejected states, which we also add as a tag to indicate the exact state of the story.
With tags in Testlab, you can easily find all Pivotal Tracker pushed stories in a specific state by searching with the appropriate tag, for example, tag:icebox.
What data and/or fields exactly are pushed from Pivotal to Testlab?
When creating user stories to Testlab the ID, name, description, creator, update timestamp, assignee/owner and requirement class is mapped.
When creating issues to Testlab the name, description, creator, update timestamp, assignee/owner and workflow status are mapped. In addition, the resolution is set to Fixed according to the state of the story in Pivotal Tracker.
For both requirements and issues, attached files and all comments relating to the story are pushed to Testlab.
Can I easily jump between systems for linked assets?
Yes, you can! In Testlab, editing views for linked assets will contain a button that enables you to open up the related story from your Pivotal Tracker project.
And other way around, all stories created from Testlab’s assets in your Pivotal Project contain a link to open up the related asset in Testlab.