 Familiarize
 Deploying Testlab
for your teams
This article is to help you plan your deployment of Testlab. It gives pointers on things to consider when enrolling Testlab in use, and food for thought when adapting Testlab to your software development process.
Adapting a test management tool to your software process usually takes a bit of planning. Especially so, when you want to utilize the full power of requirements/specifications management and task management. The tool is easy to use when deciding how to use it, but how to get to that point? There can be many stakeholders and many possible areas to improve. In this post, we will discuss different details of Testlab’s features, and way of storing the quality-related assets, and give pointers on how to enroll Testlab in use as efficiently as possible.
-
Familiarizing yourself with Testlab
Even though we speak of Testlab as a software-centric test management tool, you should keep in mind that Testlab is a fully-featured quality management suite. This means, that you can use Testlab for specification, verification, issue management, task management, and analysis of your product quality regardless of what your product is.
The easiest way to grasp what Testlab is about is to:
- Log into the “Demo” project and browse through the data. When you look around it is good to read through the description of the demo project which gives you insight into the (fictional) software development project the Demo project is about.
- When you are logged in to Testlab, you can always restart the tour feature that tells you about the user interface elements. The tour starts from the part you are currently seeing, so it is good when you are familiar with it.
- Give it a go and feel free to add assets, edit assets, and execute some tests in your Demo project. This helps you shed light on how different things affect others in Testlab. You can also add a new blank project to your Testlab for sandboxing if you wish to retain your copy of the Demo project as it is. When you try the tool a bit, it is easier to put the rest of the reading into the right context.
- read through this article.
- Now you know a bit more about how Meliora Testlab works. Try it out a bit more. Log on to the Demo project or create a sandbox project for you to play around.
- Browse through the help manual found in your Testlab. Chapter 9 has some guides you should read.
- When in Testlab, you can also click the question mark icons on each view to jump around the manual in a context-sensitive manner.
- Browse through the documentation online.
- Pick a real project where to try Testlab. You can start small – you can start with one part of a project to get experience about how Testlab works. Once you learn how it works, you can roll out the usage to a larger part and for more people.
- Log into the “Demo” project and browse through the data. When you look around it is good to read through the description of the demo project which gives you insight into the (fictional) software development project the Demo project is about.
-
Requirements, user stories and other specifications. How to use them in Testlab?
In Testlab terms, formal requirements, user stories, and all other design specifications are called a specifications. They are just different types of requirements. We recommend using that information when designing test cases and tracking how they are tested. Testlab offers great ways to utilize the information.
First of all, if you haven’t used requirements as a basis for planning your testing, you don’t need to when using Testlab either. We do recommend trying it out at some point, but you can skip straight to the test design if you want. If you have your specifications managed in another tool ( Like Atlassian JIRA ), you can integrate your tool to bring your requirements to Testlab automatically. if you have your requirements in spreadsheet format, you can use CSV import to get them to Testlab. Or, if starting a new project, you can start designing and managing your requirements in Testlab. We have all the needed features for easy and efficient requirements specification.
Just to note as said earlier, the requirements in Testlab don’t have to be traditional business requirements even though the term implies so. Requirements can be anything that fits well with your development process and can be used to specify the qualities and functionality of your system under testing. In agile projects, these can be user stories for example. Or better yet, a mixture of different kinds of specification assets.
Why manage the requirements in Testlab in the first place?
- When the one ordering software and the one developing software have the same view about what is to be developed, the project has a much better chance of succeeding. Testlab offers all the needed features to efficiently collaborate on what is to be developed.
- Often you need to see the big picture – see how far you are in design, and see what are areas still to be developed. Testlab collects the situation automatically and you can always report the situation when you want.
- Testlab allows a large group of people to work on your set of requirements simultaneously.
What do your testers get out of having requirements in the tool?
- Covering the features with test cases is a lot easier when you have the features listed. The result is a more relevant set of test cases.
- When the requirements change you see what test cases you need to modify.
- When executing test cases you see linked requirements. This helps testers concentrate on what is important.
What does the rest of the team benefit from?
- Developers get better bug reports when the tester can point directly to why something has been filed as a bug.
- Management gets a lot more accurate view of quality and the status of the project when test results are linked to original requirements. It is easier to estimate if the project is able to meet the deadlines when there is more relevant information.
- It is easier to concentrate the work on the most relevant area during development when you have well-organized feature specifications. This holds true for developers and designers as well.
Some tips and things to consider
- If you have your specification somewhere else outside Testlab you could add requirement “stubs” to your Testlab project which makes a reference to your existing specification. For example, If your specification has the functions of your system with identifiers (which it should anyway) the easiest way would be to add requirements to your Testlab project with the same identifiers set and just leave the descriptions and other fields as blank as you prefer. This way linking the test cases to your (outside) specification is a breeze by just dragging and dropping the test cases and you would get transparency on how your testing is doing from your specification point of view.
- If you don’t have any specification at hand for which to link the test cases you should think of some kind of categorization for which you would like to see and analyze your testing. You should think about this as a grouping of test cases. For example: Let’s presume you have a UI-centric web application which you would like to execute test cases. You decided, that it would be great if you could see the testing coverage from the user interface point of view. You could then add each page of your web application as a requirement to your Testlab project and link all test cases to these pages. When requirements and test cases are set up this way in Testlab, you can see the testing status and coverage for each page and/or group of pages from test coverage analysis.
- If you are expecting a huge amount of requirements you might want to add custom fields to classify your data more. This way you can create relevant groups easily.
- Keep in mind, that requirements are added to a tree structure. It is a good idea to take advantage of this. If you have a folder level before the actual requirements, it is much easier to handle the requirement mass. The coverage analysis is using the same hierarchy, so all leaf nodes in the tree are summed up when calculating the coverage.
-
Maintaining your test case library
Testlab stores test cases in the test case repository. When your test case repository structure is well designed, it is easy to maintain, it is easy to find relevant test cases from the repository to be tested, and you can use it for reporting the testing situation.
Making a well-organized test case repository is not hard. Most often the best structure is to store the test cases based on the structure of the system under test. The structure might be based on user interface structure, feature structure, or something else that makes sense to you. You might already have that thought the structure for your requirements, and if so, you can use the same. You can have multiple levels in the test case tree ( just make folders for the structure ), so it’s best to use those.
What you should not do is to make the tree structure based on when the software is being released. So do not create folders named after releases or sprints. This would make it super easy to pick test cases to be tested, right? True that, but there is a big but. In what sprint or release ceases to be any relevant just after that release? Imagine having 20 sprints. You would need to re-run a test case that was designed 18 sprints ago. Or was it 17? It is hard to find test cases from this structure, and it does not help when reporting either. Instead of using a folder for release, in Testlab you can use the field “Testable in”. This way you can find the most recent test cases easily using the field and at the same time have a test case tree structure that stands the test of time.
Sometimes you might need to classify your test case mass further. You can define priority for your test cases, you can define a custom field with selectable values that allow a systematic approach to classifying your test cases. Just keep in mind that these need maintenance as well, so often less is more. Less to maintain, less to explain to now people make more efficient testing process. You can always easily use tags to make groups of test cases if you need to.
-
Deciding on a workflow
In Testlab, customizable workflows are used to define how you can work with your assets ( requirements, test cases, and issues ). The workflows define possible statuses, what status transitions are possible, and who can access them. You can pick from predefined workflows or you can build your own.
The easiest way to start using Testlab is to use a predefined workflow. If you are more into a lean way, choose simple. If you want to enforce review processes, choose “With review”.
When talking about workflow in Testlab, we mean a way of working with different types of assets in a project. A workflow specifies:
- Possible statuses for an asset, and
- who (= which user role)
- can do what (= execute an action)
- on what (= a requirement, test case, or an issue in a specific status).
As mentioned, Testlab provides two different kinds of workflows out of the box for you to assign for your projects. A “Simple” style workflow for a test case and a requirement is shown in the following diagram:

“Simple” workflow defines a simple asset workflow for requirements and test cases where assets are first created to “In design” status. When the asset seems ready it is approved as ready. That’s it. If some requirements or test cases get stale they can be deprecated and therefore regarded as removed.
If you prefer that your requirements and/or test cases should be reviewed (for example your product owner, customer or someone else) you can use the “With review” workflow described in the following diagram:
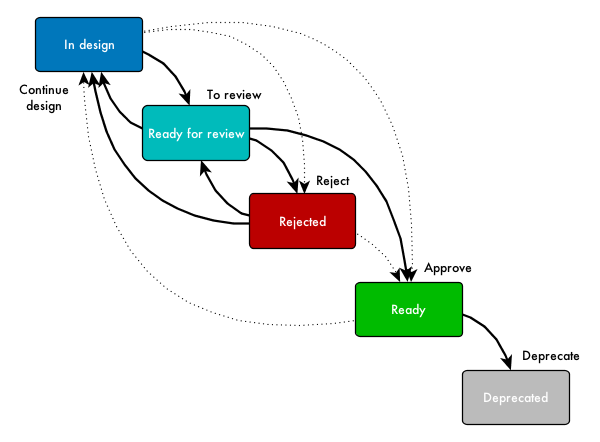
In this workflow, assets are created to “In design” status and when they seem ready, they are marked as ready for review. Persons in the appropriate REVIEWER role (see “Roles for users” chapter below for more information) then either reject or approve the asset. You should pick this workflow for your projects if you prefer your assets to be reviewed through the above process.
Keep in mind, that you can customize all workflows for your liking by copying an existing workflow and making the needed changes for it. You can customize permissions on user roles and asset workflows for requirements, test cases and issues separately.
-
Roles for users
Testlab has a role-based privilege system. You can define what permission each role has, and assign your users to the roles. User roles are project-specific so each account can have different user roles in each project.
Roles Description TEAMMEMBER TEAMMEMBER is an all-around role that can access all areas of Testlab, except administration. This role can not permanently delete assets. TEAMLEAD / TESTMANAGER / PROJECTMANAGER These roles have access to most features inside the projects – including permanently deleting assets. VIEWER VIEWER-role is for users who should only be able to view and read the existing content in the project. Users in this role can view the data, generate reports and diagrams, and export data in CSV format. TESTER TESTER is a role that can create and manage test cases and execute the tests as well. PRODUCTOWNER PRODUCTOWNER is a role that can work with specifications ( requirements ) and view what else is happening in Testlab. When assigning roles for users with provided workflows, a simple strategy is as follows:
- Give Company admin roles only to those who really need it. They can do everything in every project Testlab.
- If you do not need to restrict what users can do, TEAMMEMBER is a good role to use for your users.
- If you wish to be more specific with what users can do, for example, to enforce review practices, or if you want to hide unneeded areas so that there is less distraction for users, use more specific roles. You can add new roles if you do not find relevant to the existing ones.
- Grant the VIEWER role to all users who should have read-only access to the project’s data.
-
Customizing fields of assets
The fields you see on the forms when you edit requirements, test cases, and issues are a default set of fields visible out of the box. If you have some information you would like to store in an additional field, let’s say for example for your issues, you can configure a custom field for it. You can also hide the unneeded ones.
In Testlab, custom fields are configured via project details and are always project-specific. You can add custom fields for requirements, test cases, test case steps, and issues. You can also set some of the fields to be mandatory if you want to be sure they are filled.
-
Milestones – how do I use them?
Most projects have a way of dividing the project into smaller chunks, for example, releases. The Milestones are Testlab’s way of keeping track of those. Milestones can be further split into sprints.
Generally, it is a lot easier to manage a project when it is split into pieces. Smaller pieces are easier to manage. Most likely your project already has some sort of milestones. If so, just use the project milestones in Testlab. The same goes for sprints. If your project uses sprints it makes sense to utilize them in Testlab as well. It is possible to use Testlab without touching milestones or sprints, but you probably want to. A few of the benefits are:
- If you track when certain features, as requirements, are to be released, you can better manage the feature design. This is especially relevant in a little bit larger projects.
- You can also track the test design from the requirements. You can always check if you have test cases ready for new features.
- When your test cases have information on what milestone they can first be tested, it is easy to create test runs for new features.
- When you tell Testlab what milestone or sprint you are currently testing, you can create astonishing coverage reports easily. With a few clicks, you can for example
- Find out what features you have tested in this milestone, and what not
- Find out what you have tested in the last two or more milestones – What are the test cases that you have not run in a long time?
- The defects you find during testing are automatically set to be found in a milestone they were tested in. It is pretty relevant information when investigating what has happened.
So the milestones can be split into sprints. If your project uses sprints, use them in Testlab as well. This way you use the same language with everyone. It helps you with representing the situation as well. You can easily make reports for the whole milestone about what is happening in its sprints.
-
How should I use versions and/or environments?
Versions and environments are used to mark what exactly you are testing. In Testlab they are not tied to milestones or sprints.
To reiterate,
- a version is most often a version of software under testing. It might be for example a build number.
- An environment is where you test the software in.
- Versions, environments, and milestones are separate from each other. Often you will have many software versions released and tested during one milestone, but Testlab does not enforce this. For reporting, all these can be used separately or in combination. You can for example find out what you tested during “Milestone 1” in the “System test” environment.
When your test runs contain information about the version and the environment, your information is automatically transferred to a bug report when you create one during testing. This is often very good information in troubleshooting.
-
How does Testlab store my data?
It helps to understand how the central quality-related assets are stored in your tool. First, all your data (excluding your company details) will be stored under a project. You should think of the project as a domain that will include all requirements (specification of some kind), test cases for them, executed testing results, issues, etc for a single product, application or system under testing.
The next diagram shows a simplified diagram of how the different assets relate to each other in Testlab inside a project.
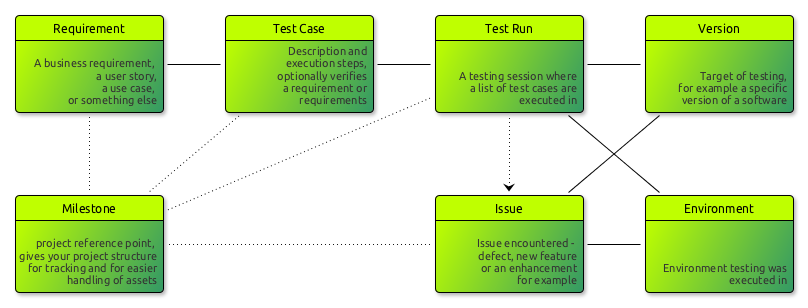
In addition to the picture above, Tasks can be linked to Requirements, test runs or issues.
Each project can be split into milestones, and milestones can be split into sprints which are project reference points that aim to be completed at some point in time. Milestones can be used in various ways to separate the assets inside the project from each other and in addition, using milestones makes it easier to track the progress of testing. For more examples on how milestones can be used please see the 5.2 Milestones section of Testlab’s help manual.
Every good test plan is based on a solid set of requirements. In Testlab, requirements can be anything that can be used to specify, define, or qualify features and functionality for the product, service, or application under testing. Testlab is development process agnostic, so you can define your requirements as user stories, use cases, traditional business requirements, or something else that fits best with your development process. You can even use requirements to group your test cases to the grouping of your liking if you for some reason prefer to skip using the requirements in the specification phase. See the next chapter for more pointers on user requirements.
For the testers to be able to test the system they must have information about what they are testing and most of the time instructions on how something should be tested. For this, test cases are defined to include description, pre-conditions, actual step-by-step instructions, and expected results. For the tool to be able to automatically track which functionality each test case is testing, they are usually linked to requirements. When a test case is linked to a requirement we say the test case verifies this requirement.
When test cases are executed they are always executed in a test run. A test run records the results for each test case that is included in it and specifies for which version (of the software for example) the testing was executed and in which environment the testing was executed.
During testing, test runs are recorded with testing results for each test case. Good. But when something is encountered which requires attention later on it should be recorded as an issue. Issues can be seen as tasks that should be handled somehow later on. Issues can be defects encountered (i.e. bugs in software), future development ideas, new features, or something else you wish to record for later use. Keep in mind that you can add issues anytime – they don’t have to be the results of some specific testing session.
All major testing data assets: requirements, test cases, and issues have automatically stored history data. This means you can find out what these assets have been at each point in time.
Is there any data in Testlab that can be shared between Projects?
Yes, there is.
- Users: Users of your company are of course shared between all your projects.
- Workflows: Workflow schemes can be configured once and shared between projects. When you set up a new project you can select a workflow scheme from a list of your previously configured schemes. A workflow scheme defines the “who can do what on which assets” in a project.
- Notice schemes: Notice schemes can be shared between projects. A notice scheme defines the events that trigger e-mail notifications to your users in a project.
- Reports: Reports can be configured and published to be shared between your projects.
- Announcements: Announcements can be published on your dashboard for all your projects.
-
How to manage tasks in Testlab
Testlab has a taskboard that can be used to manage tasks that are popular in agile methodologies. Managing tasks this way gives the team better visibility of what the team is doing as a whole and helps track the situation, distribute work meaningfully, and prioritize the tasks.
There is a good best practices document here, and you should read it first.