 Technical description
 Integrating Testlab to Atlassian JIRA
Meliora Testlab can be integrated into the Atlassian JIRA issue tracker with an integration module that works in realtime with a two-way synchronization strategy. This integration requires the installation of JIRA plugins to achieve this.
Using a two-way synchronization strategy requires plugin installation to your JIRA so it is only available if your JIRA server is installed on your own servers. Testlab also offers a simpler integration strategy to push issues from JIRA to your Testlab project which requires no plugin installations and therefore can be also used with both JIRA On-demand and with JIRA installed on your own servers.
-
How it works
When an issue is created in JIRA it is immediately added to Testlab and vice versa. If issues are edited, the changes are propagated between systems in real-time. In addition to this, a 15-minute synchronization job is scheduled to synchronize any changes missed for example in situations where network downtime occurs. In addition to this, the JIRA side plugin adds an “Open in Testlab” menu item for all issues synchronized to Testlab which enabled to you easily open up the issue in your Testlab.
The module is implemented as a plugin at the JIRA side and as an integration interface for the plugin at the Testlab side. The following diagram describes the synchronization principle at a high level.
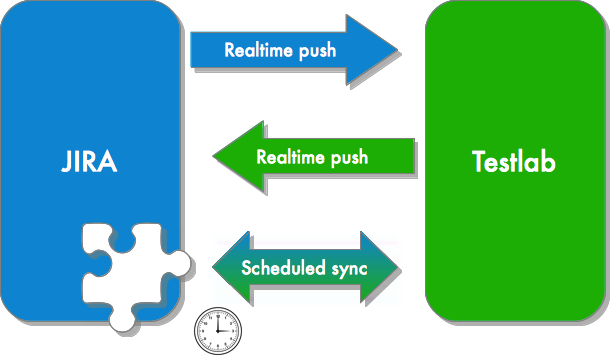
Both peers have an event listener which publishes the changes in issues in real-time. This means that when an issue is updated, commented or a file is attached to it in JIRA the change is immediately pushed to Testlab and vice versa. As said, we currently sync issue details, comments, and attached files.
In addition to real-time push a scheduled (every 15 minutes) synchronization job is triggered. This means that JIRA pushes all issue updates from the last synchronization point of time to Testlab. Testlab processes the data and replies with a push of its issue changes in a similar fashion. This allows us to synchronize the issues between the systems even if the real-time push fails for some reason for example due to network problems. We allow you to choose a conflict resolution strategy when overlapping updates occur to always honor the latest data, the JIRA data or Testlab’s data.
The actual data between JIRA and Testlab is pushed through a secured and key authenticated network channel. Just make sure your JIRA allows secured HTTPS to make the push from Testlab to JIRA secure.
To control which issues from JIRA are synchronized you can configure the plugin to synchronize only specific issue types from specific projects.
-
Prerequisites
- You have a JIRA server v5.1+. This way you can download the plugin directly from Atlassian’s Marketplace.
- For Testlab hosted:
- Your JIRA server must be accessible via internet from Testlab’s production servers by HTTPS. Testlab will call your JIRA server’s REST endpoint at https://yourjiraserver/rest/testlab/1.0 to push any changes for issues. Note that Meliora will provide you addresses of Testlab’s production servers if you want to limit the access to this url at your network boundary.
- For the above, a valid SSL license should be set up to ensure confidential communication between the systems.
- Your JIRA server must be able access the internet and call Testlab’s API from https://yourcompany.melioratestlab.com/api
- For Testlab on-premise:
- Your JIRA server must be accessible from your Testlab server. Testlab will call your JIRA server’s REST endpoint at https://yourjiraserver/rest/testlab/1.0 to push any changes for issues.
- Your JIRA server must be able to access Testlab’s API (http(s)://yourtestlabserver/api) at your Testlab server.
- A technical user account with a password set must be created to your JIRA. This account will be used when calling the endpoint described above.
- We strongly recommend you have proper backup practices in place in your JIRA installation. Keep in mind, that as the integration is a true 2-way integration the plugin will modify the tickets in your JIRA.
-
How to get started
To get started with integration follow the steps described below. If you have questions about these instructions or any problems with the set up please feel free to open up a support ticket in Testlab. We are happy to help you with your setup!
1. Preliminary configuration at JIRA side
- It is recommended to boost the logging level of Testlab for JIRA -plugin to trap any unexpected errors in configuration. Please go to Administration > Logging & Profiling and configure a DEBUG logging level for “fi.meliora” package. If and when the plugin is working as expected this logging level should be removed.
- Install the “Testlab for JIRA” plugin from Atlassian Marketplace to your JIRA
- Add a technical user account to JIRA for which the actual synchronization runs. Go to User management > Create user and add a new user for example named “Testlab User”.Make sure to add the user to groups with needed permissions to operate on your issues. A good bet is to add the user to at least ‘jira-users’ and ‘jira-developers’ groups – if your JIRA instance provides such groups. Refer to your JIRA administrator or documentation on granting rights to this user for accessing JIRA’s REST APIs.
Make sure to add a strong password to the user. - Get an API token for your JIRA user. If integrating with JIRA Cloud, log in to https://id.atlassian.com/manage/api-tokens and click “Create API token” and proceed with the instructions provided. This token generated should be used as the password later on.
- Add the following custom fields to your JIRA. Please go to Administration > Issues > Fields > Custom Fields and add two new fields as:
- Field type: Text Field (read-only) [or, in older JIRA versions “Read-Only Text Field”]
- Field name: Testlab
- Description: Linked issue ID in Testlab
- For older JIRA versions, set
- Search template: Free Text Searcher
- Issue Types: Any issue type
- Choose applicable context: Global context
- Click Finish and associate field Testlab to screens: Default screen or, Default and Bug screens of your appropriate JIRA projects.
and-
- Field type: Text Field (read-only) [or, in older JIRA versions “Read-Only Text Field”]
- Field name: TestlabLink
- Description: Internal link information for Testlab linked issues
- For older JIRA versions, set
- Search template: None
- Issue Types: Any issue type
- Choose applicable context: Global context
- Click Finish and associate field TestlabLink to screens: – none –
“Testlab” field stores the human-readable issue ID Testlab assigns the issue with. You can show this field on which JIRA screen you prefer. Above, we suggest you bind this item to the Default Screen to make this ID visible to your users. “TestlabLink” field stores the internal synchronization data for issues and should be hidden from all screens by default. Note that the actual configuration of these fields might vary a bit depending on your JIRA version.
2. Preliminary configuration at Testlab side
- Go to Company management > API keys and configure an API key to be used for authentication for calls from JIRA to Testlab. Please see the Testlab’s Help-manual for configuration of API keys.
- Optional: Configure a new custom field with the title “Jira” to the projects in Testlab you wish to track the associated JIRA issue IDs with. When synchronizing issues the Testlab side plugin automatically inserts the JIRA’s issue ID to this field if the custom field is found in the project at the Testlab side.
3. For Testlab hosted: Create a support ticket to Meliora
As the synchronization works in a two-way manner setting up the integration requires some configuration at the Testlab side by Meliora. A support ticket to Meliora should be created by selecting Contact support… from the Help-menu of your Testlab. Make sure to include the following information to the ticket:
- URL-address of your JIRA server (please see the Prerequisities).
- User name and password of the technical user account in your JIRA (see above). This account will be used when calling your JIRA from Testlab servers.
- Two-way mappings of issue types, priorities, resolutions and statuses between your JIRA workflow and Testlab workflow. If you are using the default JIRA workflow and default Testlab workflows we have the configurations pre-setup at Testlab side. If you have set up any custom issue types, priorities, resolutions or statuses in your JIRA please include this information to the ticket. If you have a custom workflow for issues in your Testlab please include the information on which JIRA issue status you would like to map each Testlab status to.
- A confirmation that the steps described as prerequisites are set up.
3. For Testlab on-premise: Set up a connection from Testlab to JIRA
As the synchronization works in a two-way manner setting up the integration requires some configuration at the Testlab side. To set up a connection from Testlab server to your JIRA server you need to:
- At your Testlab server, create a new configuration file DOMAIN_HOME/lib/classes/jira.properties as explained in the On-premise configuration files chapter at the end of this document.
- Restart your Testlab server.
4. Configure the plugin
That’s it! When you get the confirmation from Meliora that the integration is set up you can continue on and configure the Testlab plugin to synchronize the projects’ issues. Please see the next section below.
-
Configuring the JIRA plugin
The configuration of the JIRA plugin can be found in Administration > Plugins (or) Add-ons > Integrations: Meliora Testlab. To configure the plugin the following settings can be set:
- Testlab details
- Integration enabled: Should be checked for the integration to be enabled. Uncheck this to completely disable the synchronization if needed.
- For Testlab hosted:
- Company ID: Company ID of your Testlab. If you are using Testlab from yourcompany.melioratestlab.com your company ID is ‘yourcompany’.
- For Testlab on-premise:
- Testlab URL: Full URL (scheme, hostname & domain + optionally port) of your Testlab server, for example, ‘https://testlab.mycompany.com’.
- API key: API key to use to call your Testlab’s integration APIs. This is the key set up in step 2. above.
- Synchronized content
- Issue types: Issue types which to synchronize with your Testlab. Select all issue types by checking the appropriate checkbox for all issues of that type to be included in the synchronization. Selecting none will result in nothing to be synchronized from JIRA to Testlab.
- Scheduled synchronization
- Synchronization User: Select the JIRA user to use for a scheduled synchronization job. This the technical account created in step 1. above.
- Conflict resolution strategy: Select which conflict resolution strategy to use in possible data conflicts:
- Select Use latest data strategy to always prefer the latest issue data by comparing update timestamps for both systems. The issue data in the system with older data will be overwritten with the issue data from the system with newer data. [Default]
- Select the Prefer Jira data strategy to always prefer the data in JIRA. This way if both systems have updates on the same issue JIRA data is always honored and Testlab data is overwritten.
- Select the Prefer Testlab data strategy to always prefer the data in Testlab. This way if both systems have updates on the same issue Testlab data is always honored and JIRA’s issue is overwritten.
- Select Use latest data strategy to always prefer the latest issue data by comparing update timestamps for both systems. The issue data in the system with older data will be overwritten with the issue data from the system with newer data. [Default]
- Mapped extra fields
- To map extra fields from your JIRA issues to Testlab enter which Testlab’s custom fields the data should be mapped to. Keep in mind that the plugin automatically maps most of the issues’ fields to Testlab. This setting may be used to map extra fields to Testlab which are out of automatic mapping scope.
- Integrated projects
- To integrate a JIRA project to Testlab the project from Testlab must be mapped to the JIRA project. Please enter Testlab’s project keys to matching JIRA projects here. You can find Testlab’s project key on the Project Management‘s Details tab in Testlab.
Note: When a project is set up to be synchronized and it already contains old issues in it the issues are not pushed to Testlab and vice versa. When the issues are later on updated or new issues are created these issues are synchronized between the systems. - Testlab details
-
On-premise configuration files
Connection setup file
To set up a connection from the Testlab server to your JIRA server a jira.properties configuration file should be placed in DOMAIN_HOME/lib/classes directory of your Testlab server. The format of the configuration file is as follows:
# if set as false, testlab does not fire any events TO jira or receive any events FROM your JIRA
enabled=true
# address and credentials of your JIRA server Testlab will use for calls
jira.url=http://ourjira:8080/jira/rest/testlab/1.0
jira.username=testlabuser@somedomain.com
jira.password=testlabuserapitoken_or_passwordifapplicable
Notes:
For jira.url, please enter a full URL of your JIRA server with /jira/rest/testlab/1.0 appended. If you are using HTTPS/SSL, make sure that you have a valid SSL certificate set up to your JIRA server so connection confidentiality can be ensured. For jira.username and jira.password use the credentials you’ve set up for your JIRA’s technical user account as explained in 1. Preliminary configuration at JIRA side chapter above.
Testlab – JIRA data mappings file (optional)
Testlab uses a default set of mappings between information in Testlab and JIRA as follows:
Field Testlab value JIRA value Type Defect Bug New Feature New Feature Enhancement Improvement Other Task, Sub-task Priority Trivial Trivial Low Minor Normal Major High Critical Critical Blocker Resolution Open – Fixed Fixed, Done Won’t Fix Won’t Fix Duplicate Duplicate More Info Needed Incomplete Cannot Repeat Cannot Reproduce Status Open Open, To Do Assigned In Progress Resolved Resolved Closed Closed, Done Reopened Reopened The default mappings, as explained above, match to the default values in a Classic JIRA project.
If you need to customize the data mappings, create a new file DOMAIN_HOME/lib/classes/jira-datamappings.properties as follows:
####
#### two-way data mappings between testlab - jira
####

##
## Basic data mappings for testlab’s constant fields
##

#
# Type
#
# In Jira: Bug, New Feature, Task, Improvement, Sub-task
#
# Testlab Defect (1) = Jira Bug
map.type.1=Bug
# Testlab New Feature (2) = Jira New Feature
map.type.2=New Feature
# Testlab Enhancement (3) = Jira Improvement
map.type.3=Improvement
# Testlab Other (4) = Jira Task, Jira Sub-task
map.type.4=Task,Sub-task

#
# Priority
#
# In Jira: Blocker, Critical, Major, Minor, Trivial
#
# Testlab Trivial (1) = Jira Trivial
map.priority.1=Trivial
# Testlab Low (2) = Jira Minor
map.priority.2=Minor
# Testlab Normal (3) = Jira Major
map.priority.3=Major
# Testlab High (4) = Jira Critical
map.priority.4=Critical
# Testlab Critical (5) = Jira Blocker
map.priority.5=Blocker

#
# Resolution
#
# In Jira: Fixed, Won’t Fix, Duplicate, Incomplete, Cannot reproduce
#
# Testlab Open (1) = no value in JIRA
# Testlab Fixed (2) = Jira Fixed
map.resolution.2=Fixed,Done
# Testlab Won’t Fix (3) = Jira Won’t Fix
map.resolution.3=Won’t Fix
# Testlab Duplicate (4) = Jira Duplicate
map.resolution.4=Duplicate
# Testlab More Info Needed (5) = Jira Incomplete
map.resolution.5=Incomplete
# Testlab Cannot Repeat (6) = Jira Cannot Reproduce
map.resolution.6=Cannot Reproduce

##
## Mappings for workflow dependant fields
##

#
# Status
#
# in JIRA default workflow: Open, In Progress, Reopened, Resolved, Closed
#
# in JIRA Agile (formerly GreenHopper): To Do, In Progress, Done
#

# Note: In Testlab, default workflows use key mappings in format testlab.status.STATUS
# to help localization. For this reason, the workflow statuses are should
# be mapped also to these values. If you have customized your Testlab workflows
# with new statuses please make sure to map them also.

# Testlab Open = JIRA Open, To Do
map.status.testlab.status.open=Open,To Do
map.status.Open=Open,To Do

# Testlab Assigned = JIRA In Progress
map.status.testlab.status.assigned=In Progress
map.status.Assigned=In Progress

# Testlab Resolved = JIRA Resolved
map.status.testlab.status.resolved=Resolved
map.status.Resolved=Resolved

# Testlab Closed = JIRA Closed, Done
map.status.testlab.status.closed=Closed,Done
map.status.Closed=Closed,Done

# Testlab Reopened = JIRA Reopened
map.status.testlab.status.reopened=Reopened
map.status.Reopened=Reopened
The example file above defines the default mappings displayed in the table above.
As an example, if you are using Simple Issue Tracking projects in your JIRA (To Do -> In Progress -> Done) something like this should do (make sure to create a matching (To Do -> In Progress -> Done) workflow to your Testlab):
####
#### default two-way data mappings between testlab - jira
####

# TYPE_DEFECT
map.type.1=Task
# TYPE_NEWFEATURE
map.type.2=New Feature
# TYPE_ENHANCEMENT
map.type.3=New Feature
# TYPE_OTHER
map.type.4=Task

# PRIORITY_TRIVIAL = Jira Trivial
map.priority.1=Trivial
# PRIORITY_LOW = Jira Minor
map.priority.2=Minor
# PRIORITY_NORMAL = Jira Major
map.priority.3=Major
# PRIORITY_HIGH = Jira Critical
map.priority.4=Critical
# PRIORITY_CRITICAL = Jira Blocker
map.priority.5=Blocker

# RESOLUTION_OPEN = null
# RESOLUTION_FIXED = Jira Fixed
map.resolution.2=Done
# RESOLUTION_WONTFIX = Jira Won’t Fix
map.resolution.3=Done
# RESOLUTION_DUPLICATE = Jira Duplicate
map.resolution.4=Done
# RESOLUTION_MOREINFONEEDED = Jira Incomplete
map.resolution.5=Done
# RESOLUTION_CANNOTREPEAT = Jira Cannot reproduce
map.resolution.6=Done

# workflow statuses
map.status.To_\ Do=To Do
map.status.In_\ Progress=In Progress
map.status.Done=Done
To make sure the changes take effect please restart Testlab if these configuration files are modified.