Demo project
This is a description of a DEMO project you’ll get as an example when registering your own Testlab and it aims to demonstrate how a small typical software project could be managed with Testlab. Keep in mind that the chosen agile project model is just one kind of project style you could use. You can read this document to learn how some of the real-life project phases are done using Testlab.
You can find highlight thumbnails from Testlab’s user interface in relevant sections. You can click the thumbnail to open up an associated screenshot with an informative caption.
Boris’s bookstore
Meet Boris Buyer. Boris has a successful web store selling old books on the internet which has been providing a steady income for him and his family. It was the Christmas season of 2018 when he noticed his sales declining. He decided to call some of his old and faithful customers and asked if there was something he could do to serve them better.

Boris’s web store was old. Yes, you could order books from the store but the only way to place an order was to send an e-mail message to Boris. His customers were telling him that he really should look into his web store and make the order process better. There were all kinds of requests for new payment methods, delivery options, and more, and Boris had a feeling he was losing customers to more agile competitors.
The Plan
Luckily, Boris has a brother-in-law named Victor who owns an IT company specializing in web design. Boris meets up with Victor on holidays and agrees on a tentative plan to implement a shopping cart in his web store enabling his customers to place orders more easily.
And so it happens that Victor has a few months free for this team right away at the start of January 2019. Boris and Victor agree that it is necessary to implement the basic functionality of the shopping cart as soon as possible. The first milestone of the project has only the basic shopping cart functionality enabling self-service shopping without clumsy e-mailing. Victor suggests that the current Cash On Delivery payment type available as the only payment option is probably a show-stopper for many customers. Boris and Victor agree that the second milestone for the project would be to implement PayPal payment enabling credit card shopping. To make it possible to offer discounts for holiday sales Victor suggests that Boris should consider implementing coupon codes in his web store. Coupons would grant a discount on orders. Boris likes the idea and it is agreed to be implemented as a third milestone in the project.
A rough sketch of the project contents and its timetable is agreed upon:
Milestone 1 – Develop a basic shopping cart for the web store
- possibility to add items to the shopping cart in the web store
- choose a delivery option between: “pick up” or “DHL shipping”
- check and place an order
- orders are payable only with Cash On Delivery
| Week 1 | Requirement planning and design |
| Week 2 and 3 | Implementation/programming and test design |
| Week 4 | Acceptance testing for Milestone 1 |
| Week 5 | Installation to production, Milestone 1 in use for customers |
At the end of milestone 1, the team discusses the use of tasks to track the actual work in a better way. The team decides that in addition to having good visibility of the testing, specification, and issues of the project, it would also be great to have visibility of the team’s actual work. To achieve this, the team decides to use a modified Kanban board with tasks and divides the next milestones (2, 3, …) into sprints each taking two weeks.
Inspect milestones & Sprints
In Testlab, Milestones are used to split the project into larger defined entities, such as product releases. Sprints, on the other hand, are used to split these milestones into smaller periods. In many lean software development models, these sprints are often a few weeks in length, but in Testlab, you may freely use sprints of any length.
To see how Milestones and Sprints are presented in the tool, do the following:
- Click the “Milestones” button on the left.
- Choose one of the three milestones by clicking on it on the left part of the Milestone view.
Now, on the right-hand side of the screen, you have two tabs presenting statistics for the chosen milestone:
- “Summary” tab to inspect the statistics against the specification, tasks, tests run and the issues found.
- “Development Pipeline” tab to show how the assets to be implemented are progressing in the chosen milestone (or a sprint).
Please note that these tabs are for real-time live inspection of the progress and the status of the milestone. There are plenty of other reports, and radiators, as well.
Milestone 2 – Add PayPal support
- add an option to pay the order via PayPal
| Week 5 | Requirement planning and design |
| Week 6 and 7 | Implementation/programming and test design |
| Week 8 | Acceptance testing for Milestone 2 |
| Week 9 | Installation to production, Milestone 2 in use for customers |
The milestone is divided into two sprints (PP.)S1 and (PP.)S2. The first sprint consists primarily of updating the specification with new requirements, updating the testing assets, and some work on automation. The second sprint has tasks for the actual implementation, testing, and fixing of issues found.
Milestone 3 – Add support for discounts via coupons
- possibility to add new coupon codes to the system
- orders can be placed with coupon codes granting discounts
| Week 9 | Requirement planning and design |
The first sprint (C.)S1 of the third milestone has tasks for updating the spec, implementation, and testing of the coupon-related features in addition to fixing the issues found in the earlier sprint.
Milestones and Sprints
Using milestones to split your large project into more manageable pieces is super easy. Just do the following:
- Click the “+” button above the milestone list on the left. This opens a window where you can input milestone info.
- Enter a title for a milestone – for example, “Milestone 4”. This field is mandatory. The identifier is needed too, but it is automatically suggested from the title.
Now your milestone is ready to be used. You can, for example, create a test run and tell Testlab that it is the target of current testing. This way you can easily combine knowledge of what is happening to a certain milestone.
You can also split milestones into sprints. This is needed if you wish to use tasks on your project task board.
Boris and Victor agree that Victor and his team will do the preliminary design before the turn of the year which enables a quick start for the project. Victor suggests that for user interface design they employ an old friend who has promised to deliver approved user interface layouts by the end of week 1 of 2019. Victor also knows that the real usability and accessibility of the shopping experience are crucially important. He employs an old colleague who has expertise in the usability field to review the final implementation and deliver a report on it.
Victor recommends to Boris that it is wise to use a good tool to document the features, test cases, and all the related assets. This makes the future easier for Boris if and when he decides to develop his online ventures further. Boris likes the idea and in addition, this keeps Boris more up-to-date on what is going on in his project. Naturally, Victor suggests using Meliora Testlab and Boris agrees.
Project timetable
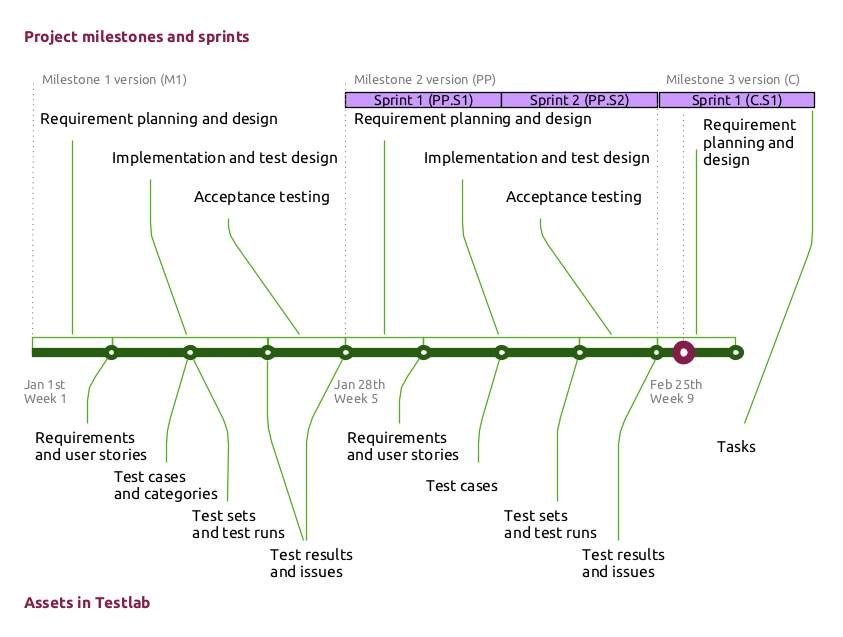
The following diagram presents a timetable for the project explained above. The upper half of the diagram shows the phases of the project and the bottom half shows when at the latest the milestone-relevant assets are added to the Testlab project. The timeline is divided into weeks and the purple dot on the timeline shows the moment in time the project currently is in.
Meet the Team
Victor’s trusty team of developers is assigned to this project. The responsibilities of the project are divided as follows:
Boris – Buyer

Responsible for approving the specification as requirements and user stories.
Victor P. – Owner
![]()
Victor agrees to act as a ‘product owner’ and document the features of the shopping cart as requirements and user stories to Testlab. Victor and Boris agree that Victor will work as a bridge between his team and Boris.
Pedro – Manager

Pedro will act as a test manager and plan all the test runs and assign them. Pedro’s responsibility is also to monitor the testing and issues and report to Victor about any issues impacting the delivery. Pedro will also review the test cases designed and approve them before they are tested.
Liana – Tester

Liana is doubtful at the heart and has all the genes of a good tester. Liana will design the verifying test cases for the requirements and user stories Victor and Boris have agreed on and run the actual tests.
Dean – Developer

Dean is the nuts and bolts kind of guy and will do the actual programming and web design involved. All the issues found in testing will be assigned to and handled by Dean. Additionally, Dean will consult and help Liana to develop good enough test cases for all the technical aspects of the system.
And as external resources, the team will be backed up with
User Interface Designer
- Delivers the UI design and layouts by the end of week 1.
Usability expert
- Reviews the usability and accessibility of the implementation and reports back to the team.
Milestone 1 (M1)
Victor’s team is familiar with agile methods and prefers modeling requirements as user stories. As a team, they decide to use a hybrid method by modeling the features of the Shopping Cart as user stories and other features as generic requirements.
The team has a discussion on how should they divide the specification of the project. First, they consider dividing the core web store functionality as Epics but – as the core functionality is simple enough – they decide to first model the initial core implementation from the user role standpoint. They agree that, as the core functionality has been implemented in the first milestone, the new additional functionality (PayPal support, coupons, …) should be modeled as separate Epics.
Requirement planning, week 1: Jan 1 – Jan 4, 2019

Victor hosts a design workshop meeting with his team and Boris and they talk through the requirements for the Cart implementation. Victor tells Boris that he will document the requirements to Testlab and Boris should review and approve them later on so that they match the discussed features.
Requirements in Testlab
Try the following actions
Find relevant specifications
- Choose “Specification” in the left part of the screen to open the corresponding view
- On the top left, you’ll see a tree consisting of requirements and user stories. Above the tree you see filters. Choose Milestone “C” – the tree will now show requirements that are to be implemented in the latest milestone.
- Try out other filters if you wish. To clear filters, click the “Reset Filters” -button in the title bar.
Add a new requirement
- In the requirements tree, pick a folder where you wish to create your requirement. Click the right mouse button to open a menu, and choose “New -> Requirement”.
- Give the requirement a name and description.
- Click the “Save” button in the bottom right corner or click the corresponding keyboard shortcut (depending on the browser and your OS).
Collaborate
Workflow can be customized for your project needs. On this demo project, we have a review phase for requirements. See how it works in Testlab.
- After selecting a requirement from the requirement tree, you see its data on the right. Below different tabs you see workflow buttons. Select “To review” to mark your new requirement to set its status to “Ready for review”.
- If you set “Assigned to” to someone, the user will know he/she is supposed to work with the requirement.
- Click the “Add comment” button on the right part of the user interface to give a comment about the requirement.
- Set “Target milestone” to mark when the requirement should be implemented. This helps you in tracking the development and planning of the testing.
- Save when ready.
You’ll find the requirements of the project in the Requirements section of Testlab.
Victor starts working. He knows, that all features planned to be implemented in the first milestone will act as a basis for all further work in Boris’ web store. He decides to create all assets of the first milestone.
He brings in his expertise in web application design and decides to leave the actual Cart features to a later time and start on generic security and usability-related requirements. He wants the requirements to be easily tracked later on in the hierarchy and by their identifier, so he creates two folders “SEC – Security” and “U – Usability“ for his project. When a requirement is specified as a Folder it means that the requirement just groups sub-requirements below it. Victor goes on and adds the needed security and usability-related requirements to these folders.
As said, the actual functionality of the Shopping Card is decided to be modeled as agile user stories. Victor decides to create user stories to a hierarchy by the actor. He adds some folder classed requirements as
- US – Functional
- US1 – As a Customer, I
- US2 – As a Web store, I
- US3 – As a Seller, I
The subfolder named by the actor will hold the actual user stories for each actor. Victor goes on and adds the user stories to each folder. US1 will hold the user stories of the Customer meaning the user who is shopping in Boris’ online bookstore. US2 will hold the user stories of the system – in this case, the Web store. US3 will hold the user stories of the Seller meaning Boris. Victor documents the user stories gathered earlier in these folders.
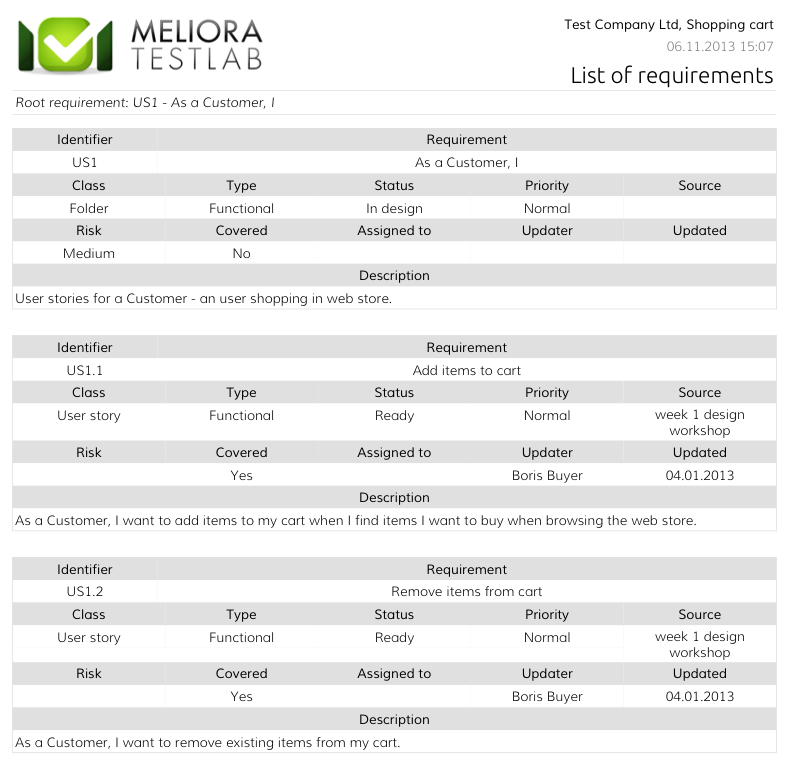
List of requirements -report
When Victor is happy with the requirements and user stories he goes through them once more. He prints out some reports, takes his work home, and has looked through the requirements before telling Boris to approve them. Victor thinks the requirements are now good enough, assigns requirements to Boris, and marks them as ready for review.
To make sure the team and the buyer are on the same page it was agreed that Boris will review and approve the documented requirements. Boris goes on and finds that Victor has assigned the documented requirements to Boris for review. Boris reads through the requirements, finds the requirements as adequate, and approves them as ready. This tells the team that the requirements have been approved by the buyer and the design can go on.
Later, when the actual development work starts, related requirements will be set to the status “In development”. Once the version will be released to use, they will be set to “In production”. This way it is easy to follow the development process.
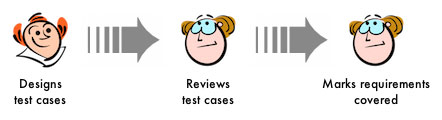
Test case design, week 2: Jan 7 – Jan 10, 2019

Liana takes on the challenge and starts to design the test cases which will verify the requirements Victor and Boris have planned. First, she creates a proper test category structure for the test cases to make the grouping of test cases easier. She decides to follow the similar actor-based category structure as in requirements for all functional tests and add some folders for security and usability-related test cases. Liana also informs Pedro to reserve some time for a test case review at the end of the week as Liana plans to have the test cases ready as soon as possible.
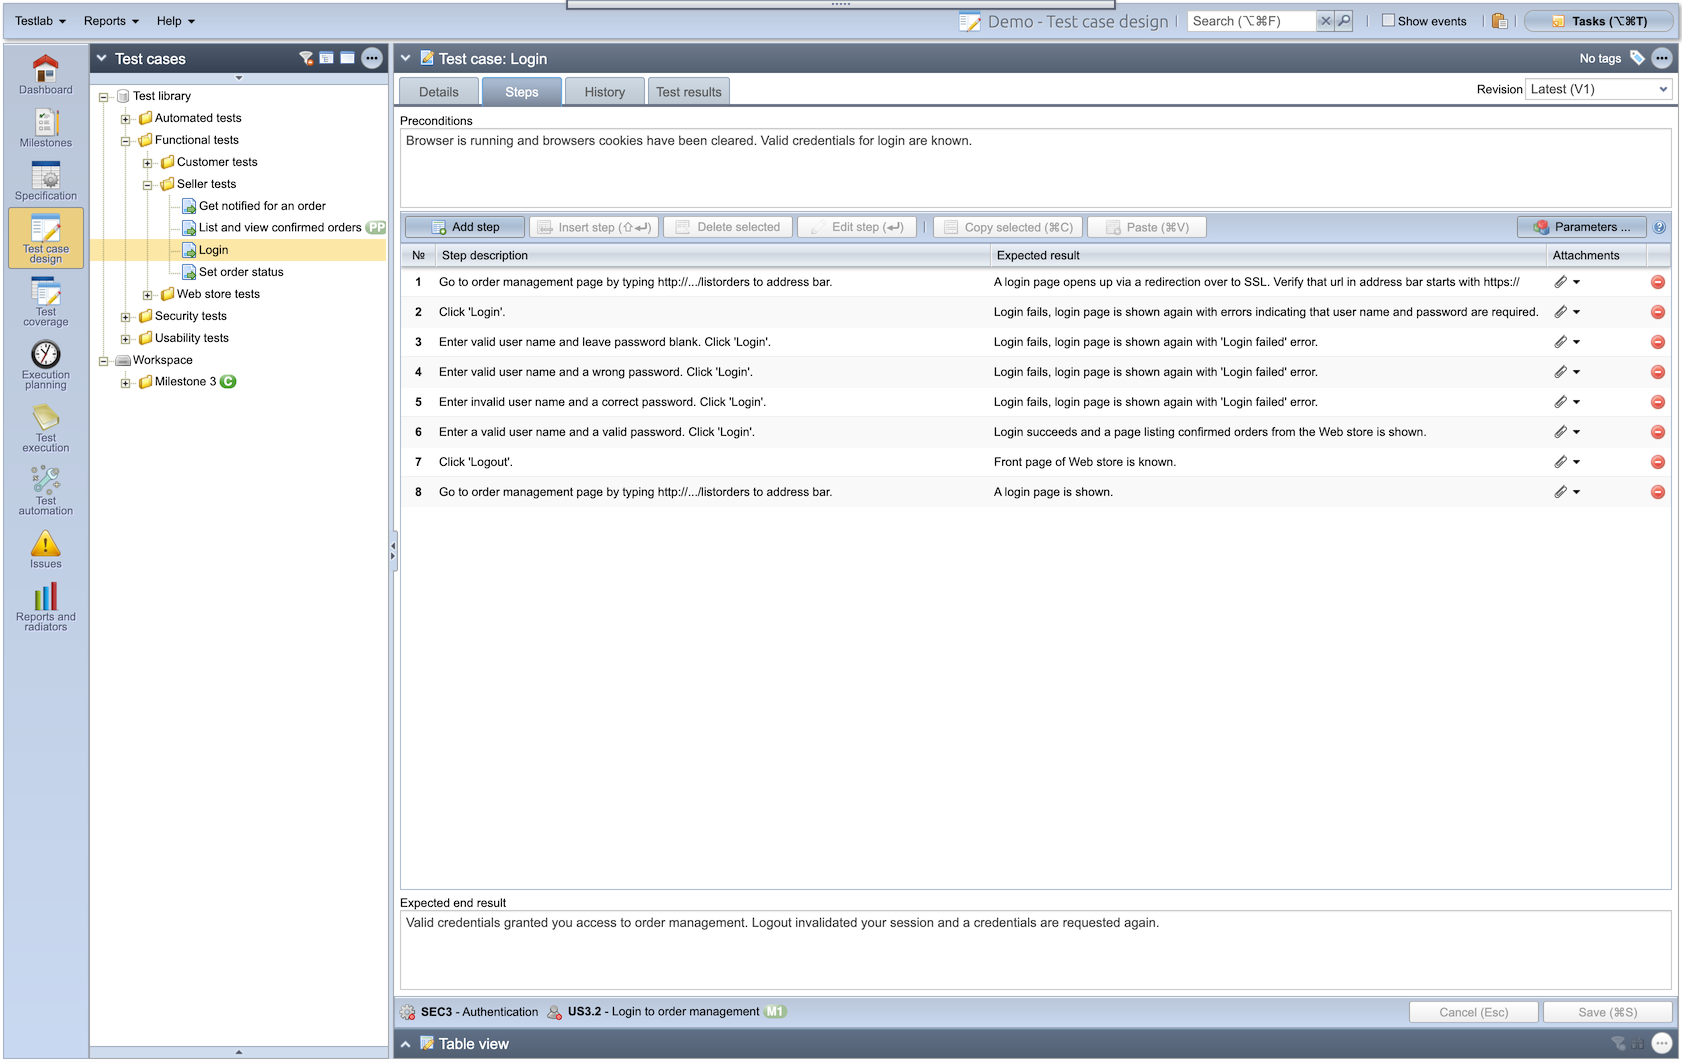
Examine the test library
The “Test case design” view is a test case repository and the place where the test case design is done.
- Choose the “Test case design” view from the left.
- Choose the test to view/modify from the test case tree on the left.
- You see details for the selected test case on the right part of the UI. Choose tabs to see test steps, modification history, and execution history.
- To see which requirements the selected test case verifies, look at the very bottom of the “details” tab. You should find the links for a few test cases created by Liana.
- If you wish to examine your test data in a spreadsheet-style, click “Table view” at the very bottom of the right part of the screen. Then select a folder (or root folder) from the test case tree on the left. You’ll see your test case data in a table. Please note that the columns you see here can be customized.
Test cases of the project are found in the Test case design section of Testlab.
Liana reads through the specification and goes through the user interface layouts provided by the user interface designer and starts to type in test cases. With the help of Dean, she describes the needed security test cases to fulfill the security requirements defined. Liana knows that an external expert will review usability. For this reason for usability, she just adds a stub test case for usability defined as just to ensure that the report the expert will deliver gives the green light for the cart’s usability. Liana knows that it is not always necessary to design as detailed steps for test cases as possible – just as detailed as needed to ensure that the requirements are verified.
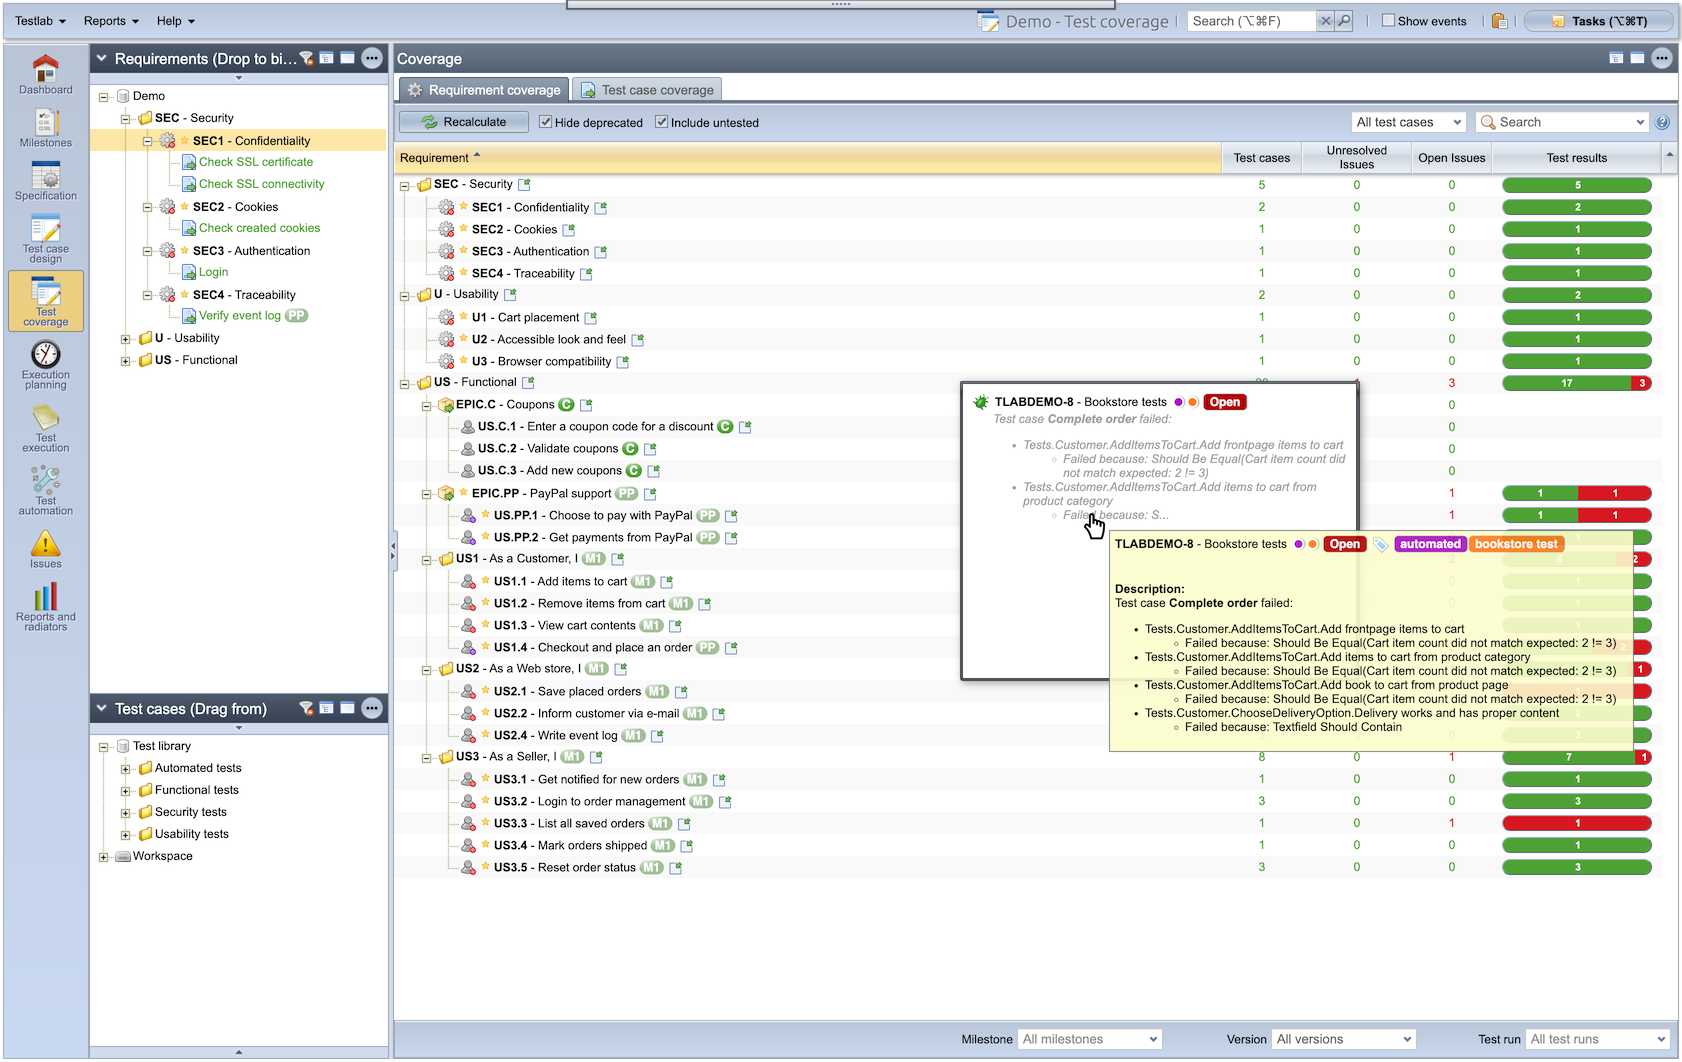
Test Coverage section can be used to investigate the requirement coverage of the project.
When Liana is happy with her test cases she goes through them once more. She additionally ensures that all the test cases are bound correctly to the requirements that the test cases are designed to verify. For this Liana just drags and drops the test cases on the requirements for the binding.
Finally, Liana assigns test cases to Pedro for review. At the end of the week, Pedro logs into Testlab and as agreed goes through the test cases and reviews and approves them. He uses the Requirements-, Test Case Design- and Test Coverage -sections to see if the test cases are detailed enough to cover and verify Boris’ requirements for the Shopping Cart. Pedro likes what he sees and as he goes through the requirements he edits them and marks them as Covered. This tells the team that the test cases have been reviewed and Pedro thinks that the test cases are good enough to verify the requirements for Boris’ Shopping Cart.
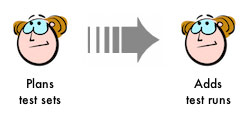
Test execution planning, week 2: Jan 10, 2019

Pedro knows that Dean has been working day and night to get the first milestone done. He knows that Dean would like that Liana would start the testing on the features already testable as soon as possible. He goes to work and starts thinking of sets of test cases that would be run as test runs in this milestone.
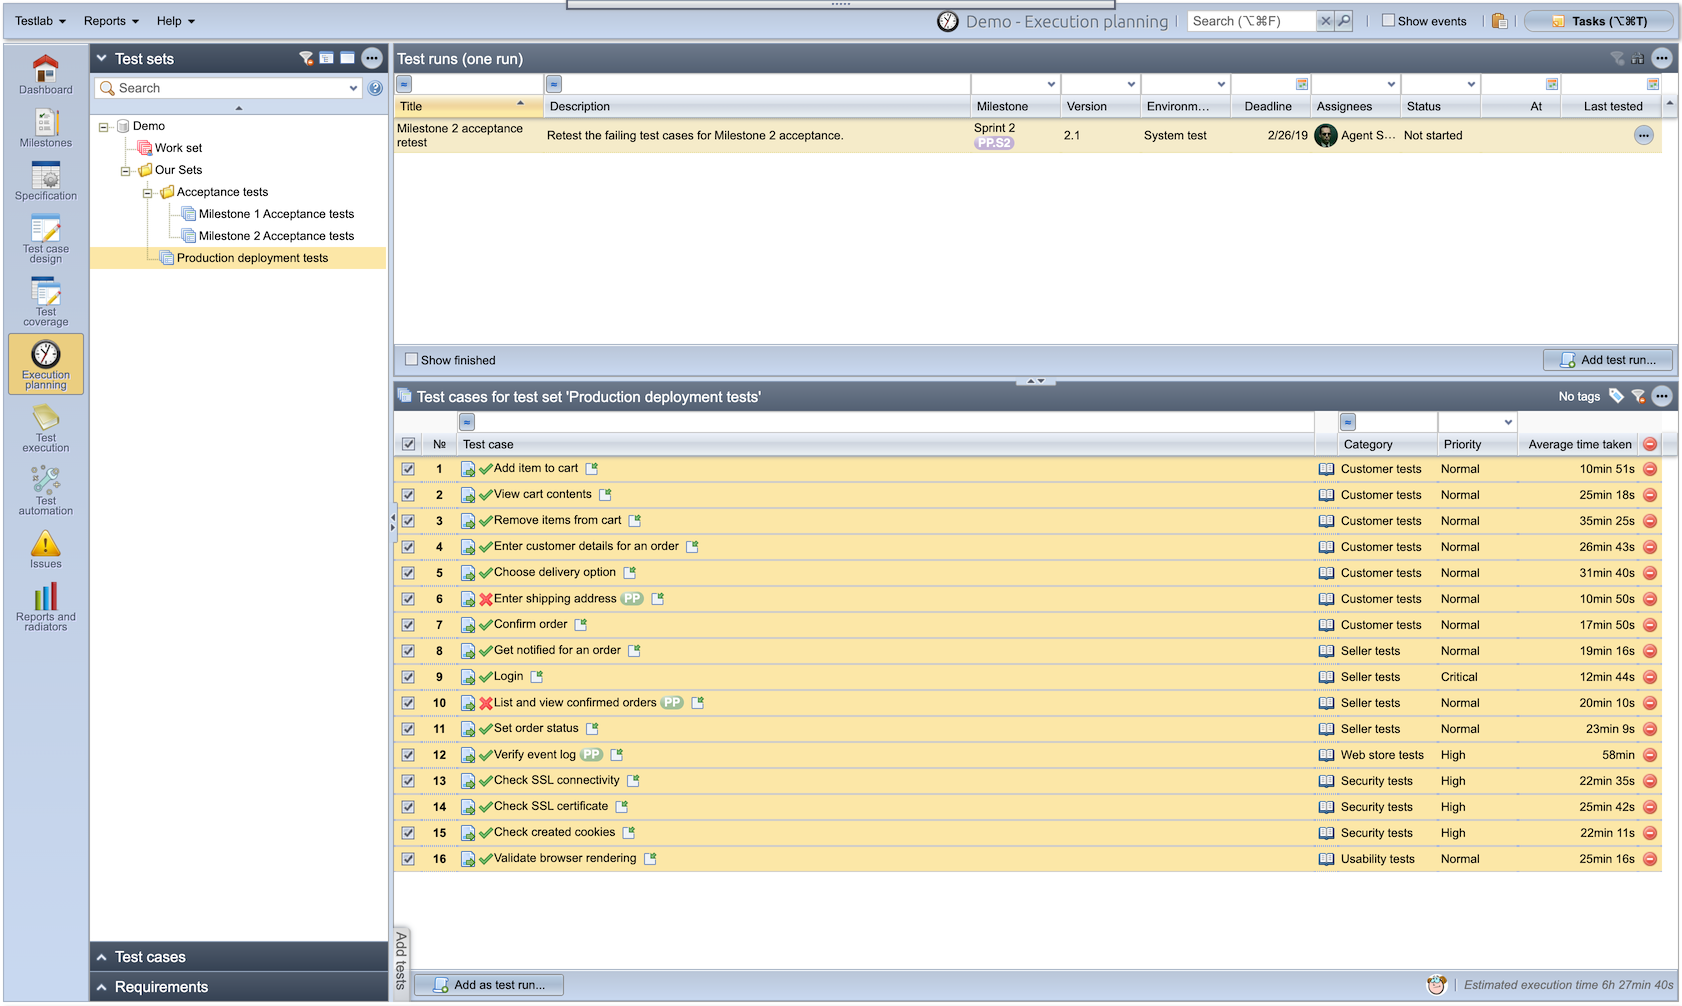
Execution planning in Testlab is used to plan repeatable test sets and add the test runs to be executed
Pedro knows that it’s possible to add the needed test runs to Testlab directly by using his personal work set in execution planning. Then again, he knows that he probably should add some repeatable test sets to the system as the project will span multiple milestones which will be tested fully as they are finished. He ponders a bit and ends up adding a “Production deployment tests” titled set of tests which he thinks should list the minimum set of test cases always run to a new version before it should be accepted to be installed in the production environment.
Pedro wants to easily find the actual acceptance test sets for each milestone so he goes on and adds a new test set category “Acceptance tests“. To this category he copies the already created production deployment tests as “Milestone 1 Acceptance tests” and adds the few missing test cases to it which are not contained in the original test set, for example, he knows that the “Validate accessibility” test case is not run for every version because they have agreed for the Usability expert to deliver the usability report for only the first version.
Pedro speaks with Dean and gets informed about the functions Dean thinks will be testable by end of the week. He knows that Liana can also pick the test cases to be executed herself but chooses to help Liana in her efforts by adding test run “Milestone 1 Sprint 1 tests” for her to test the Dean’s progress with. Pedro set the starting date for the test run for Jan 11 and expects the tests to be run next Monday and assigns the test run to Liana.
Pedro also adds two additional test runs for Milestone 1’s acceptance tests and installation tests. The first contains all test cases that should pass for the version for it to be accepted as working and the latter one for test cases that should be run to verify that the version works correctly in a production environment after the installation.
Execution planning in Testlab
There are many ways how to pick test cases to be tested. Here we show one:
- Go to the “Execution planning” view
- On the top left corner, you see a Test set tree. It is a place for your reusable test sets. Pick “Work set”.
- On the bottom left, you can see the test case tree. You can drag & Drop test cases from this test case tree to the right to the selected set.
- The test case tree can be filtered. Just click the small triangle just above the tree to open filters to the view.
- Below the tree click “Show results – when latest run”. This shows the latest execution results. Great for finding test cases that are not run or failed the last time.
Creating test runs
Testlab uses test runs to store test results. Test runs are often created from test sets, which we just modified.
- Click “Add test run…” to open the test run creation window
- The title is used to distinguish different test runs. Give it a name now.
- Other fields are optional. If you, for example, tell what milestone (or sprint) you are testing with these tests, Testlab can create a testing report for that milestone – for all test runs.
- Click save when ready.
First tests run, week 2-3: Jan 11 – Jan 14, 2019
Dean is eager to know if the functionality he has already implemented works at all. Liana gets notified via Testlab that she has a test run assigned to her to be run. She opens up the test run in Testlab, selects all tests in it, and starts testing.
Running tests
To see how tests are executed in Testlab, try the following:
- Go to the “Test execution” view and choose the “Execute tests” tab.
- Click “Select a run” (if you have any) and select a test run from the list. This will open up the testing view for the selected run.
- First, give each test step a result (pass, fail, blocked, or skipped) for the selected test case. You find the result buttons in the test step row.
- Once you are done with the test steps, you should read the “expected end result” below the steps and give the whole test result. The button for giving the test case a result is found on the bottom right part of the screen.
- Once you are ready with this testing session, click the “stop” -button on the top right part of the window.
For a few first test cases, everything seems to be working fine and Liana is impressed with the work Dean has done. She knows though that as this is the very first test run against the Cart she expects some issues to be found in it. And so it is that the third time is the charm and the “Remove items from cart” test case does not work as expected. A confirmation dialog is missing when she removes all items for a specific product from the Shopping Cart. Liana marks the test case step and the test case has failed and adds an issue “DEMO-1 – Removing all items for a product does not show confirmation dialog” for Dean to resolve.
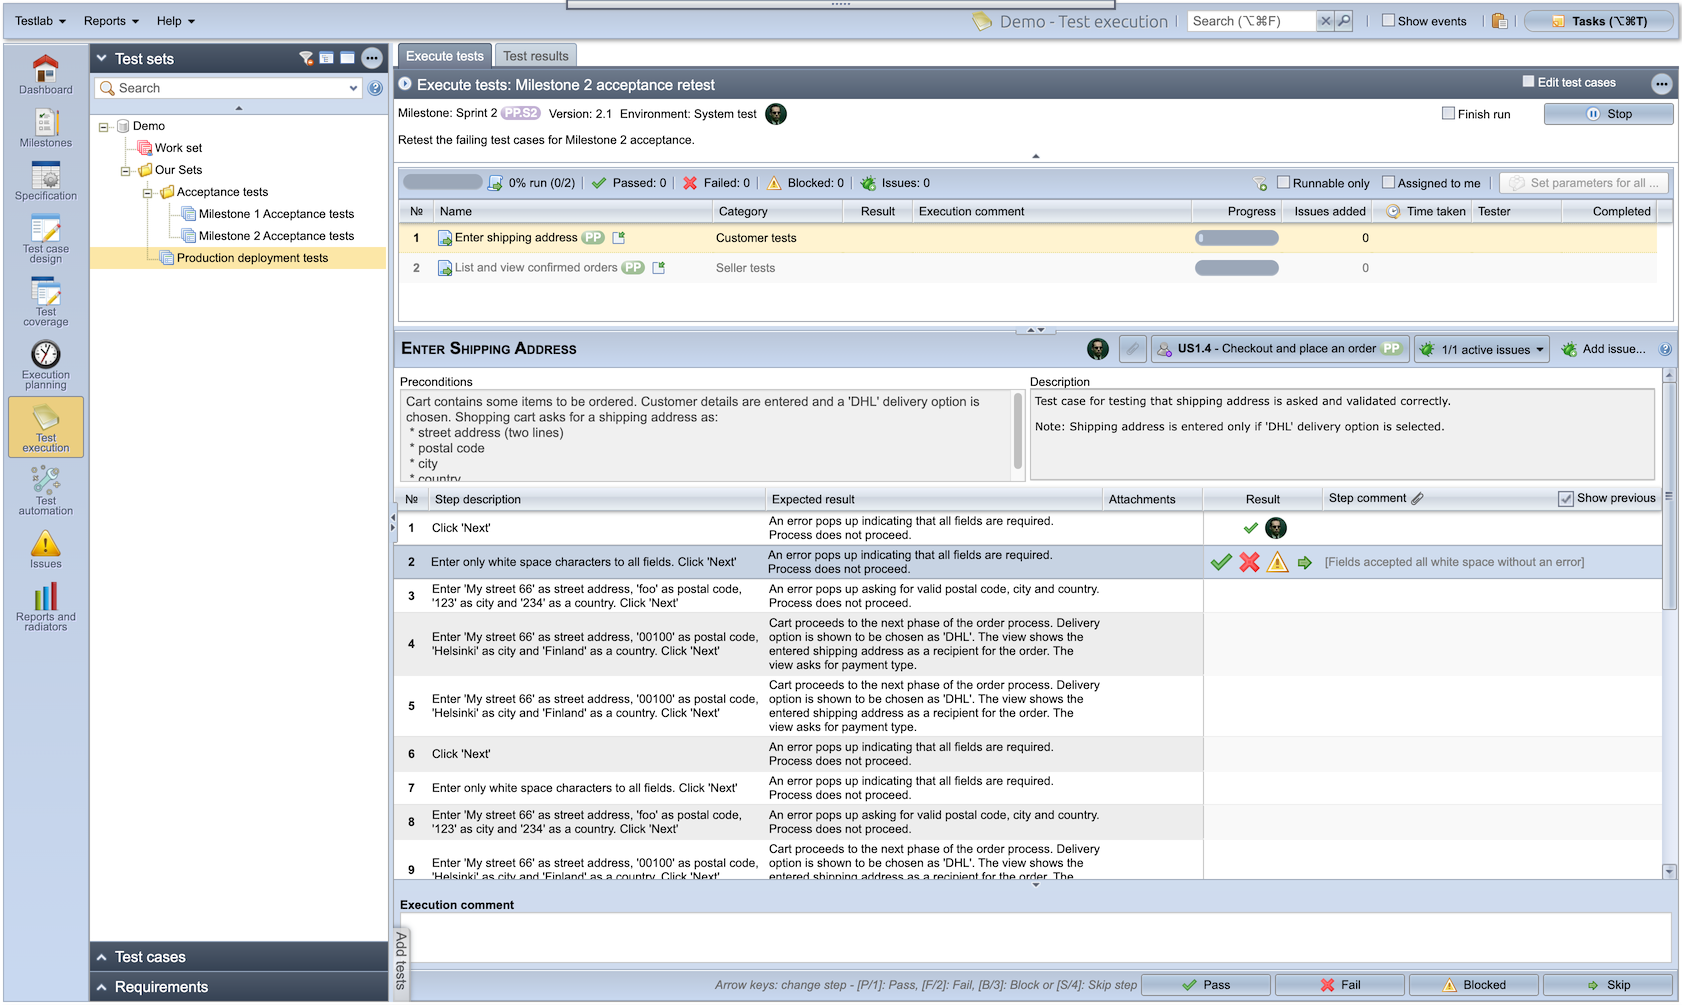
When running tests Testlab records a result for each test case step.
Liana goes on and runs all the remaining test cases and finds three more issues with failing test cases. She adds the issues and assigns them to Dean.
Resolving issues and re-testing, week 3: Jan 13 – Jan 19, 2019
Dean knows that the first milestone version should be in acceptance testing by week four. He gets notifications from Testlab that Liana has found some issues in her first tests. Dean goes through the issues and adds some comments to them when applicable. He goes on and fixes the issues, adds comments, and marks the issues as resolved. He knows that the test cases for the issues should be retested before the acceptance tests so he assigns the issues back to Liana for closing.
When running a test case, its issues – and other relevant assets – are easily available.
Liana gets informed that the issues should now be fixed. She adds a new test run “Milestone 1 Sprint 1 retest” for test cases that failed in the previous run and she starts testing. While she is testing she closes the issues found in the previous run. She is satisfied to find that the issues are now resolved.
Acceptance testing, week 4: Jan 21 – Jan 23, 2019
Liana has a talk with Dean and Pedro and gets informed that the implementation is nicely on schedule and the acceptance testing can be run as planned. Acceptance tests are run to verify that the requirements are covered and that the planned functionality works as expected before installation.
Liana starts testing. The acceptance test run has all the test cases needed to pass the first milestone version. She is glad to find that only one test case has some issues: An event log file that should be written to the server’s file system was not found. She is a bit baffled as this file did exist previously as expected and adds a comment about the fact with the issue. She assigns the issue to Dean for resolution.
The Test Coverage view can be also used for the tracking testing progress against your current specification.
Dean reacts quickly and notices that the server has some file permission problems with the directory where the application is trying to write the event log file. He quickly fixes the issue, marks the issue as resolved, and adds a comment to the issue. As it was only a server-specific issue Liana decides that she re-test and closes this issue in the production after the installation.
The team meets up to discuss whether the version in a testing environment is acceptable to production. Pedro presents the coverage of the Milestone 1 version and everything shows up green except the traceability requirement regarding the event log file. As Liana explains in the comment on the issue, the issue is environment specific and should not show up in the production environment. In addition to this, the team goes through the issues with the issue list report and concludes that everything seems to be ok for a production installation.
Creating issue tickets
To fully track issues, we want to create issue tickets. You can create one during testing.
- On the test execution window, you find the “Add issue…” -button on the right. Click it to open a window for adding a new issue.
- Give the issue a descriptive title. This field is mandatory.
- Test case steps are copied into an issue. You can add any other relevant information to the description as well.
- Often is it important to assign the issue to someone so they get a notification and know they should respond to the issue. Do this by selecting a value in the “Assigned to” -field.
- Click the “Save” -button when satisfied.
Production deployment and installation testing, week 5: Jan 30 – Jan 31, 2019
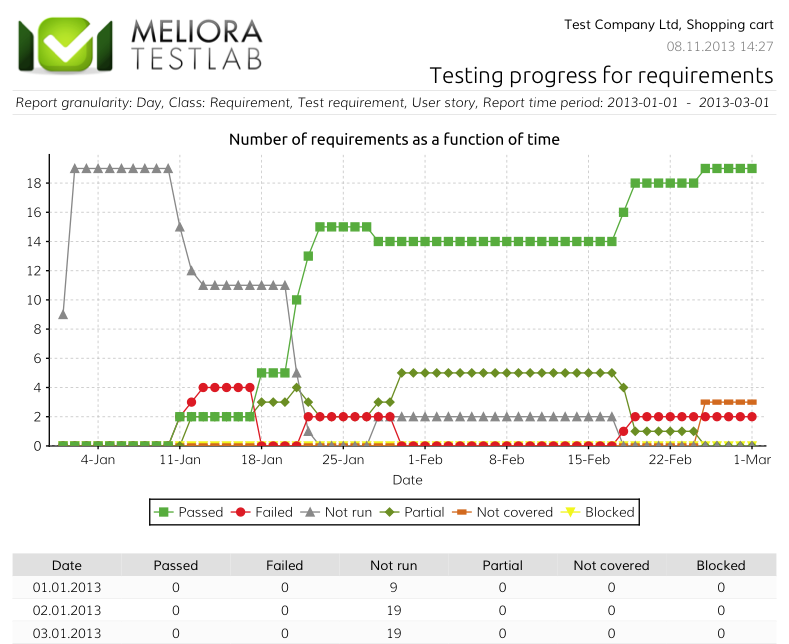
Testlab offers time-series reporting for the progress of your testing.
Victor meets up with Boris and reports that all should be green for the deployment of the first milestone version of the Shopping Cart. They agree that Wednesday the 30th of January is a good day for a small downtime in Boris’s web store. They plan to take the version to production and Liana is on standby to run the test cases scheduled after Dean reports back that the installation has succeeded.
On the 30th Dean goes to work and sets up a maintenance break page for Boris’ web store. The maintenance break page is set up in a way that Liana has access to the production server but customers from the outside internet do not. Dean installs the Shopping Cart application to the servers and tells Liana to start testing.
Liana runs the test cases in the “Milestone 1 installation tests” test run and is happy to find out that the Shopping Cart works as expected! Victor reports back to Boris and tells him the good news. They decide to take down the maintenance break page and open up the brand new enhanced web store to the public!
Milestone 2 (PP)
Before going into the details of PayPal-related functionality, Dean as a developer proposes that the team should start using the task board functionality in Testlab. Dean likes the idea of using Kanban-like boards to understand better what Liana and others actually are doing and what still needs to be done. Victor adds a new milestone Milestone 2 [PP] to the project and splits it into two-week sprints.
For the project to go on as smoothly as possible, Victor right-away starts to plan the next version of the Shopping Cart. He kicks off the design of the PayPal-enabled Cart at the same time as the finishing of the previous milestone. As agreed before, they decide to model the new (PayPal- and coupon-related) functions as Epics “on top of” the core functionality.
Requirement planning, week 5: Jan 28 – Jan 29, 2019
Examine Milestone 2 requirements in the table view
View the mentioned requirements in a table view
- Click “Specification” on the left to open up the specification.
- Click the “Table view” bar on the bottom right part of the browser.
- On the requirements tree, click the root labeled “Demo” to open all requirements into a table
- Filter the table using the “Target milestone” field, and choose the value “PP” to show only the Paypal features in a table.
Victor knows that the next release should be quite simple. He talks with Boris and gathers up the requirements for the PayPal payment option. Victor adds a new epic “EPIC.PP” to the folder “US”, documents the findings, and adds a couple of new user stories: “US.PP.1 – Choose to pay with PayPal” and “US.PP.2 – Get payments from PayPal“.
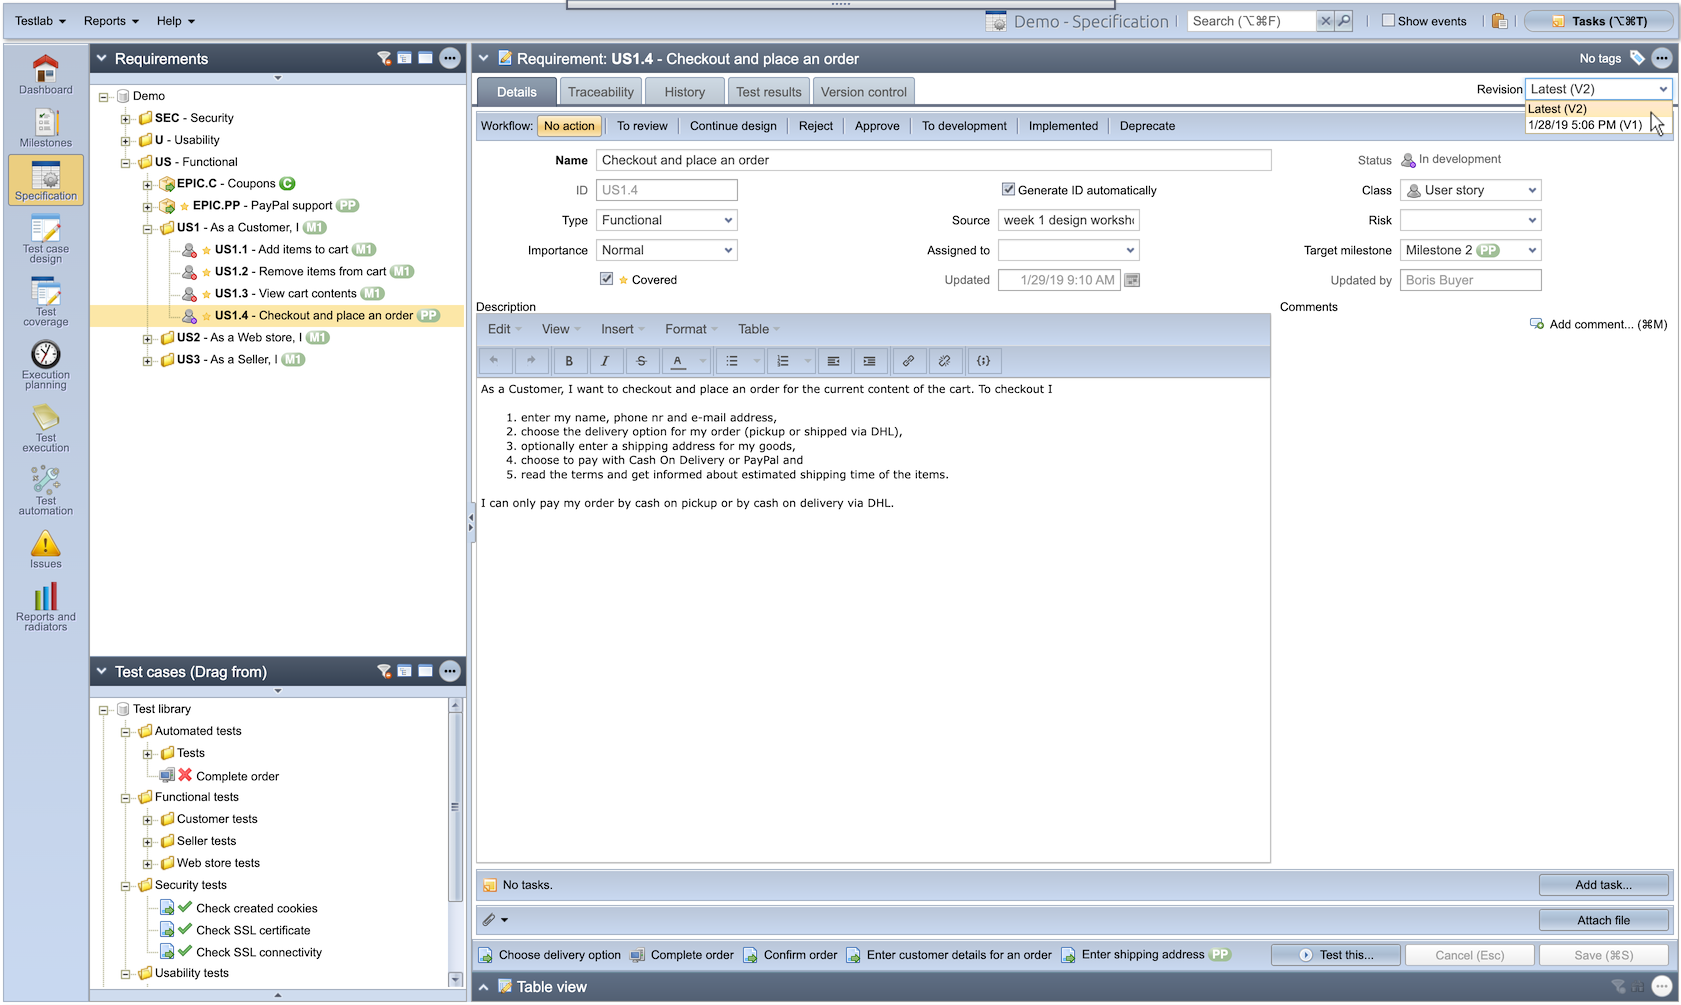
Old revisions are stored in Testlab and easily accessible later on.
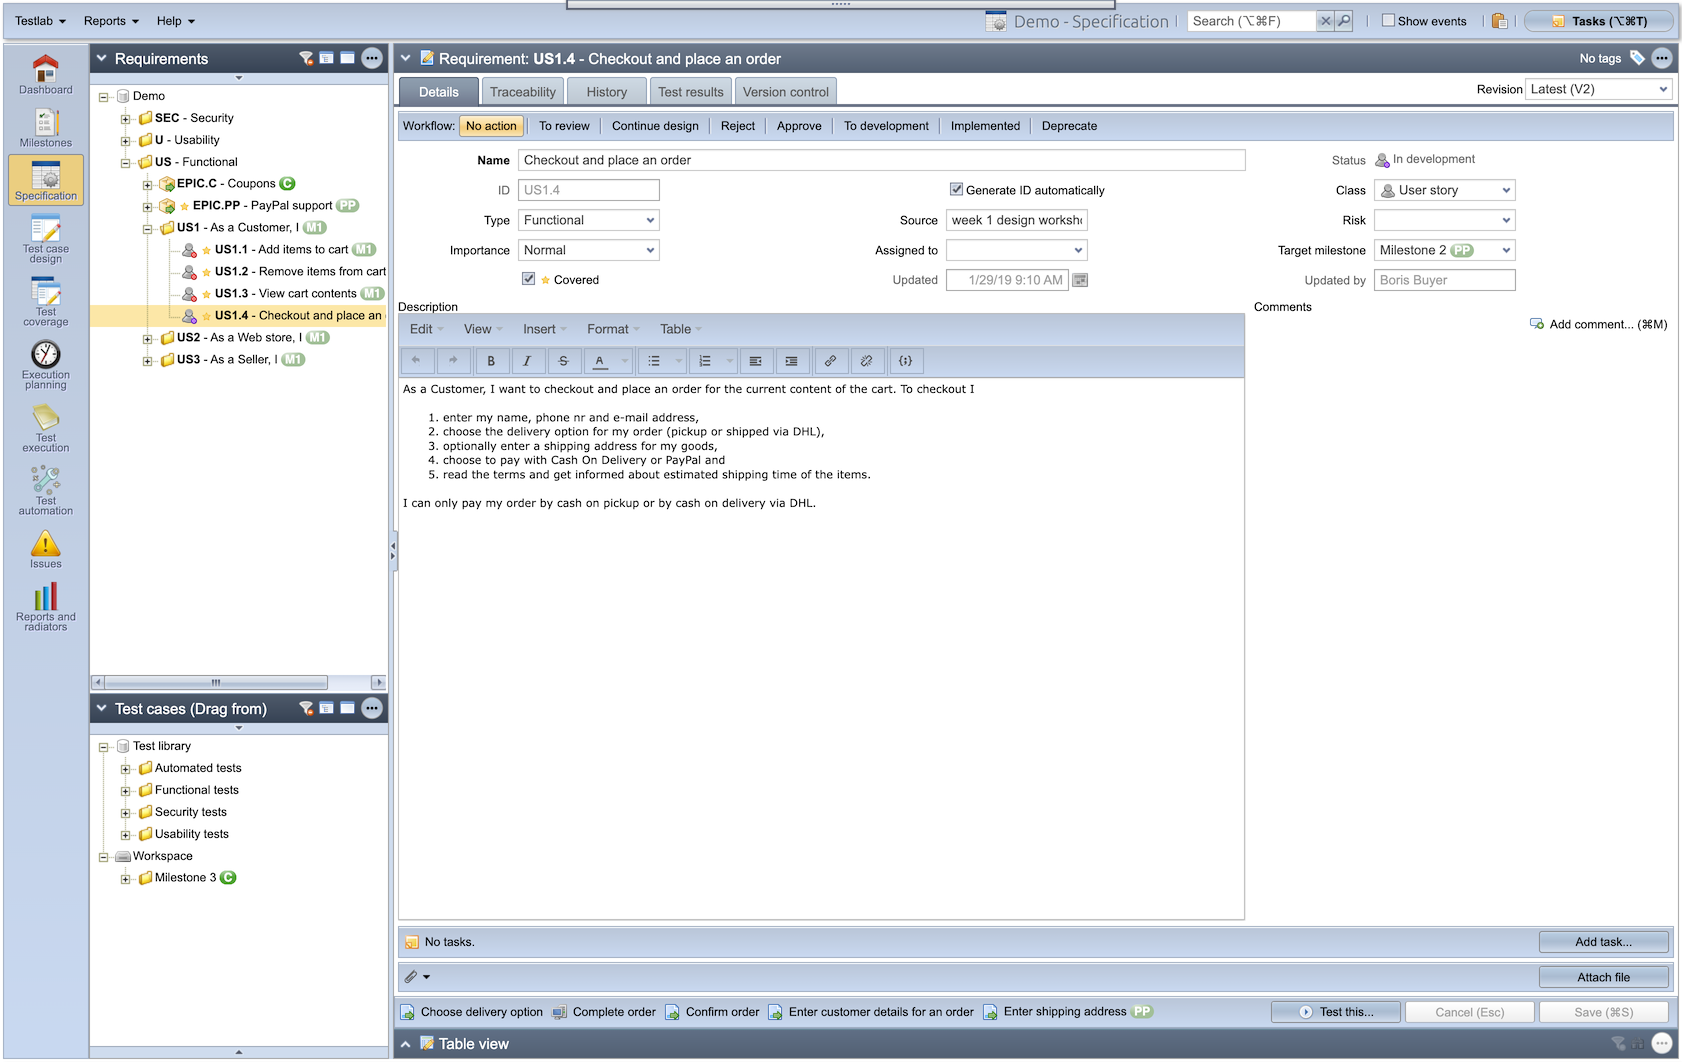
Then Victor goes on and goes thru all the existing requirements to see if they need any refinement because of the newly added payment option. He updates the “US1.4 – Checkout and place an order” user story which creates a new revision for the user story. Finally, Victor assigns the created and updated user stories to Boris and marks them ready for review, and marks the user stories as not covered.
Boris logs in to Testlab and gets notified about requirements needing some work. He reads through the user stories Victor has asked him to review, likes what he sees, and approves the requirements as ready.
As they have agreed to use tasks for this sprint, at the same time, Victor adds tasks as he sees fit to the sprint’s backlog in the taskboard view. To make tracking tasks easier, he couples the tasks with the related assets, such as user stories, in the project. Victor gathers the team together and they finalize and agree on the tasks they should be working on. The tasks are assigned to the team members accordingly. They also agree that each member keeps their tasks up-to-date on the sprint’s taskboard by moving them to the right column and updating the remaining work estimate at the end of each working day.
The test case design, week 6: Feb 7 – Feb 8, 2019
Liana talks with Dean and they go through the changes in user stories. She finds the relevant requirements from the project easily by looking at which requirements and user stories are currently marked as not covered. They agree that the changes in the application are quite small so they agree that it’s probably enough to test the implementation of Milestone 2 once and for all in the acceptance testing phase. Dean is confident in his skills and promises Liana to deliver a working version in one go.
Liana knows that she must go through the current test plan and make sure the test cases cover the new and updated user stories. She does this and ends up adding a new test case “Pay with PayPal” and updating a few: “Enter shipping address“, “List and view confirmed orders“, “Verify event log” and “Submit an order“. She assigns the test cases to Pedro for review so that she knows the test cases are given another look before testing.
Dean knows that PayPal integration adds some important fields to his data model in the application. He goes through his automated tests and updates the “Submit an order” test case to ensure it is still up to date with the PayPal-related changes.
Pedro‘s e-mail inbox pings and he gets notified about the test cases to be reviewed. Luckily he has spare time on his hands so he goes on to read through the updated test cases and the requirements verified by them. He approves the test cases as ready and marks the requirements as covered.
Test execution planning, week 7: Feb 15, 2019
Pedro knows about Liana’s and Dean’s plans to test the changes in one go at acceptance testing. He starts to think about the test runs needed for the testing and adds the “Milestone 2 Acceptance tests” test set with a list of test cases to verify that the Shopping Cart still works with the PayPal payment option included.
By using the test set added Pedro adds a new test run “Milestone 2 acceptance run“, and assigns it to Liana due to be run between the 18th and 20th of February.
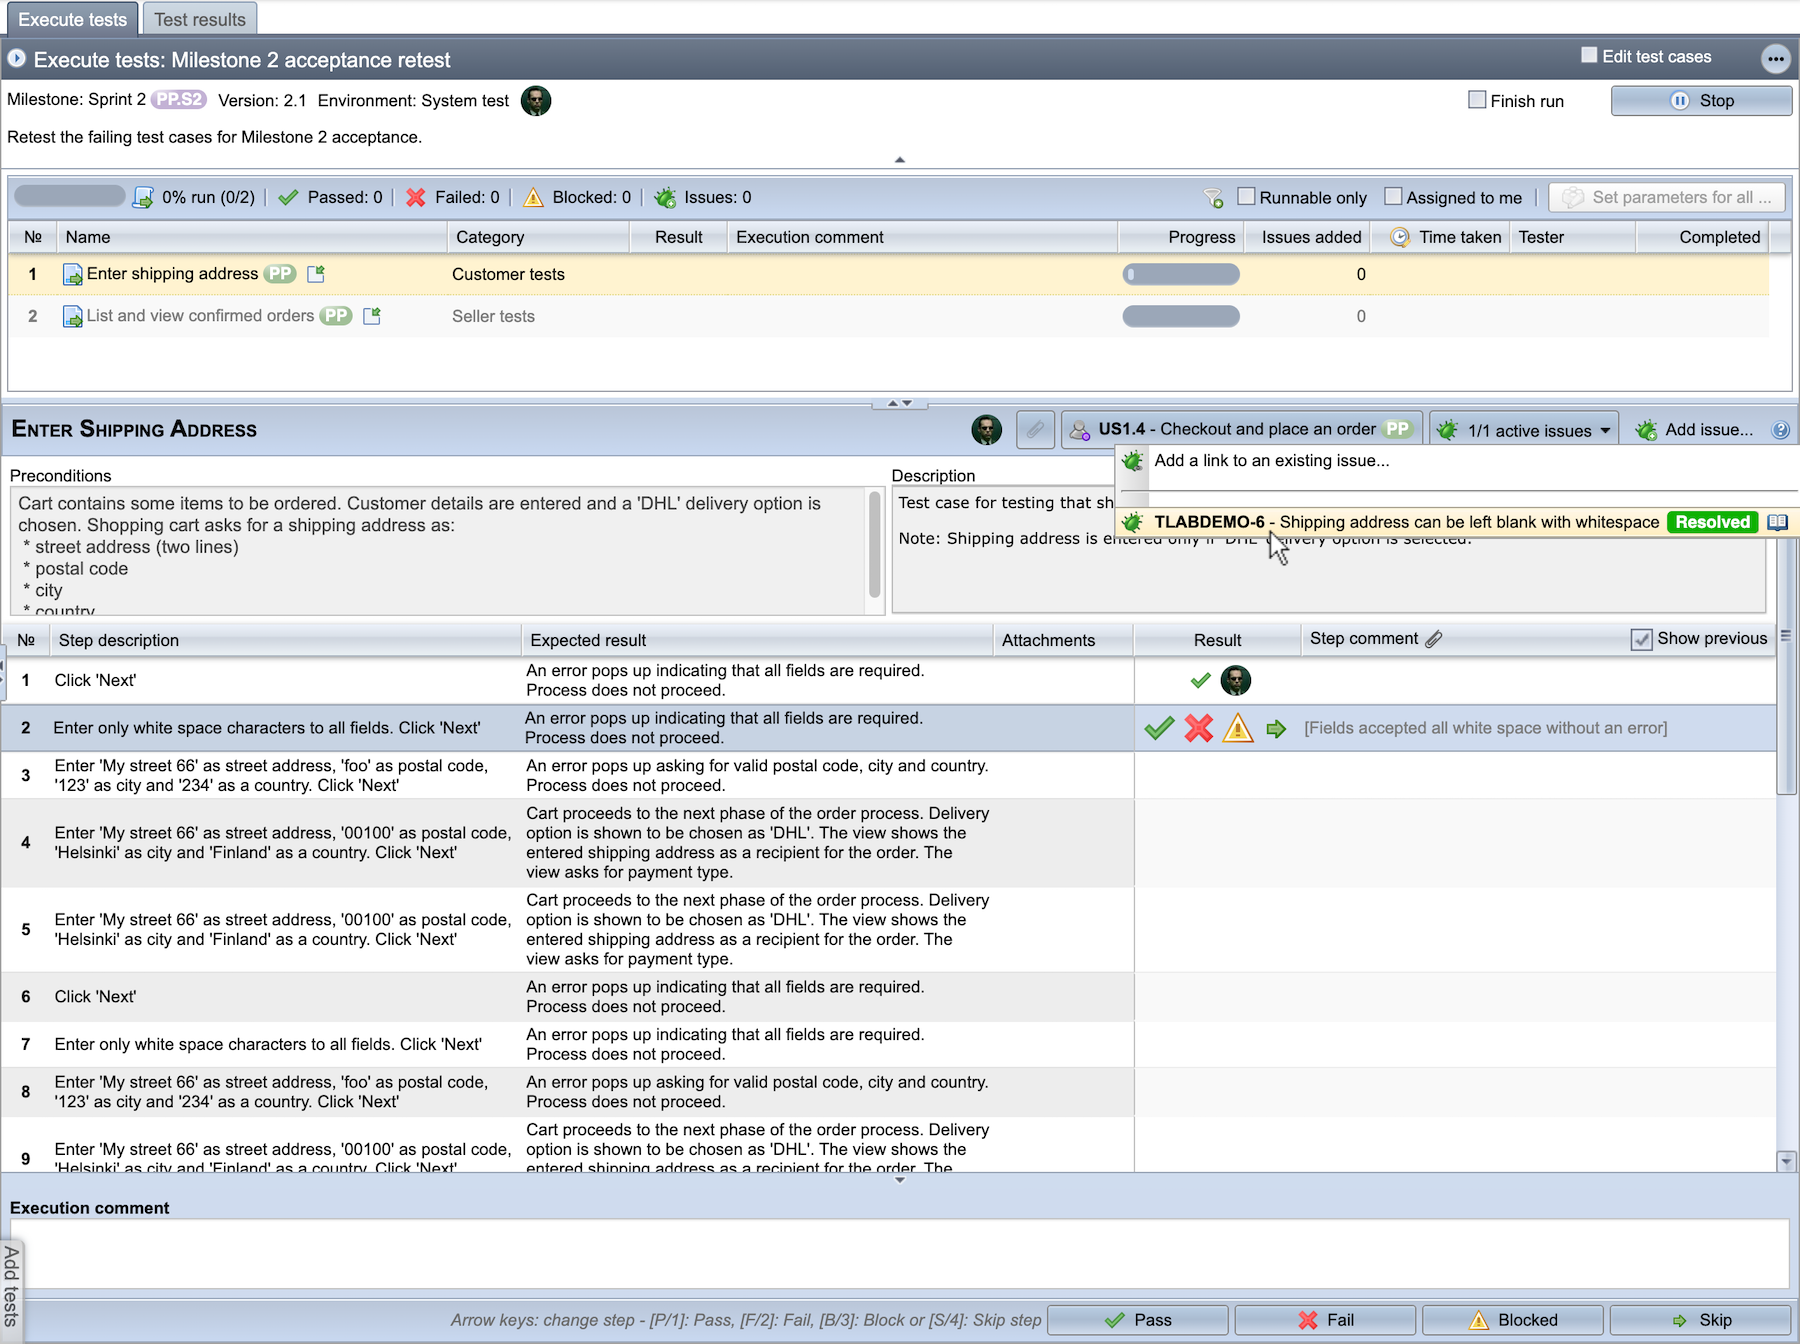
Acceptance testing, fixing issues, and planning re-test, week 8-9: Feb 18 – Feb 26, 2019

Pick test cases to be executed based on previous test results
Often it is best to execute test cases, that most likely find new issues first – those test cases that have not passed successfully the last time, or on a certain test round, were executed. To pick test cases based on certain milestone results, do the following:
- Go to the “Execution planning”
- Select a test set that contains a selection of interesting tests. For example, pick “Milestone 2 Acceptance tests” from the “Test sets” tree. The test set opens up to the editor on the right.
- Click “Test cases” on the left to open up the tree of test cases. Below the tree, click the “For Milestone” box to open the control that picks test results for the selected milestone.
- By default, Testlab hides completed Milestones here. Now, we want to follow the story and see “Milestone 2”. To do that, click “Show completed” and then select “Milestone 2”
Now, in the test set editor, you can see test results – represented with icons before the name of the test – like they were executed for your test set on Milestone 2. You could easily pick new and previously failed test cases to be run from this set and add them as a new test run to be executed.

Testlab offers you a set of tools to help you in planning the test runs for re-testing.
Dean, Pedro, and Liana meet up and agree that everything is in place for acceptance testing. On Monday the 18th Liana starts testing. She works hard for a few days and finds that some issues are present in the application. Liana adds her findings to Testlab as issues and assigns them to Dean. The handling of the shipping address for the order has some regression compared to the previous version and PayPal paid orders payment identifiers are missing from Boris’ order management view.
Dean gets notified about new issues. He adds some comments to the issues, fixes them, and marks the issues as resolved. Pedro gets informed about issues in acceptance. He reports this to Victor and schedules a re-run for the test cases related to the issues to be run on Wednesday 27th of February.
Milestone 3 (C)
The third milestone is the next version of the Shopping Cart with discount-related features, including handling coupons.
Victor calls for a team meeting and together, they reflect on the successes and problems encountered in the previous milestone and its sprints. They finalize the previous sprint and move the remaining regression testing-related tasks to the new sprint C.S1. They add new tasks needed to implement the coupons-related functionality to the backlog and estimate and assign the tasks to the team members.
Requirement planning, week 9: Feb 25th, 2019
At the same time when the previous second milestone version is in its finishing stage, Victor thinks ahead and starts to plan user stories for the third milestone. He adds the third Milestone 3 [C] milestone to the project and, a new Epic “EPIC.C” and three new requirements for it: “US.C.1 – Enter coupon code for a discount“, “US.C.2 – Validate coupons” and “US.C.3 – Add new coupons“.
Automated testing: Sep 10 – Sep 17, 2019
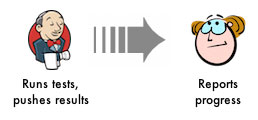
Liana has noticed that much of her testing involves repeating similar patterns. Adding more automated tests to handle the routine inputs would allow her to spend more time on refining tests instead. Liana had heard of a testing framework called Robot Framework which would allow her to create and maintain automated tests easily. Even better, Meliora Testlab reads the test results allowing the same operations for automated tests as for manual ones. The output of test results is elaborate enough for Pedro and Dean to easily understand what the tests do. Dean gets super excited about this plan as it means the tests can be run right after each software build automatically, which in turn means the problems will be found right away – not just after the manual regression testing phase.
Liana goes through the manual regression test cases and picks the ones that are most suitable for automation. She values the ones that are generally executed always the same way, tests that are executed most often, and the ones that are most important. When Liana has created her first automated tests that run well, she creates a ruleset Bookstore ruleset to Testlab and adds an Add and Map – rule, that will import all test results by mapping them to Testlab test cases, creating new test cases when necessary. This allows her to import test results to Testlab right away when she is still developing the tests.
Examine test automation results
In Testlab, you can view automated test results, modify import rules, and import automated test results in the “Test automation view”. Let’s take a look:
- Click “Test automation” on the left bar to open the view.
- On the top left pane, click “Bookstore tests” to open Liana’s test results into view. On the bottom-left part of the screen, you see automated test results for imported test cases, and on the right history- and summary data.
- To see how automation rules are presented in Testlab, click the “Automation rules” tab on the top part of the UI.
- On the top left, you see saved rulesets. Click “Bookstore ruleset” to see how rules are set in this demo project.
- Below the rulesets, you see rules for the selected set. Now you see here how Liana has set the rules for her tests.
- In the middle part of the UI, you see the latest imported test result files – the ones generated by the test automation tool. You could drag & drop your own files here to import test results.
- Below the middle part, you see the button “Apply rules”. Click it ( it doesn’t save the results yet ).
- On the right part of the UI, you see how you would see the test results in Testlab if you would save them.
- If you push your results from a CI tool like Jenkins, this part can be made automatically.
Later on, Liana adjusts the ruleset by ignoring a test she knows does not currently work. She also wants to organize her tests a bit and adds a rule that maps all tests related to ordering products to a single test case named Complete Order. She also adds another ignore rule, ignoring those tests so they won’t get mapped twice. When Liana runs the tests using her automation tool she just drags & drops the test result file to Testlab. Now, using the newly created rules Testlab gets the results and adds the test cases to Testlab. Liana then updates the requirement verification situation for the new automated test cases so that she will be able to see what effect test execution has on the requirements.
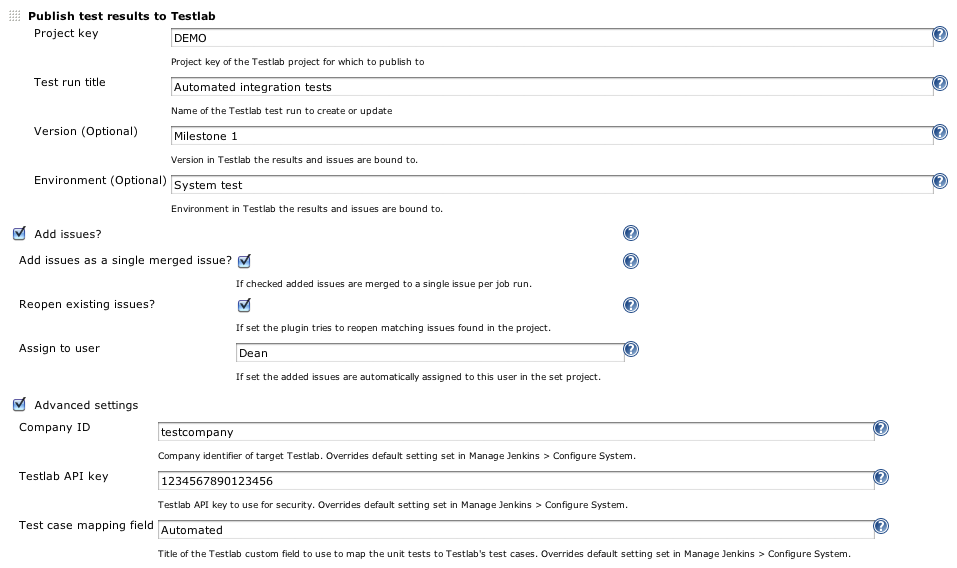
Testlab can be integrated into the Jenkins CI server to push tests of automated tests directly to your project. The results of the mapped test cases can be seamlessly integrated into the reporting of your testing project.
Where are we now
The first milestone with basic Shopping Cart features is happily in production and customers can now enjoy themselves more by shopping the books Boris is selling. The second version with PayPal-enabled payments had some issues which are fixed and a re-test test run is scheduled for it but it is not yet tested. The third milestone with coupons has been started with requirement planning. Automatic tests have been run and results imported into the Testlab. The task board for the latest sprint (C.S1) has tasks, some are done and some still need to be finished.
What to look for in Testlab
This section contains some additional pointers on what to look for in the Testlab project. We recommend that you log on to the Demo project in your Testlab and follow the steps explained here to help you familiarize yourself with the concepts in Testlab.
Finding out the status of the project
For a single test run
For a single test run the status of the testing is seen by going to the “Test execution” view and choosing the “Test results” tab. The pane below lists all test cases run in the test run, the results for them, and some additional details. You can expand each row to show a result card of an individual test case. To drill down into issues found for each test case you can click the value on the “Issues added” column. On the right, you also have access to some relevant statistics on the run.
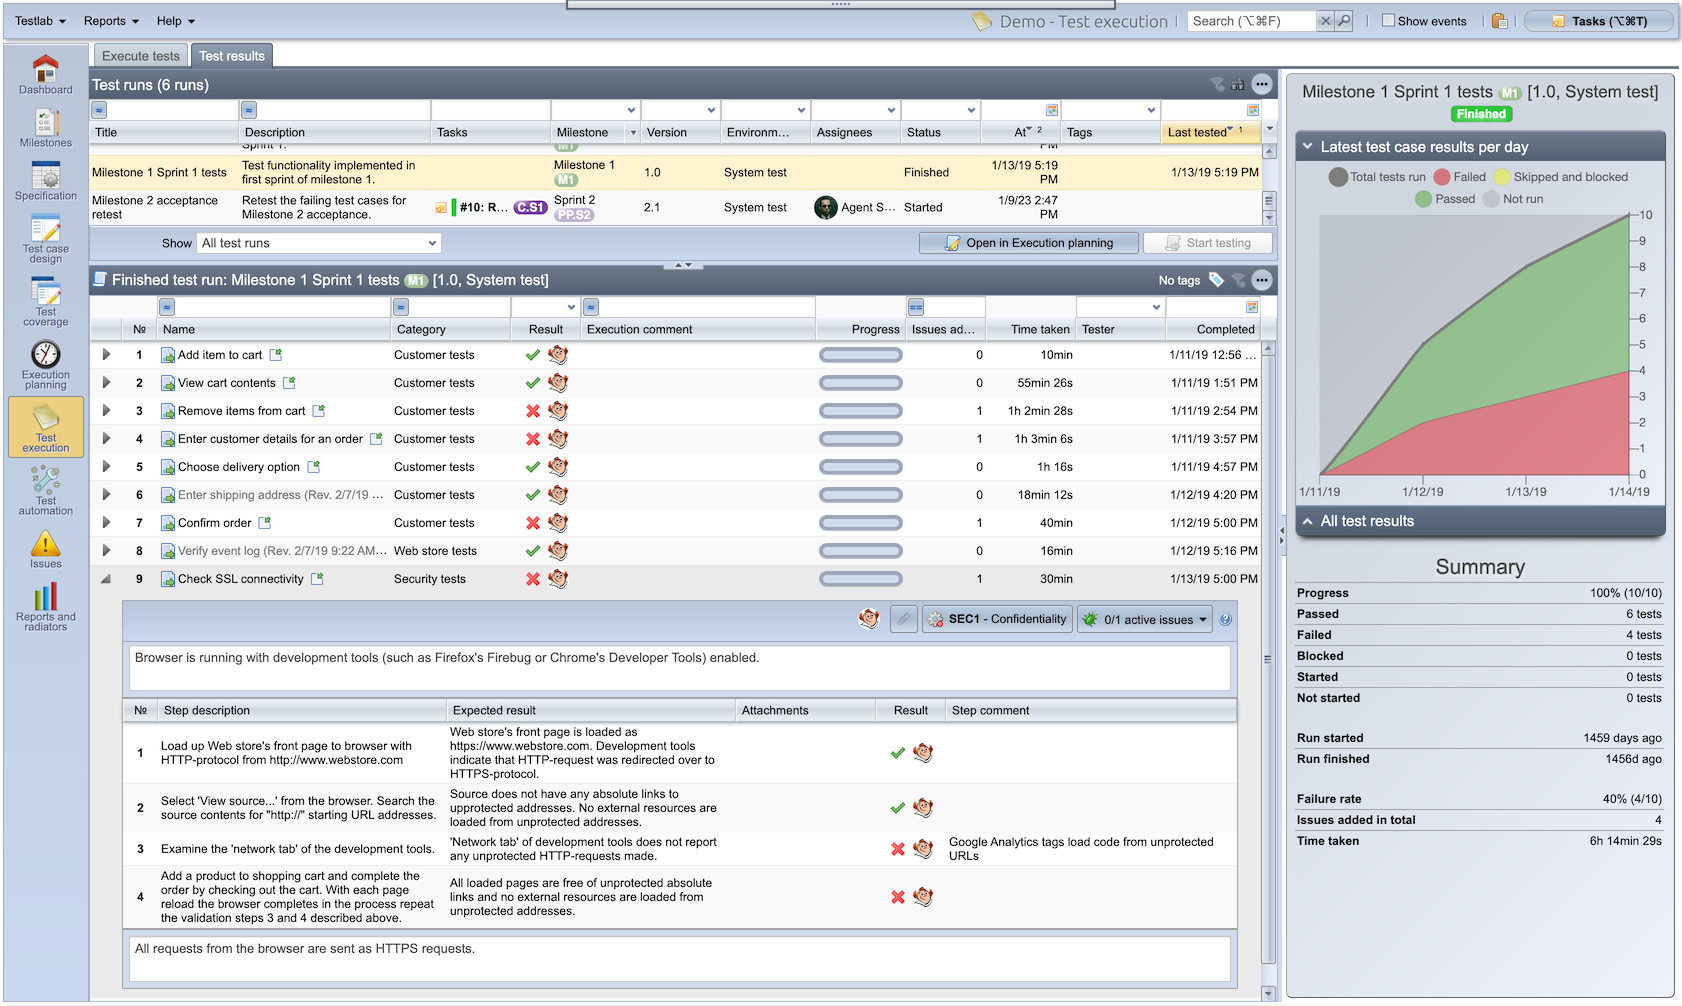
The already finished runs can be easily inspected and analyzed in Testlab. You can easily restart testing in an already finished test run if you wish.
Examining manual test results
To view previous manual tests results, you can do the following:
- Click the “Test execution” view button from the left, and choose the “Test results” tab.
- From the top, select a test run you wish to inspect.
- To view individual step results, click the grey arrow button before the test name on the test case list on the bottom right part of the UI.
- To drill down to found issues, you can click the number in the “Issues added” column.
Current status of requirements
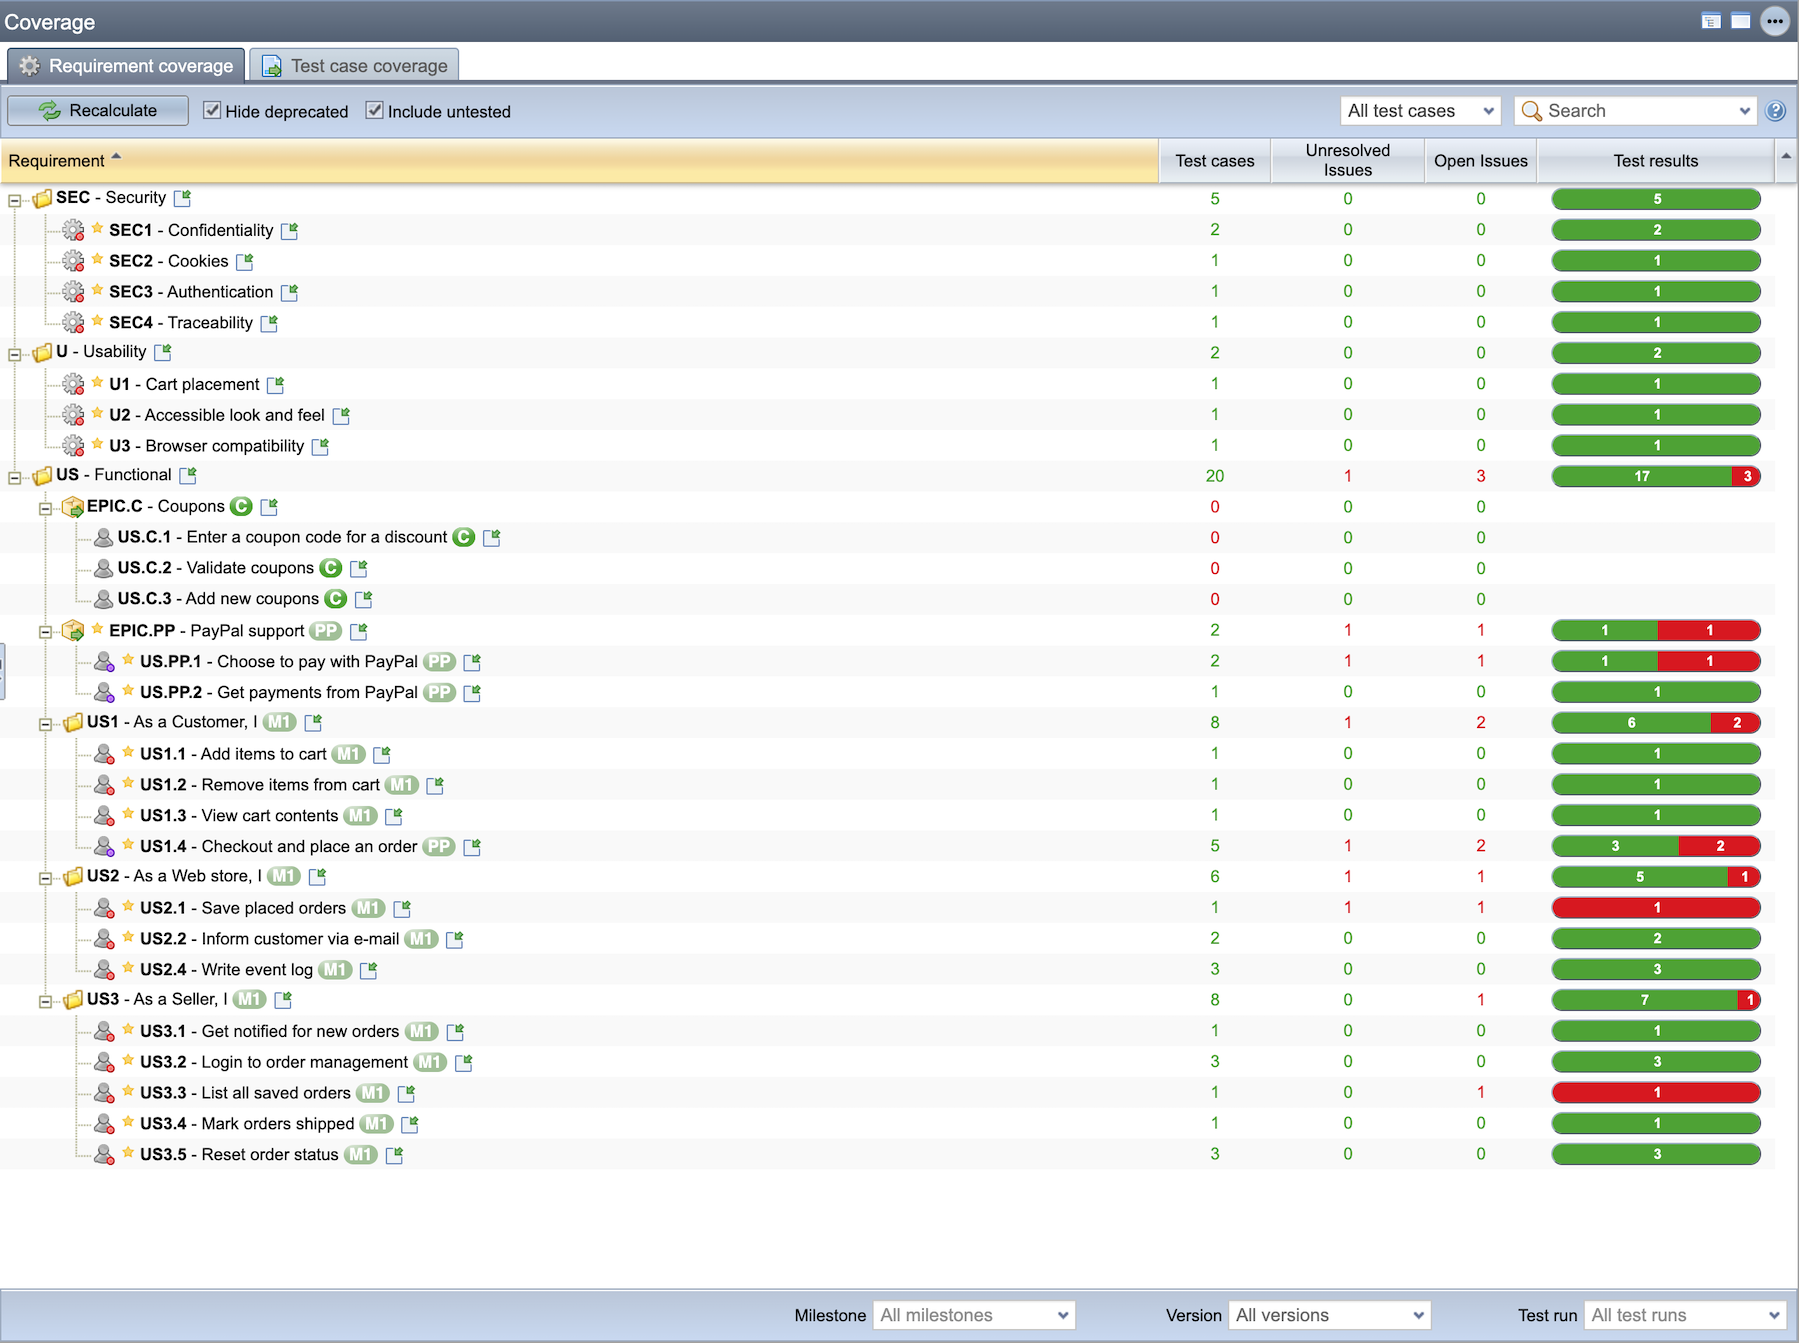
As said, the project is in the finishing stages of Milestone “PP” which has some issues with it, milestone one is accepted and successfully installed and the third milestone has just started with requirement planning. Getting an understanding of the project’s status is probably easiest achieved by looking at the Test Coverage view.
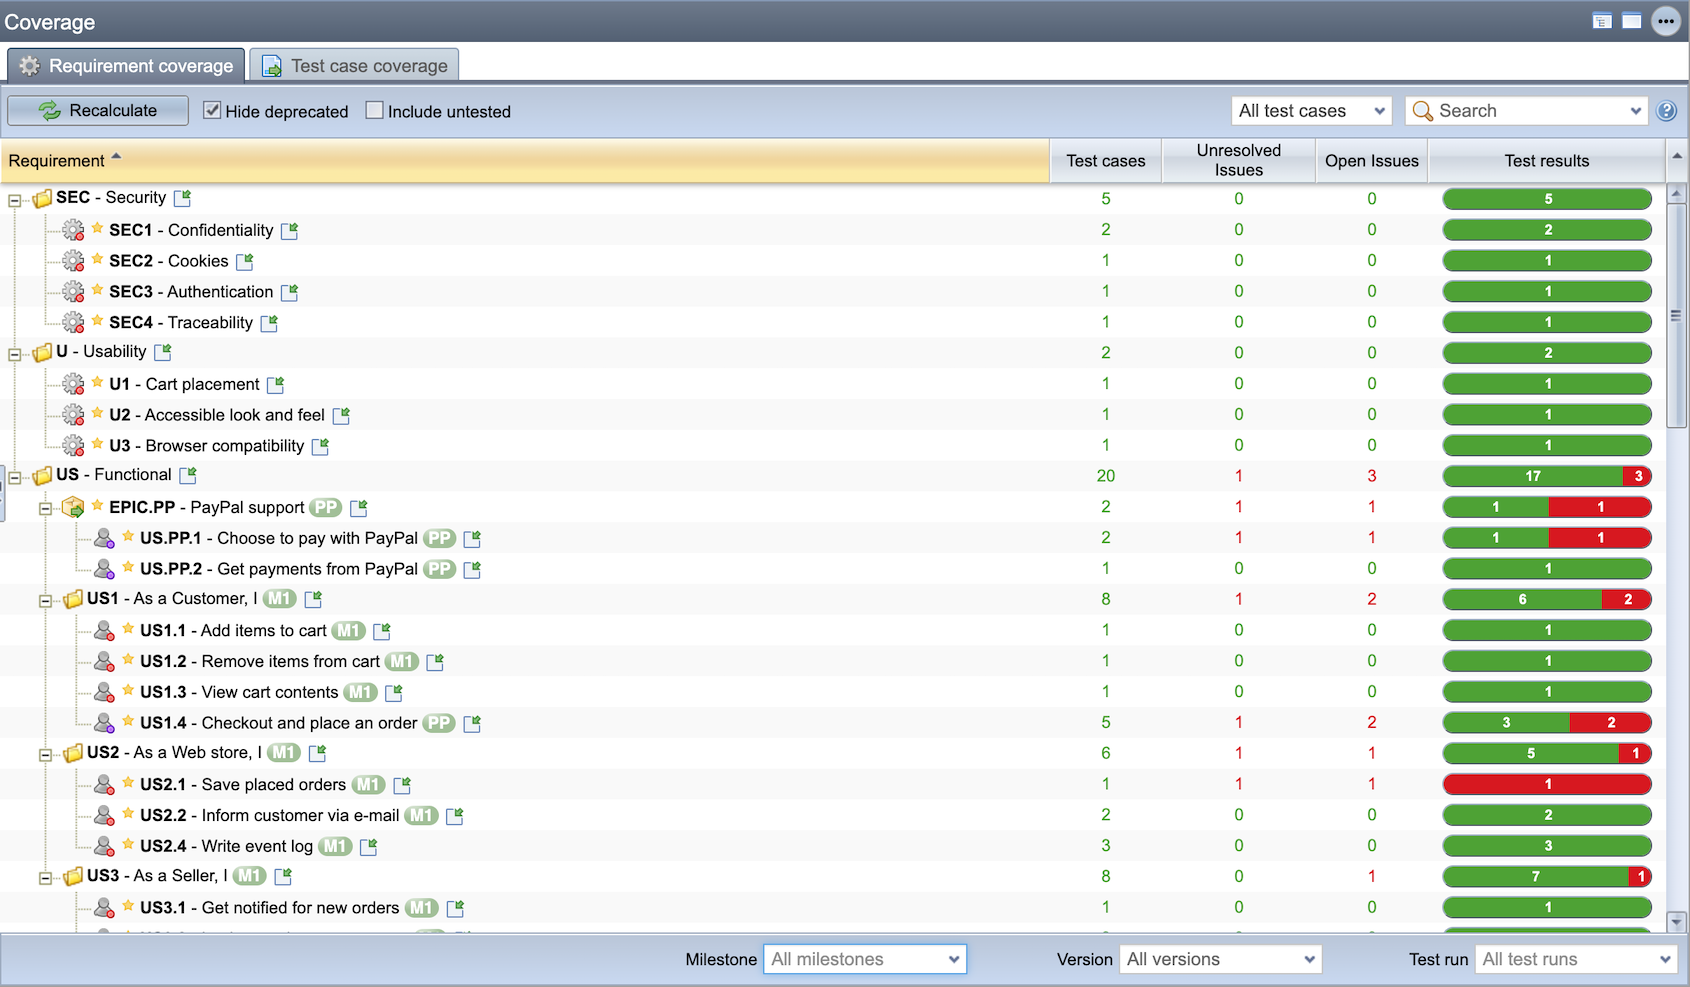
Examining requirement coverage
To view how the requirements are covered with test cases, and what is the testing status for those, you can do the following:
- Click the “Test coverage” view button from the left
- On left, you see the requirements tree and test case tree. These can be used to add links between requirements and tests. It is done by dragging a test case from the below list over the desired requirement.
- On the right, there are two tabs. “Requirement coverage” shows test results for linked tests in the Specification. Test case coverage shows test results for tests, as they are arranged in a test case tree.
- You can also drill down to the results. Just click the number on the graphs to see what they consist of.
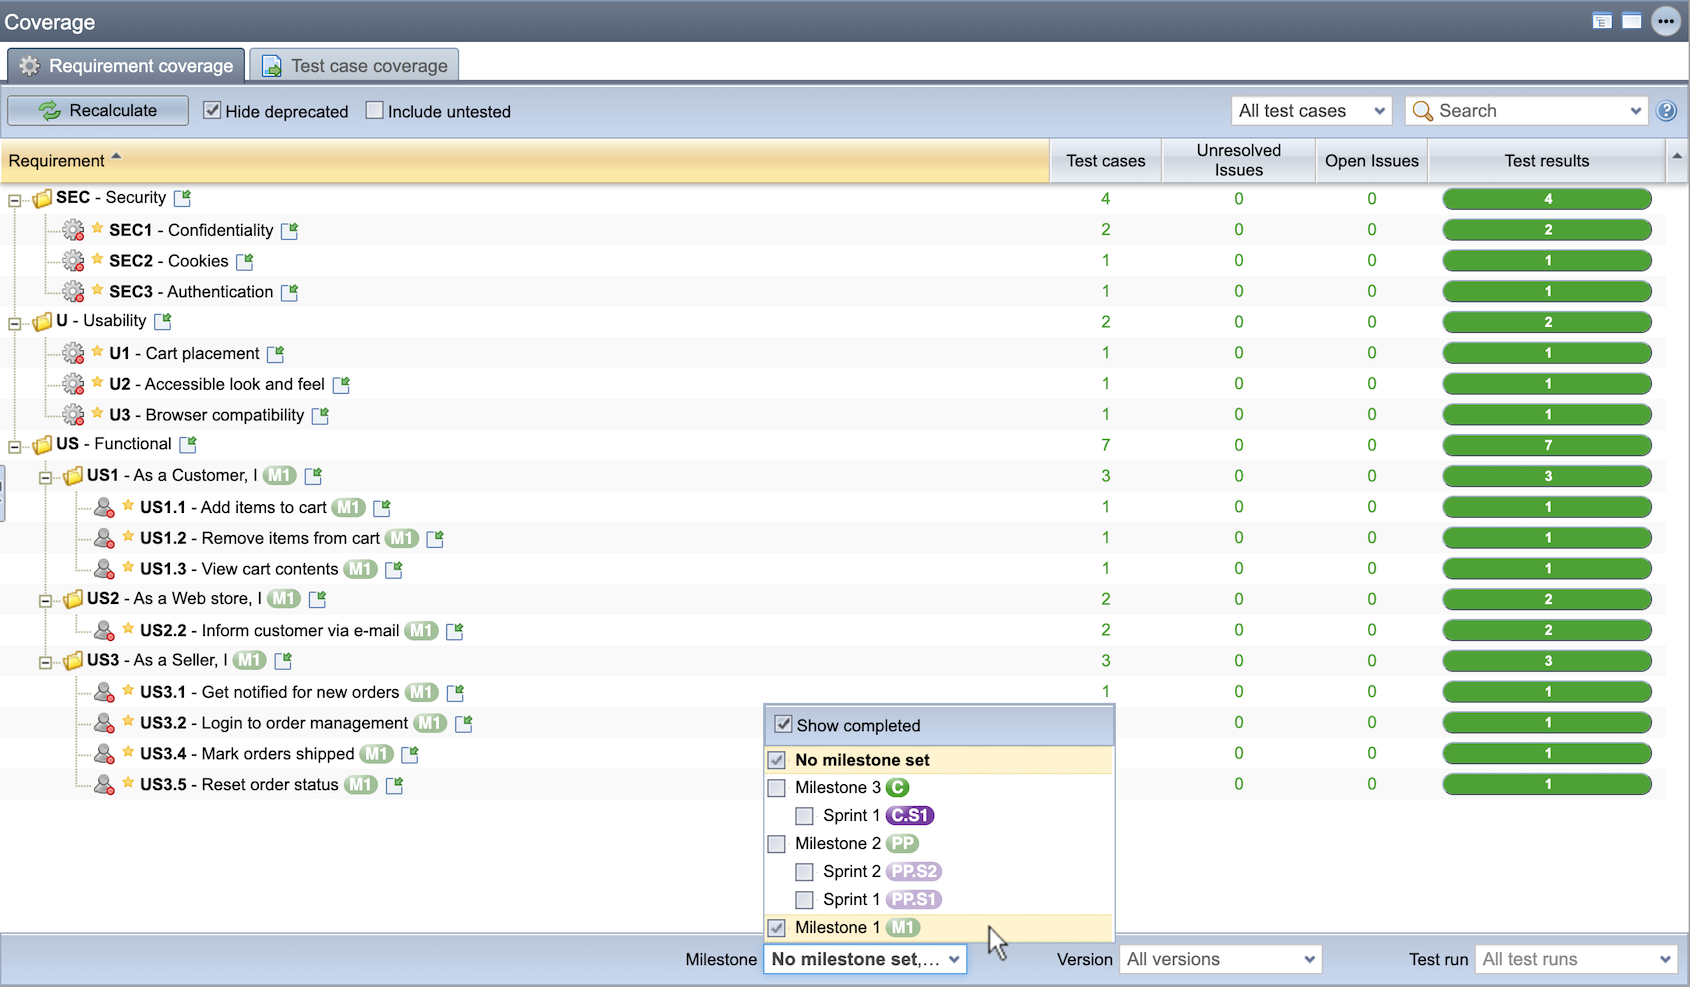
For a milestone
Go to the Test Coverage view and select a milestone. If you would like to include all non-milestone-targeted requirements, also choose “No milestone set” in the selector.
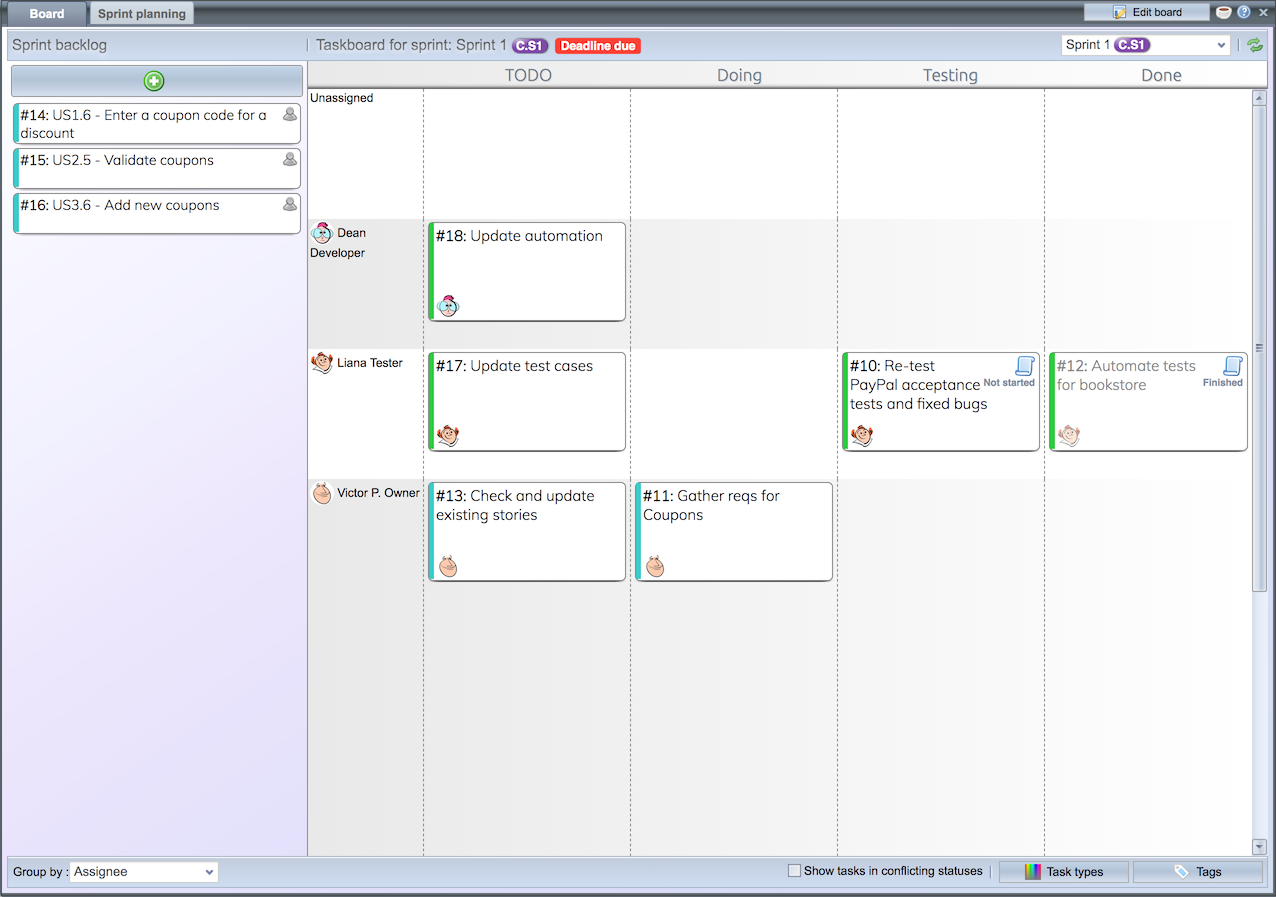
Examining the task board for a sprint
Click the “Tasks” button at the top-right corner of the view. The task management window opens up. Choose the “Board” tab to open up the taskboard view.
Reporting and sharing the testing situation
Testlab has many ways how to share information about the quality of the system under test. Testlab has a dashboard to show data, events showing on the user interface, e-mail messages sent on events, reports, dashboards, and different views.
Using radiators
Radiators are a powerful way to share information about the quality of the system under testing with the stakeholders. The radiators are commonly used in project room monitors so, that certain easily understandable visuals are always visible to all. This helps people to better understand where the project is going and helps spot deviations in the quality early on. The radiators can be configured to show exactly what you are interested in the project.

You can set up a radiator to show live-quality situations based on testing results.
Setting up radiators
Radiators are configured on the “Reports and radiators” -view.
- Click the “Reports and radiators” view button from the left
- On the bottom left, you see a list of radiators that have been set up. Click the name of one to see what the radiator looks like.
- You can edit the configuration of a radiator via the actions menu in the grid or by right-clicking the appropriate row.
- As you configure the radiator, you can set up a password for the radiator. It is needed if you set the radiator up to a standalone monitor in an unattended meeting room computer.
- When you click over a link in the radiator list you get a link to the radiator. When setting the radiator up, use this URL with the password you set up to see the radiator. No user account will be needed.
Using reports
Reports are a powerful way to find out about different quality aspects of the project. You can manage them in the “Reports and radiators” view. Each report can be configured by defining what they exactly show, who should see the reports and if you wish for example to send them by e-mail.

You can set up reports for your users in the Reports and radiators view.
Viewing reports
Look at some of the saved reports.
- On the “Reports and radiators” view there is a list of saved reports on the top left part of the UI. Select one of the reports. You will see the PDF file on the right.
- Similarly to the radiators before, you can configure the report by choosing to “Edit” it from the actions menu or, by right-clicking it. Try it out!
- You can also export reports to excel and other formats. You can find these options from the actions menu at the top right corner of the view.

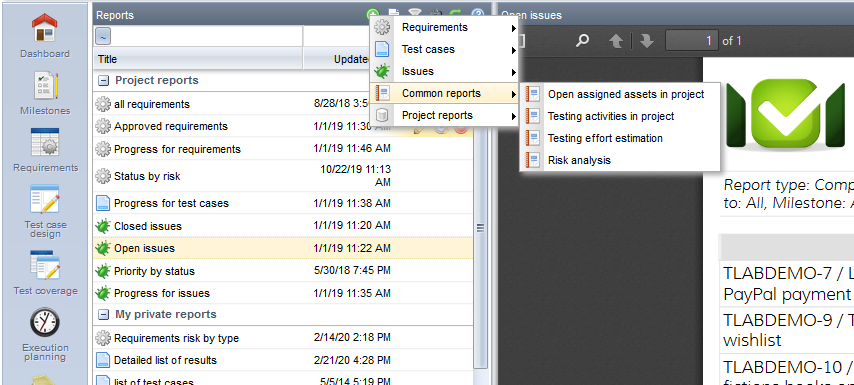
This report shows you the number of open issues per priority for a time period. This helps you to keep track of how many issues you still have to resolve and close.
Examining the issues reports
You’ll recognize the issue-related reports by the green bug icon before the name of the report in the report list. Check them out.
- Click the “Progress for issues” report to see the report
- Click the “Open issues” report to see the compact listing report for issues. You can choose which field you want to include in such a report.
You can create new reports by clicking the + -button above the report list and selecting a report template. Read the manual for descriptions for each report type.
Try creating a report!
- Click the (+) button above the report list to open a report template list
- Pick one – now choose “Issue grouping”
- Fill in the values for mandatory fields which are presented in bold formatting. For the Issue grouping report, you need to pick “Field to report” and “Group by”. These dictate how the report groups your issues. Now choose “Priority” and “Status”
- Give the report a title that tells you where you use the report. Type for example “Priority by status issue report”.
- If you do not tick “Public report” not select the audience, the report will be visible only to you. You could also choose who will see the report.
- Click save when ready. You’ll see the report right away.
On Dashboard
You can use and set up your dashboard with widgets you prefer to keep you up to date with your project.
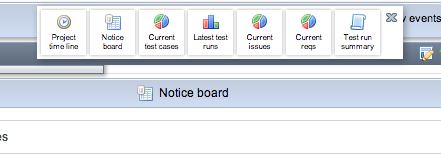
By clicking the configure view icon on your Dashboard you can set up which widgets you’d prefer on your view. You can also reorder current widgets from one slot to another by dragging and dropping.
Try it out by configuring your dashboard and dragging and dropping the “Current issues” widget to some slot. The widget you dropped shows the current issues in the project – in the case of the Shopping Cart project the few resolved issues are still to be re-tested and closed for Milestone 2. The “Project timeline” widget is also handy for a quick glance at recent events in your project.
Thank you for your attention! It should be noted that the Shopping Cart project chosen and described above is just one kind of quality-related project you can manage with Testlab. The practices and methodologies used are picked to suit a small and agile project with a distributed team. If you, for example, think that reviewing is time-consuming and unnecessary you can apply a simpler workflow for your project.