
This post is an introduction to how to bring your automation results into the Testlab tool. We also introduce options and questions relating to migration from earlier Testlab versions to the new version: Testlab – Automaton. You can read more about your migration options below.
Why bother – what is the motivation behind bringing the results into Testlab?
Before the test results are brought to Testlab, it is common to discuss the reason for doing that – why go through all the trouble? The test results most probably are already somewhere. Possibly in Jenkins, possibly in HTML report in the disk – anyway they are somewhere in a readable format. Why would you set up a system to bring the results into the Test management / ALM tool, Testlab? The most common reason for bringing the results in to test management tool is the better findability, usability, and ability to connect the test results to requirements/use cases. When the testing information is brought to everyone to see the project can work more efficiently – and thus make better decisions. Also combining the testing situation of Manual and automation testing into one view helps understand the overall quality situation better. If your test results are only on the CI tool you usually see the latest testing situation well, but you can not see what requirements/user stories they test, what they do not test, and how the situation develops over time.
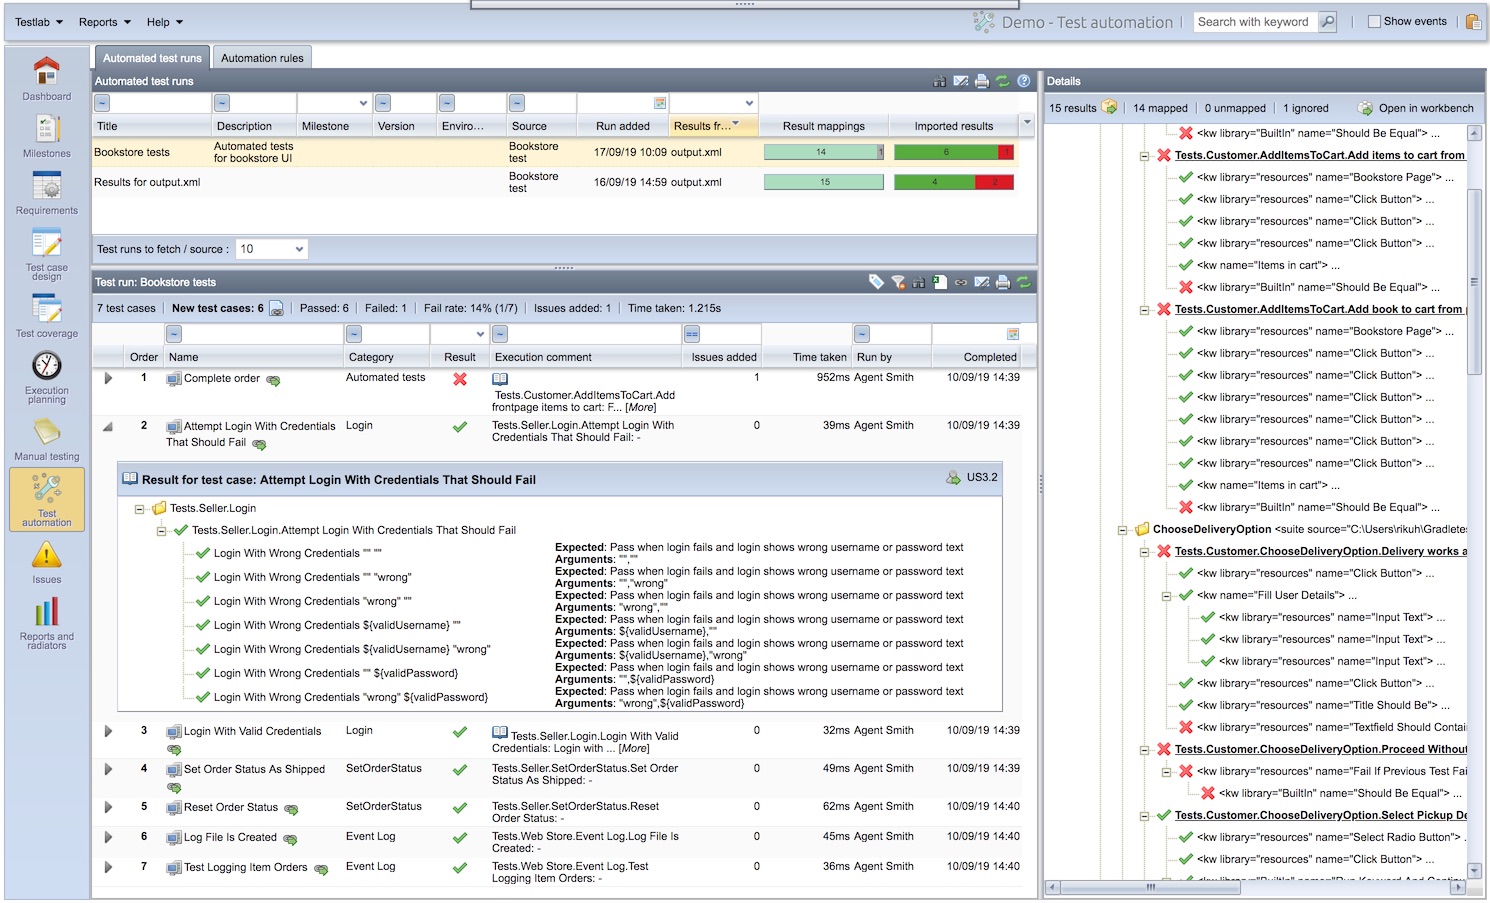
Screenshot of viewing test results in Testlab’s Test automation view
Bringing the test results to Testlab – what does it do?
If you are familiar with manual testing in Testlab, it probably helps you if we tell that you’ll be able to see similar test runs as for manual test cases, and see similar test cases for automation as for manual tests. You can use the same reports you are familiar with to report automation results as well. So this is the basic case which is only the beginning. Testlab has a rule-engine that allows you to define how you wish to see and use the test results. The reason why you want to define rules is that it will be easier for you to handle the results you get to the management tool – to communicate the project situation for example.
Central concepts of test automation
Before we hop into the details of how this test automation importing works in detail, let’s go through the central concepts and terms we use in our tool and in this article.
| Result file | The original result file that your test automation tool produced and from where you want to import results to Testlab. |
| Ruleset | Set of rules you use to handle the result file to be utilized in Testlab. If you have multiple different kinds of automated test results, you can have multiple rulesets to handle them. |
| Test run | A test run is a container in Testlab where test results are saved – very much like for manual tests. |
| Imported results | Test results in your test run that have been handled by ruleset from your result file from your test automation tool. |
| Source | As a concept, it groups test results that you wish to compare together. Jenkins job is one example of a useful source. |
| Rules | Individual rules in a ruleset that dictate how you import test results from your result files. |
| Identifier | The identifier is a unique identifier that is distinct for each test case. It consists of a folder structure and a name where the test resides in the tree. |
| Required test cases | In Testlab the test results are always saved for a test case. Thus, when importing test results, if there isn’t a test case in Testlab yet where the results would be saved, they are considered as required test cases. You can then create these test cases automatically. |
Importing my first test results
You probably have your automation tool in place already. Quite likely it is able to save the test results in xUnit XML format which is a standard for test automation tools. Testlab reads this format, as it does Robot frameworks output and TAP result files. If the tool you use does not produce any of these formats, let us know and we’ll see if we can add support for your used format. So when it comes to Testlab, the story starts from the point where you have run the tests using your automation tool and have the results in a file.
When automating testing, the tests are often launched from a CI tool like Jenkins or using some other automated method. Jenkins can be configured to send the test results to Testlab automatically after the tests have been run, or the results can be sent using an API. You can also drag and drop result files to Testlab manually from your computer so you can try how it works pretty easily.
Do it yourself!
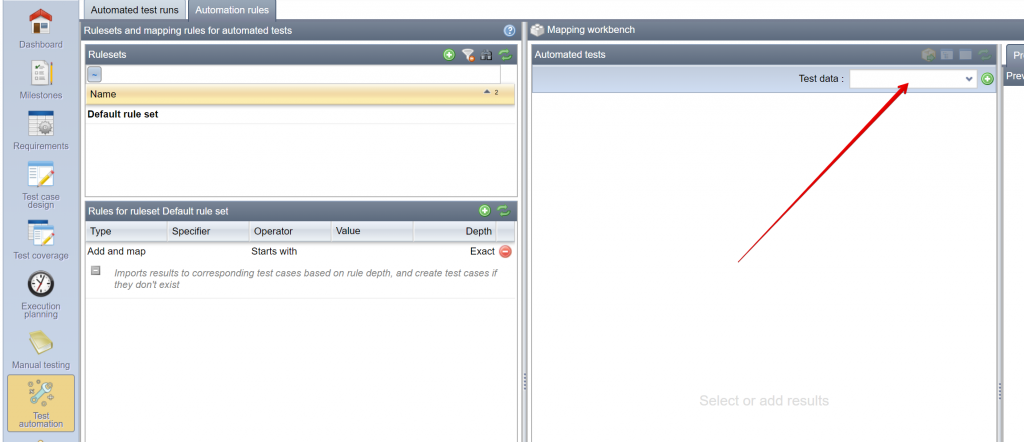
We assume you have your Result file at hand. If not, and want to try how it works, grab one from the demo project that came with your Testlab ( Instructions a bit later). In Testlab, head to “Test automation” view and select the “Automation rules” -tab. This is the place where you can define what Testlab does with your automation test results. Let’s start by creating a new ruleset for reading your automation test results. Do that by clicking the + in “Rulesets” pane.

You can use this ruleset for reading this file and similar ones you might import to Testlab later, so you should name it accordingly. Now you can call it “My ruleset” or “Mithrandir” if you wish. Another required field is the Title of the test run that will be created by default using this ruleset. It can be overwritten later, but in case you do not give it a name, this one will be used. Give it a name now, you can use for example “My results”. You can also give defaults to Milestone, Version, and Environment if you wish, and mark some tags to be added to the test run. You can also define if you wish to create issues automatically if test runs contain failing tests, and how the issues are created. Once you save your changes, you have the ruleset ready where you can add your rules.
Second thing is to import your result file into Testlab. Find it in your computer and drag & drop it to the Testlab window. You should now see your test results in raw format, and you probably recognize the test names and results from this. The test cases are not yet permanently saved to Testlab yet – you still have to decide how you wish to do that. If you don’t have your own result files but want to try it out how it works, select a preloaded result file from the demo project. The results on the demo project are already loaded into the Testlab, but you can still follow the same process. See the picture below.
The third phase is this decisionmaking. Basically you have two things to decide. What are the test cases you want to bring in, and how you want to see them in Testlab. Let’s start first with the simplest case – you wish to bring all test results in and have one test case in Testlab per original test result. We’ll go to other options and to the reasons what you might want to do them a bit later in this article. So to add a rule that gets you these test results you just need to add a rule by right-clicking over your test results (in the middle of the screen), keep the rule type as “Add and map” and click “Add a new rule”. This is the rule that gets your results in and also creates test cases automatically. It matches test cases that have identifier staring with text in “Value” box. Changing that dictates which test cases this rule picks.
Next, you need to click “Apply rules” because Testlab does not do that for yourself. You’ll see the “Preview test run” on the right part of the screen. This part of the screen shows the situation from Testlab’s point of view – what will be the name of the created test cases, test results and so on. For this case where you created one test for one, the values on the right should be really familiar for you.
The fourth and final phase is confirming what you see and saving the results. Click “Save results…” on the bottom right corner. You get a window where you can enter details for the test run to be created. The values are prefilled from the ruleset you used, so you can just click save results and have the results saved right away, or you can modify them if you wish. The title of the test run is used to distinguish different test runs, so give it a recognizable name (or go with a one inherited from ruleset if it is fit for you). The source is prefilled to be your name when importing results manually. Let’s leave the other values as they are for now – we’ll cover those later. Just click “Save results”.
How you see the results
Now you have the results in – Great! The main place to peruse the automated test results is in the “Automated test runs” tab which you should be seeing now. The top part that consists of imported test runs shows their relevant statistics. Result mappings show light green for those test cases that you have mapped and grey for those test cases you have chosen to ignore. This is what you want to see. If this bar shows pink it means there are some unmapped tests for which you probably want to add rules to map them. This can happen for example when you push results from an outside source with tight rules and somebody creates new tests that do not match the rules. For clarity – you don’t have to update the rules every time new test cases are pushed in – only when the existing rules do not catch them. So if you create new test cases with your automation tool, create a file from that and upload it to Testlab. If the identifier of the new test cases starts with the value entered, your existing rule will work just fine.
You’ll also see the test cases and their results in other parts of the Testlab user interface. If you go to test case design, you’ll find the newly created automated test cases there. You can also add additional information to these test cases like a description of the purpose of the test case or other fields to classify your test cases. You can also define which requirements/user stories the test cases verify in the “Test coverage” view. This way you’ll see the coverage status for your requirements. To try it out just drag & drop test case over the requirement to mark the test case to cover the requirement. You can also use all the powerful reports to share the quality situation through automated testing.
Best practices
So now you have seen how we get test results in with a simple case. Sometimes this is exactly what you need and want, but it is also good to take heed of some of the best practices, especially if you are going to import results for a long time. When you have relevant test data organized well, it is easier for you to see the quality situation.
General practices
Classify, classify, classify! The same thing that applies to manual testing is also important for automated testing – the more Testlab knows what is the target of testing, the more relevant information you get out of it. The more relevant the information you get, the better decisions you can make. So if you have some sort of release schedule in use, create releases as milestones in Testlab and mark those Milestones to be used for test automation. This allows you to see what and how much you tested in certain milestones. The same goes for versions and environments.
Less is more: First, it feels intuitive to get all the possible automated test results to Testlab – as it has powerful reports and radiators that shows you your test execution data nicely. There is a reason for not to get all test results as they are. The reason is that we humans are bad at interpreting really huge loads of data in one go. If you would run a thousand tests every half an hour you would get 1,5 million results in a month. The detail when a certain test failed in the past is rarely that relevant in that mass. Testlab offers you a few ways to keep the data relevant for you:
- Ignore irrelevant results: This is the most straightforward – if you bring result files that have irrelevant tests for you just ignore them completely so that you never get the results in the Testlab. This might make sense for example in a case where you have test cases that your build runs but are not relevant for your project.
- Aggregate test results: You might have a huge number of small test cases that you run, and each of them runs just a small detail. In the end, you are probably interested which detail it is only when the test fails. When the test runs successfully, you are probably happy just knowing the whole group of tests we run successfully. In this case, Testlab offers the possibility to map many imported test results to one Testlab test case. The advantage of doing this is that you get a more human approachable amount of Test cases visible to your Testlab, it is easier to spot the area when something fails and if you map your requirements to the Test cases, maintaining the mapping gets a lot easier. As the test case details contain the information that imported test cases were run, you will not lose any information either. Also, if any of the imported test cases fail, the Testlab test case fails so you will not miss any fail situation.
- Save results on relevant intervals: It is not always wise to keep all the test results in Testlab. It is enough to act when something fails and know the overall situation. This holds true if you run automated tests, for example, many times a day. It is not likely that you will want to check the exact results of an individual run from the past anyway. To save the results on relevant intervals, you can overwrite the test runs in Testlab. Thus you will always import the results when the tests are run but keep only the latest. You can control this by naming conventions from for example Jenkins plugin.
Importing results from Robot framework
Testlab supports reading Robot framework own output format which enables getting a bit richer output than Xunit XML. Thus it is advised to send the results in Robot Frameworks’ own XML format instead of Xunit XML. This way you will get to see more information about what kind of test was run.
While generally, the anticipated outcome is to have Jenkins run the Robot tests, remember that you can also send the results directly to Testlab by dragging and dropping. This makes sense, especially when developing the tests and you want to share the progress to your team. Quite often the test done using Robot Framework is depicted on a high level (like usually acceptance tests are). This means you probably want to see the results in Testlab as they are in the Robot Framework. Also, the suite structure is usually well suited for Testlab usage. This means that bringing the results in is easy – try using the Add and map for all results.
Automating manual system testing
When automating system testing, you might want to consider keeping the existing manual testing tree in place and put your automated test cases in the same tree. In some cases, this makes reporting and managing requirement linking easier. You can always make the distinction between the tests using the “type” field when needed.
Migrating from the previous versions of Testlab
Compared to earlier versions of Testlab, Testlab – Automaton brings in significant changes in how the automated tests are stored in the system and presented in the user interface.
In Testlab – Automaton, test cases and test runs are typed as manual or automated. Results of manual tests are recorded to manual test runs and results of automated tests are stored to automated test runs. In the user interface, there are different views to manage and present these assets:
- “Manual testing”: This view presents all manual test runs and offers an option to execute (manual) test cases. This view is basically the view “Test runs” in the previous Testlab version.
- “Test automation”: This view shows all automated test runs and offers a mapping workbench to defined rules how the tests should be mapped when the results are imported. This is a new view of Testlab – Automaton.
You can read more about these features in the Help manual of Testlab.
Test case mapping identifiers
Earlier, test cases could be automated by defining a custom field with a value that maps to the identifier of your automated test (or part of it). In Automaton, this changes so that a custom field is not anymore necessary and all this happens under the hood. When upgrading to Automaton, you have an option to migrate all test cases which have a test identifier mapping in a custom field to Automaton-version’s “automated test case” type. The mapping identifier will be moved from the custom field to the “Automation rule value” field in the migrated automated test case. How, when and pros and cons of this, please see questions in Migration FAQ below.
Existing test automation results
If you have pushed test results from outside sources such as Jenkins, you most likely have test runs in your projects which hold results for these automated test cases. When upgrading to Automaton, you have an option to migrate all these test runs to the new model. This way the test runs will be converted to automated type and the results are shown in the new Test automation view of Testlab. How, when and pros and cons of this, please see questions in Migration FAQ below.
Migration FAQ
a) I just want to continue the using Testlab without doing anything, can I skip all this migration stuff?
Yes, you can.
The only thing you should consider is that if you have automated tests in your projects (for example, you are using Jenkins to push results in), there might be some downsides for you doing so. See question c.
b) I have only manual test cases in my projects. As far as I know, we are not using automation at the time. What should I do?
Great, you probably don’t have to do anything. The only thing we recommend is that you should make sure that you are not using automation. For example, if you know you are using Jenkins integrated to your Testlab for some projects, you most likely are using automation. You also could ask your administrator if there are any automation features in use. If it happens that you are using automation, please see the question c for your options to proceed.
c) We have automated test cases with test identifiers in our project. What are our options?
Your options are as follows:
- Continue using Testlab as you are without migrating any data
If you plan to continue pushing automated test results to your project(s), we don’t recommend this approach. If you still wish to do so, there are some downsides:- New results pushed will most likely create new test cases for your automated tests. This is because mapping via custom field value is not supported anymore and the (default) ruleset will create new test case stubs for your tests. Your old results (and test cases linked to them) will exist as expected, but you will end up with duplicate test cases for the results added via the new test automation logic. If this is to be avoided, we recommend you migrate your test cases.
- If the project has duplicate test cases for automated tests, care must be taken when reporting data to filter in relevant tests (old tests or new tests).
- The (default) ruleset will create the full depth test case tree for your automated test hierarchy. This means, that if your current automated tests are scoped to package level, the new test hierarchy will not match the old one. This means that the new tests created will need some manual work to be organized to the same hierarchy matching the old test cases.
- Migrate your automated test cases to the new rule-based system
This means that your current (ready-approved) test cases that have mapping identifiers in a custom field, will be converted to automated (typed) test cases and the mapping identifiers from the custom field will be removed. Keep in mind, that if you Jenkins is configured to create new test cases for the automated tests, after the migration, you will need to update your ruleset to also do so. By default, after the migration, the default ruleset will not create new test cases – it will only map results to your existing test cases via the “Automation rule value” field. This migration has the following benefits:
- When pushing new results, the results will be mapped to the previously existing test cases in the project.
- Reports will most likely work as they are. Only the type of the test case will be changed.
- Migrate your automated test cases to the new rule-based system and migrate your existing test results
As explained above, you have an option to migrate your test cases to the new system. Keep in mind though, that that does not automatically convert the results of these tests to the new system. You have an option to also migrate your results.
When done so, all existing test runs which have only automated test cases in them will be converted to automated test runs. All test runs which have manual tests in them will be left unconverted. After the migration, manual test runs will be found in the “Manual testing” view and automated test results will be found in the “Test automation” view. This conversion has the benefit of migrating the data to the format of the new system so that the current and all the future features tied to the automated test runs will also work with your old result data.
d) We prefer not to migrate anything but continue using Testlab. Is there still something I have to do for automation to work?
The old way of mapping test identifiers via custom fields is not supported anymore and the API where the results are pushed in has changed. Because of this, in minimum
- If you are using Jenkins, you must update your Testlab Jenkins plugin and reconfigure it. In earlier versions of Testlab, there are various settings in Jenkins Plugin’s side that have been moved to the settings of a ruleset. Please refer to Testlab’s documentation on how to manage rulesets and it’s settings.
- If you have some custom code pushing results via Testlab’s REST API, you most likely need to update your integration to work with Testlab’s rulesets.
Please see the question c for any downsides you might have by skipping the migration of your existing automated test cases.
e) We are using Testlab as a Service and I would like to migrate. What do I do?
You should read these questions thoroughly and plan your migration with the administrative user (and persons responsible for the projects in your Testlab) and decide which projects you want to migrate to your installation. You will also have to check which custom field(s) you are using to map the automated tests.
When you know
- which projects to migrate and
- what is the title of the custom field used to map the automated tests in each project,
please submit a ticket to Meliora’s support and ask for the migration of your data. Please note that we will not automatically migrate any of your data and you need to submit a ticket for this to happen.
f) We have an on-premise installation of Testlab. How do we migrate the data when we upgrade to Testlab – Automaton?
You should read these questions thoroughly and plan your migration with the administrative user (and persons responsible for the projects in your Testlab) and decide which projects you want to migrate to your installation. You will also have to check which custom field(s) you are using to map the automated tests.
When you know
- which projects to migrate and
- what is the title of the custom field used to map the automated tests in each project,
you can use the migration scripts provided in the upgrade package to migrate each project. Information on how to (technically) run these scripts after the upgrade of the Testlab is included in the additional notes inside the upgrade package.
g) I have questions and need help deciding, what do I do?
Please contact Meliora’s support and just ask, we are happy to help!
Meliora Testlab Team