
The Team at Meliora is proud to announce the next feature release of Testlab. This release is a major one introducing a new concept – testing in the workspace – and a significant feature to improve exploratory efforts: live-editing of test cases while testing.
Please read more about these new features below.
New concept: Testing in the workspace
Sometimes it is best to do testing that is not so comprehensively pre-planned – such as exploratory testing or testing some aspects of features that have not been verified by test cases yet – you might want to just start testing and document the testing as you go. For this, a new concept in Testlab has been introduced. The workspace.
The test cases in your project (and in the tree of tests in the UI) are now divided in two:
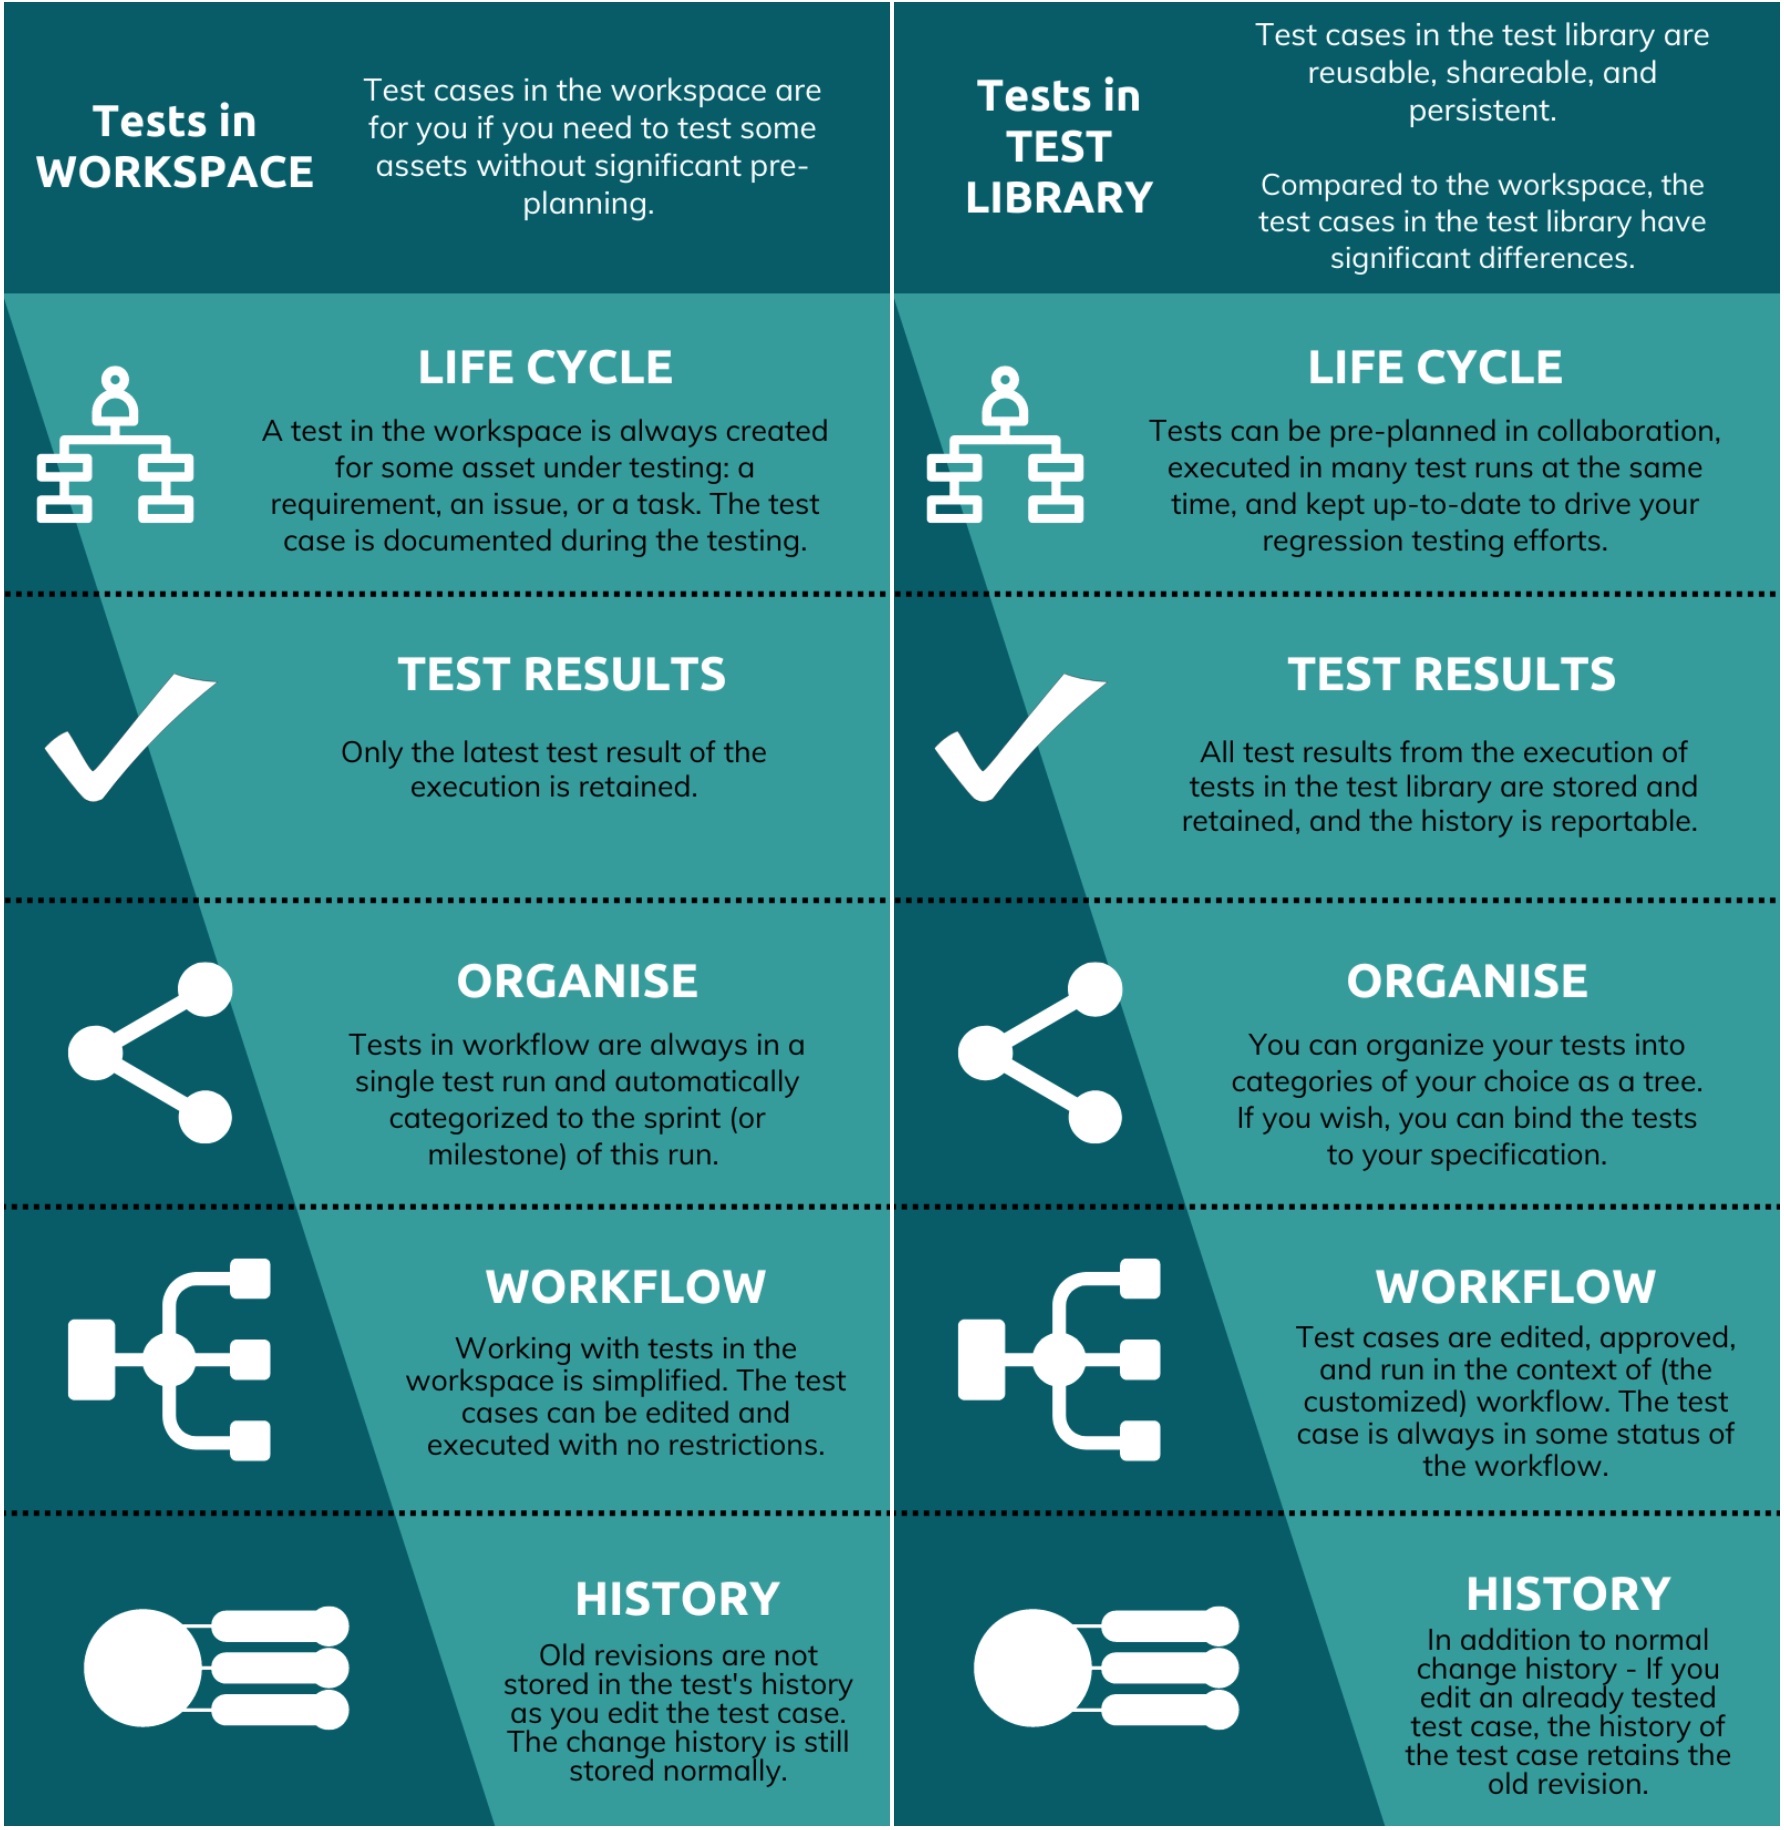
- The test library: The test library contains your test cases organized into a test category tree. You should think of the test library as a place for your tests where they are considered as shared between your team and (most often at least) usable as they are in regression testing.
- The workspace: The workspace contains user-owned tests always automatically organized to a sprint (or a milestone). As you begin testing some asset – a requirement, issue, or task – a test case is automatically created for you to the workspace (please see Easier testing of “things” below).
The tests in the library and in the workspace have significant differences and a brief summary of them can be found in the infographic on the right.
Note: All your existing test cases in Testlab are now in the library. You can find them under the “Test library” root of the test case tree. As you continue using Testlab, you can continue using Testlab as before by using the tests from your library.
Test cases in the workspace
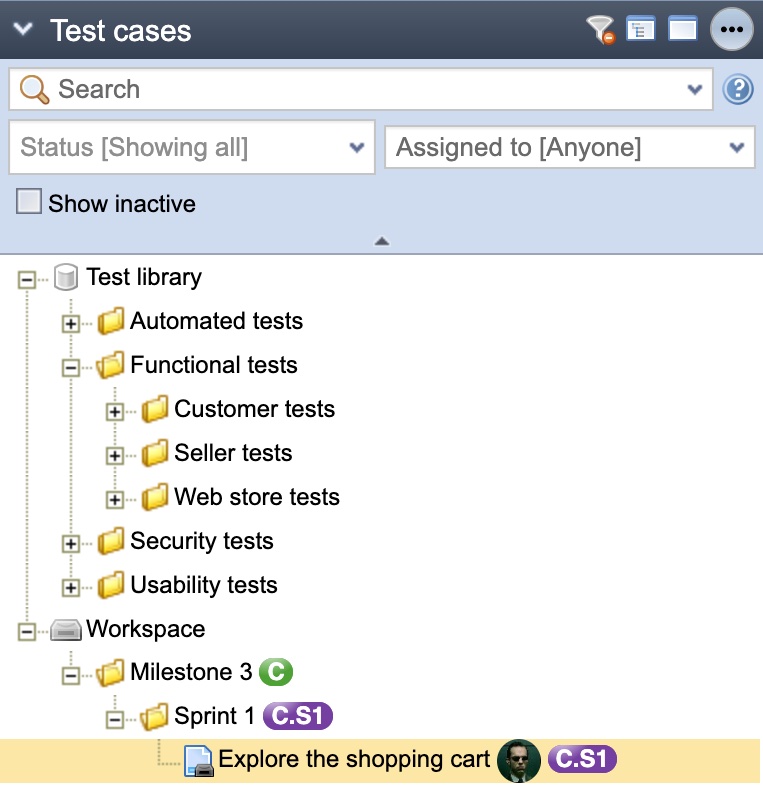
As said, the test cases in your project have been divided into two root folders. In the library, as before, you can freely design the hierarchy of test categories for your tests.
In the workspace, you are presented with all workspace test cases organized by the sprint where they have been tested the last time. Please note that you don’t – and cannot – create any categories under the workspace. It is always automatically created and only shows the sprints and milestones where workspace tests have been tested, and the sprints and milestones are not marked as completed yet.
The tests in the workspace have some distinctive differences in the UI: The test cases are always shown with an avatar (or initials) of the user who currently owns it. The tests also have a distinct icon representing that the workspace is currently in the workspace.
Please note that the workspace is public in your project. Even though the tests have an owner every user in your project will see all the tests in the workspace.
Moving tests to the library
If you are satisfied with the documentation of your tests as you test them in the workspace, you should move them to the test library for everyone to use. As you do this, you should choose a fitting test category for it. You can move tests from the workspace to the test library by cutting and pasting them in the test case tree or with the “Move to library…” feature found in the test case design view.
Changes to the API
As test cases are now divided into the library and the workspace as explained earlier, the model in the REST API has been enhanced to support these two kinds of tests. The API itself is compatible with the earlier versions but new attributes might be present. If this should affect you, please check the /api -documentation in your instance.
Easier testing of “things”
 In Testlab,
- the specification – or requirements in it – tells how the system you are testing and developing should work,
- issues point out possible problems you currently have, or, define improvements you should do in the future, and
- tasks are used to track the things your team is currently working on.
Often you plan your testing on the content of these things – or assets in Testlab. Testing these should be as easy and intuitive as possible.
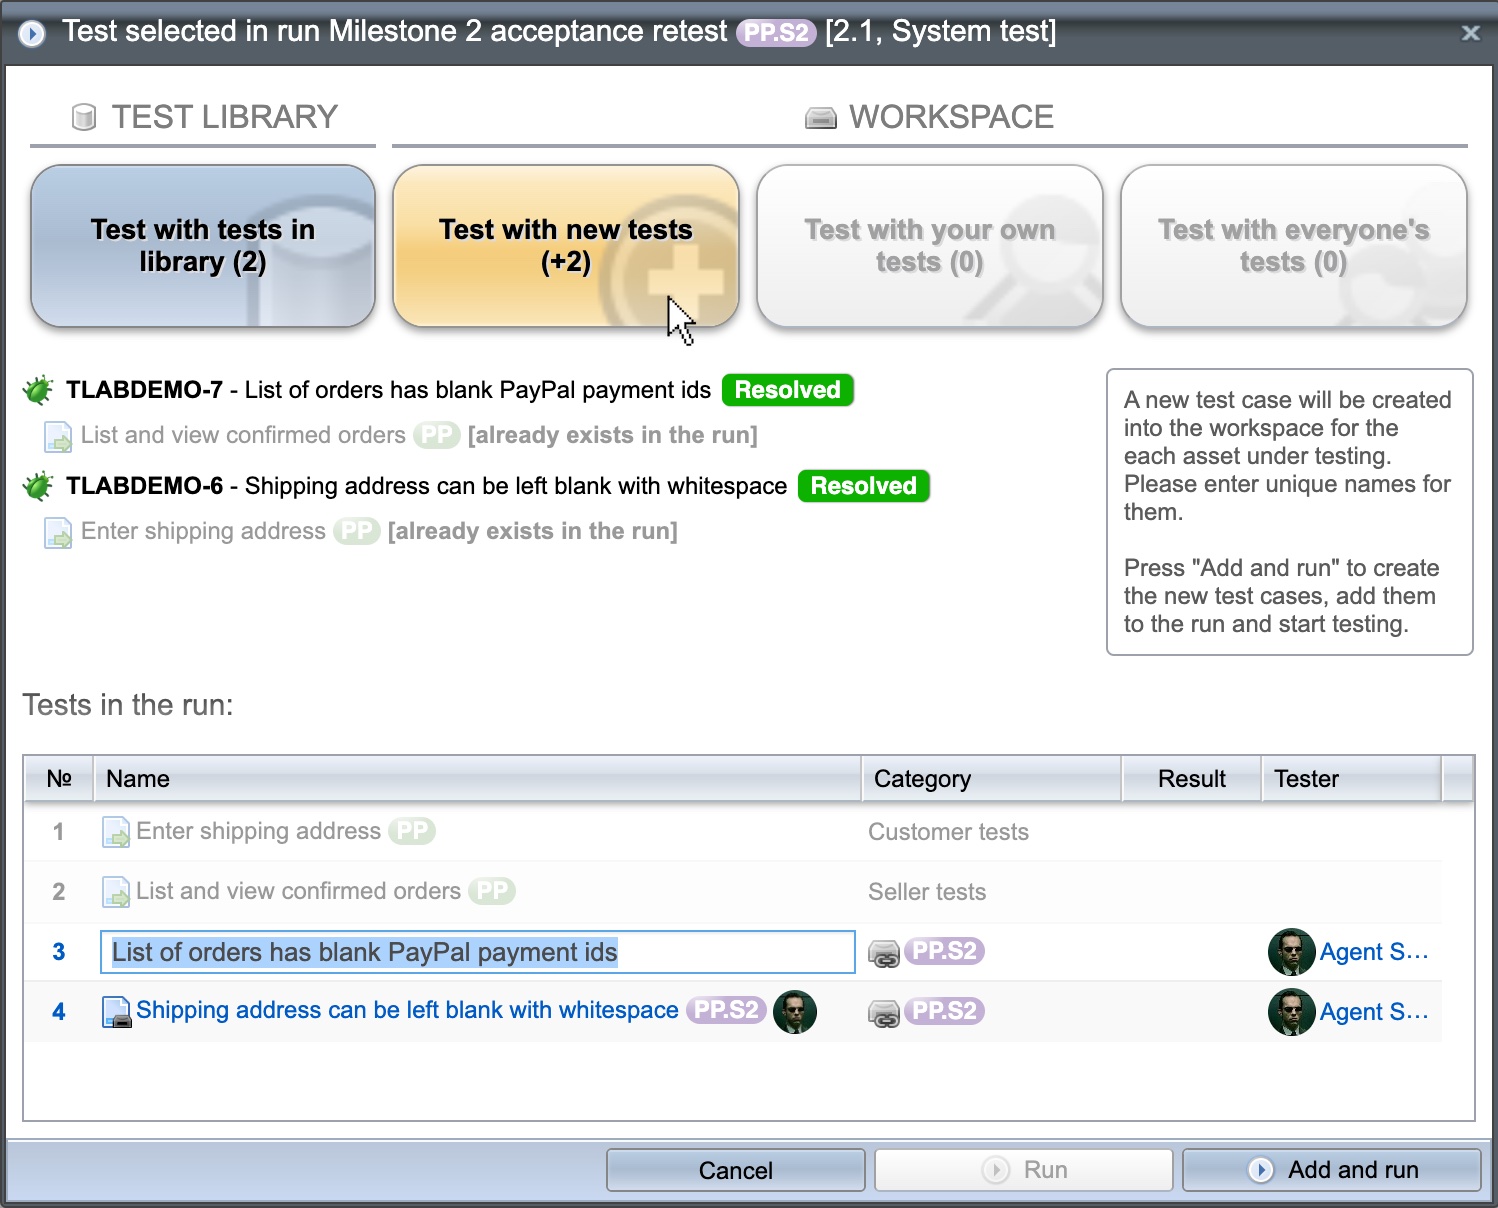
For all the above assets a new feature has been added. You can find the “Test this…” feature from the applicable trees in the UI and when viewing or editing a single asset. As you wish to test an asset (or assets), you now have an option to
- test with the linked test cases from your test library,
- create new tests for the testable assets and start testing it while designing the test case,
- test with your already existing workspace tests ( and possibly improve the test at the same time ).
Execution planning

As in the earlier versions, the tests are always executed in a test run. As tests in library and test in workspace are often used in different situations you now have chance to choose which ones you wish to use to test your chosen thing. As you drag and drop things to test on your run, you are now presented with a choice on how you wish to test the dropped assets.
If you test with test cases from the test library the choice is clear: As before, the tests are just added to the run. If you wish to test requirements from your specification, you can test them with your existing verifying tests from the library or, you can choose to test them in the workspace (with new tests or with the existing tests in the workspace, if any).
The future release of Testlab will provide additional picker components that allow you to pick issues and tasks directly from this view.
Test results tab
For requirements in the specification, issues, and tasks, a new tab named “Test results” is added. On this tab, the executed (or planned) tests linked to these assets are shown.
The tab is identical to the “Execution history” tab Testlab had earlier. For the sake of simplicity, the “Execution history” tab in the test case design view has also been renamed as “Test results”.
Editing test cases while testing
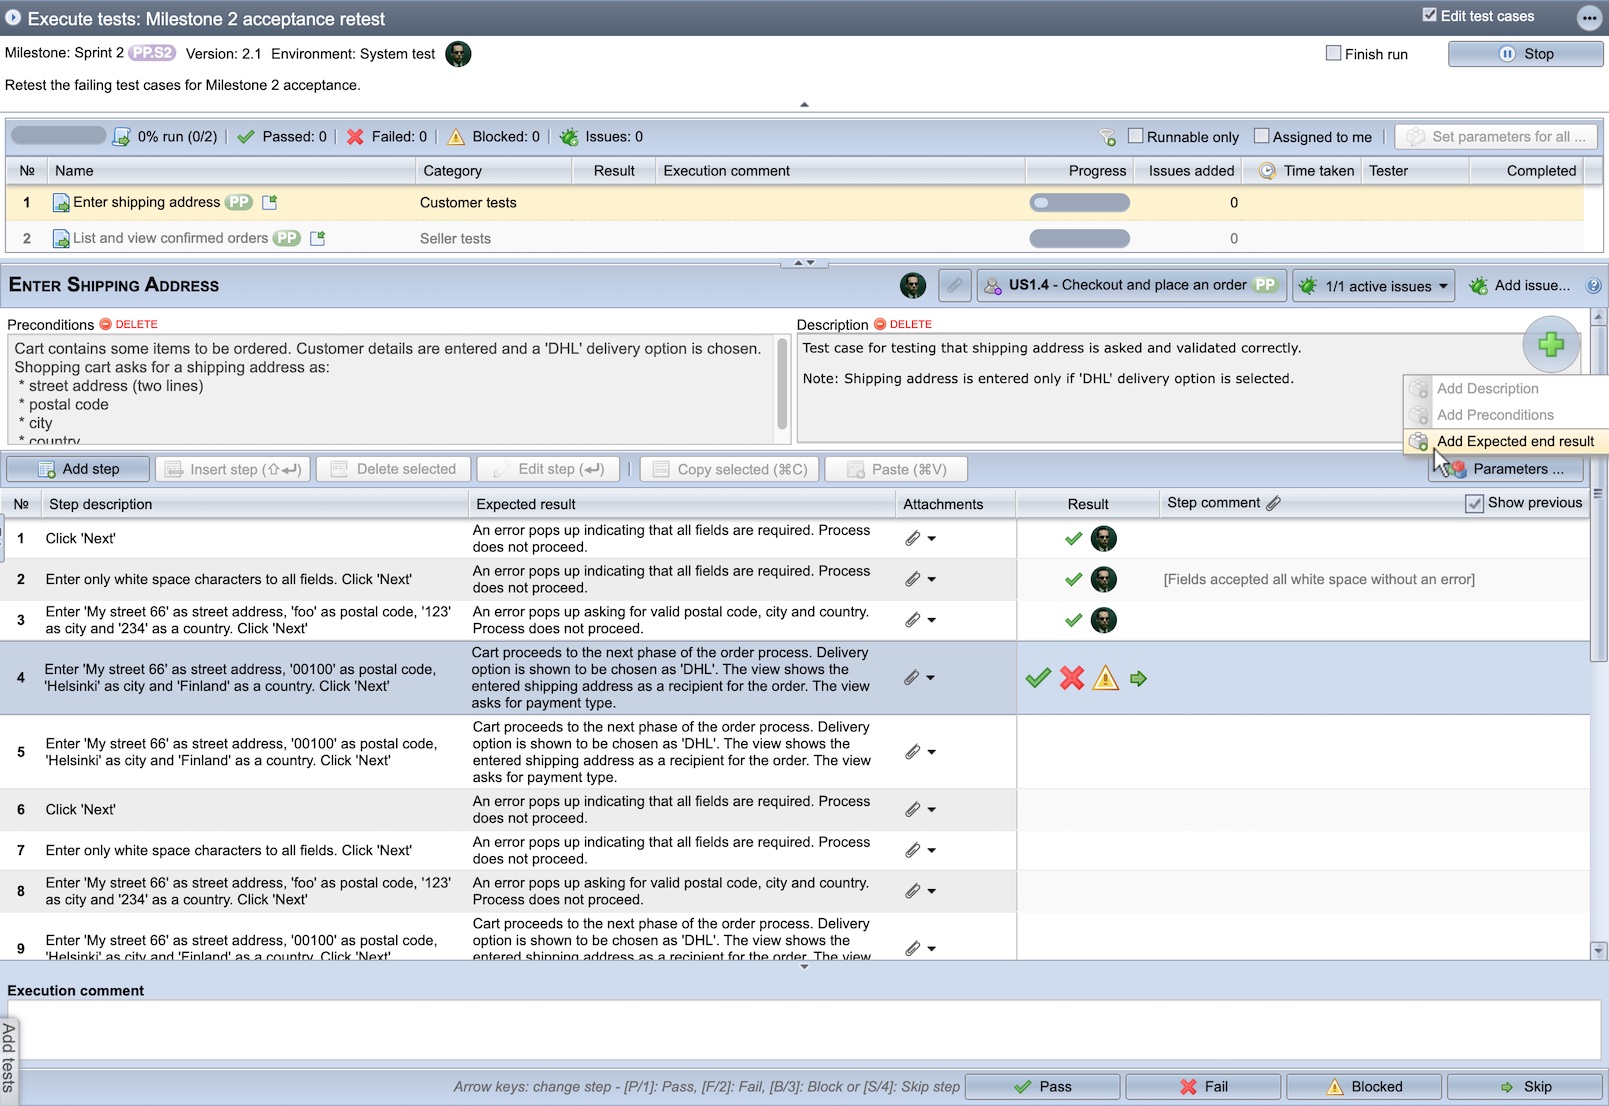
As you test with your test cases in the Test execution view, you now have the option to edit the test case while testing it. This mode is enabled by checking the “Edit test cases” option at the top (if you have appropriate permissions to do so).
The editing of test cases is especially handy when you working with test cases in the workspace. This offers you various options to do exploratory testing as you can document your exploratory findings as you go.
The live-editing of test cases is supported as follows:
- You can click the name of the test case to change it.
- The preconditions, description, and expected end result of the test case can be edited. Please note that these fields are present and shown only if they have content in them. You can add such a field for your test case by clicking the large green (+) symbol at the right.
- If you wish to remove the preconditions, the description, or the expected end result from your test case, you can do this by clicking the delete link shown in red at the field’s title.
- Steps of execution can be edited, added, deleted, and re-ordered.
Please note that all the changes to the test cases are saved as you go. The change history is saved normally and the revisions for the test cases are created. The strategy for creating revisions has been changed and you can read more about it in the Improved strategy for creating test case revisions below.
UI improvement: New menu components
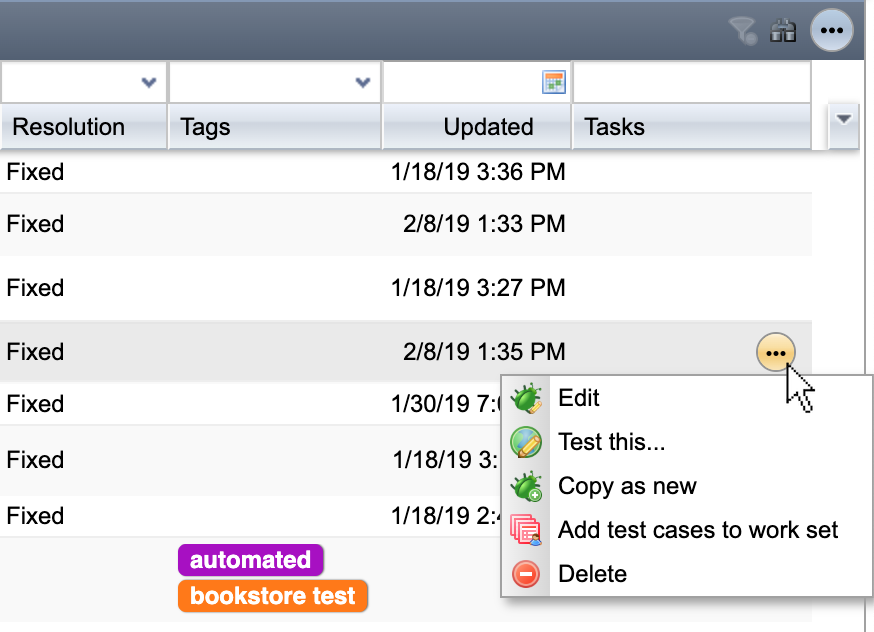 Many panels have common functions and the grids have functions tied to each row. For these controls, the UI has been made simpler by moving these controls to a new menu indicated by three dots in a circle (Please see the screenshot at the right).
In the earlier release, all these controls were presented as separate buttons side-by-side. Now, you can find these same controls in these menus.
Improved strategy for creating test case revisions
As your team edits the specification or test cases in your project, the assets are automatically created with revisions to help to track changes.
The logic on how the revisions for test cases in the test library are added has been simplified:
- A new revision for the test case – in the test library – is only created if the test case has already been given a test result in a test run.
Note that the logic for creating revisions for requirements stays the same. The revisions for the requirements in the specification are still created according to the workflow of your requirements honoring the “ready” flag.
Other changes
In addition to the above:
- In the Reports view, administrators may now show all project reports or hide the reports by the reports’ audience settings (the default). To do this choose “Hide reports by audience” or “Show all reports” from the menu at the top of the Reports pane.
- In the execution planning and Manual testing view, the left-hand-side components to pick the testable assets are now always presented one at a time.
Thank you for all your feedback,
Meliora team

As many of us are experiencing the effects of changes in the energy market today, wouldn’t it be nice to have things running on electricity raining from the sky? On the night of 2 September 1859, telegraph operators in the US were experiencing electric shocks and sparks from their equipment. This was the night of the so-called Carrington Event, an intense geomagnetic storm caused by a massive coronal ejection from the sun.
The telegraph operators actually disconnected the power sources of their equipment just to find out that – with the current provided by the storm – their equipment worked better than ever.
(Source: Wikipedia, Picture by NASA, public domain)